
 review")
Noctua NH-D9L, Premium CPU Cooler Fan (Brown) review
Noctua NH-D9L, Premium CPU Cooler Fan (Brown) review
NH d9l not the cooler attached to the test bench this one here here's a better shot of it because frankly the clutter in the view is actually really hard to distinguish which is which so the nhd Niles what we're testing today this is part of a quite an extensive amount of cooler testing we're doing to find the best coolers at certain sizes we've got two for the 110 to 120 millimeter category we've got a four for the 130 to 140 millimeter category and we have another depending on accessibility another three to four for the 150 to 160 millimeter category so up today for the 110 220 millimeter category is an octet d9l NHD arnelle to be more specific so
what we're gonna be doing through this review is going over the unboxing everything you find in the Box are going through the mounting solution for the LGA 1151 socket and then going through the testing and we'll do a little bit of noise testing as well so thermal noise testing generally thermal testing more scientific than the other noise the noise testing we're just going to be going over a range of speeds and you know hearing what it sounds like in comparison to say a click of a mouse or my voice as I talk on that sort of stuff so first thing we're gonna go
through is the unboxing if you want to skip to any particular part of the review go to the review description there are timestamps if you're on the PC in the review description the timestamps will work but if you're using a mobile go to the first pinned comment in the comments section that'll be my comment which has all the timestamps down there click on any particular part you want to skip to if it's thermal testing off its mounting or anything like that and if you're sort of bored halfway through a certain point you can skip selling the Moyne that's more
interesting to you now bear in mind I do like this product overall I'll be going over my full amount of pros cons miss opportunities comment at the end of the review in the conclusion segment after some b-roll and the thermal testing but I am heavily critical of this product as I am with every product this doesn't mean that I don't like it it doesn't mean that it's a bad product it means that there are things that can be improved pretty much every product I've used every case I've worked with has all had their separate issues and they all need to be addressed individually so that everybody that's looking to get this knows what they're up
against and knows you know all the boundaries that they have to perhaps work around so yes I am very hypocritical especially towards a certain ranting segment in the middle so feel free to skip that if you don't listen to that but yeah I'm trying to be as absolutely honest as I possibly can so everyone gets the best information they possibly can and I'll probably get some sort of hate comments in the review description for that but everyone does you know because some people you can't please so anyway thanks for checking this one out let's go straight to the
unboxing and I will catch you towards the towards the end for the thermal testing that sort of stuff if you want to know specific things about things coming up on the channel then wait to the very end and I will talk about that then so thanks for checking us out and I'll catch you in a second the Noctua NHD 9 l is a 110 millimeter tall cooler with 100% brown compatibility and a 6 year warranty we could go over the Box continuously but frankly I'd rather have the product speak for itself in the main box there are two separate packages one is of the accessories box
and the other is protective packaging for the cooler itself quickly going over the accessories box this is everything you can expect to find from right to left we have the instruction manuals mounting bracket sets for AMD and Intel sockets a common part set the secure secure firms secure firm 2 mounting bracket which is just a back plate with some threaded bolts and a long screwdriver the d9l can be fitted to all Intel LGA 1150 series sockets the LGA 2011 socket and AMD's am 4 sockets and just a quick look at the contents of the packets the common parts
packet includes a knot to a badge some rubber pads for additional fans a trickle of thermal paste in comparison to the size of the tube a low-noise adapter which is effectively a voltage limiter this can all be done in the BIOS in our case and a couple of extra fan mounting clips for an additional fan and the AMD pack includes the mounting arms of spacers and bolts for the a m4 socket so with all that out of the way let's get on to the cooler but before we do that first we need to deal with a cardboard shell something I quite appreciate is the inclusion of cardboard
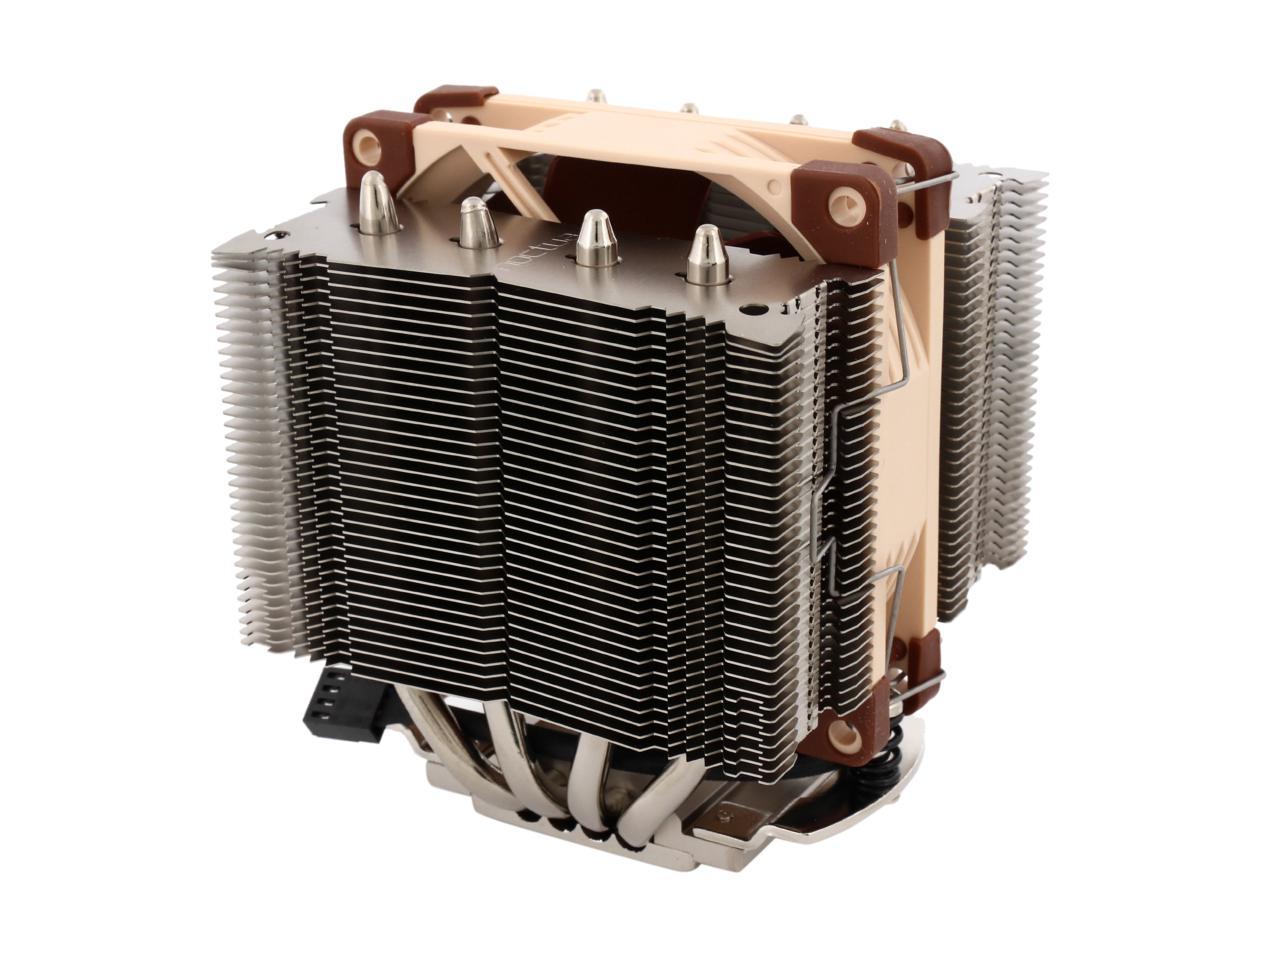
over polystyrene or closed cell foam it can be recycled after it's used and when design like this is a very effective protection technique so here we have it the nhd 9l let's take a quick tour see what we've got here traditional to the knock of a naming scheme the N stands for knock to earth the H stands for heat sink the D stands for dual tower the nine stands for the 92 millimeter fan and the L stands for their low-profile cooler series something that it's not really worth mentioning that I'll mention it anyway is the protective cardboard sheet between the fan and the opposing fins of the heatsink it's a bit of a pain to remove but I prefer to be there than
not so overall it's a good thing at the top we can see the layouts of the heat pipes knocked who have opted to position them in rows perpendicular to the airflow created by the fan this makes sense from a theoretical point of view as a heat being spread through the fins it spread more evenly in the path of the airflow as opposed to many other style coolers where the heat pipes stand in clusters to the edges of the fins speaking of the edges of the fins these are folded over to create a link between the fins for rigidity and help to keep air flow directed towards the center
of the heat sink we can also track the heat pipes or through the fins of the stacks down to the base which run through and are clamped into a base plate folder between the heat pipes is the fans wire which of course leads to a four pin connector for PWM operation but the rubberized sleeve over the wires is just inferior to the average fabric sleeve in my opinion due to its inability to bend without creating kinks and tends to attract dust and fine hair the base plate itself is made of copper for its well-known high conductivity but it's nickel-plated to give a shiny appearance you see here the top of the base plate however is noticeably made from
aluminium which is appropriate since it reduces cost and the reduced thermal conductivity encourages heat into the heat pipes and away from the base plate into the fins which is of course the target of the heat sink the last thing we need to cover before the installation is the fan which actually does need removing before installation so we are getting there once the clips have been removed getting the fan out is a bit of a squeeze the fan itself can spin up to 2,000 rpm which is a fair pace but if you want to reduce that you can use the low noise adapter which
will Hardware limit it to fifteen hundred and fifty rpm or you could just use the BIOS and have that extra 450 rpm as a last stand to prevent thermal throttling now knock door don't mention that the lower limit of the fan can be reduced using the low noise adapter and this is likely true due to the lowest limit that can spin before stalling which is controlled by the fan itself one last thing it's worth taking a quick look at the baseplate before we get into the installation especially at the sprung screws notice that when we replace a fan to keep the fans
frame within the height of the heat pipes the fan li's to sit on the bracket and between the screws also notice that the screws aren't exactly vertical when the fans are in this position this may come in useful later anyway let's get on to the installation here's the extent of the parts we're using for the LGA 1150 series installation first up is the six a key firm secure firm to backplate with pre-installed threaded bolts background to the front the spaces can be added and then the bracket arms can be slotted on top and secured into position with the included
thumb screws note that you can rotate these arms around to mount the cooler in ninety degree incremental orientations with the mounting bracket in place it's time for some thermal paste to keep the testing as consistent as possible in order to maintain fair test principles I'm using Arctic mx2 for all cooler and case tests I don't know about you but I'm more interested in how the design of these coolers perform not the differences in the included thermal pastes as for the amount of thermal paste being used I generally put quite a lot on as you can never really tell how any given mounting mechanism and baseplate will function and any excess thermal paste
will get squeezed out of the size providing that the mounting pressure is sufficient which should be the case for all CPU coolers so up next is to install the heatsink without the fan it goes without saying but it's a good idea to tighten all the screws evenly to ensure thermal paste is spread out evenly and not squeezed to one side then the fan can be installed and fixed in place with the included wire clips but this is where things go a little pear-shaped after attempting for about three minutes to slot the fan flush against the base of the cooler as it was in the package I found there was some sort of resistance you can see here that it only slots in place on one side
and the other side is left proud of the flush position which means the frame of the fan pokes out over the top of the tips of the heat pipes what's happening is that when one side is slotted into position the opposing side is clashing with the bulky screw heads of the bracket beneath this creates a teeter-totter situation where neither side can occupy the correct position at the same time it's not even a case of the tolerance is being so precise that you need to evenly slide both sides in at the same time if we go back to how it was when the bracket wasn't installed against the motherboard you can see that for some reason the screws not strictly screws are being
encouraged to angle outward slightly which is going against the position they're supposed to hold when fixed to the bracket so what's causing the problem well it turns out that the clash is between the web of the fans frame and the screws these are two solid members that cannot maneuver around each other without clashing and going through the manual it shows exactly as I've been trying to install the cooler the final installation picture shows the screw head should be in line with the rubber node of the corner pad and completely vertical as far as we can tell I had to use a macro lens flipped around to get the saw shot here it's quite small picture so after
trying to loosen one of the screws to allow the web's of the fans frame to slide into position I was then unable to fully tighten both screws adequately to ensure an even installation atop the CPU coming up now is a lovely rant about the situation that is sure to ruffle a few feathers feel free to skip it if you strive for a life of peace but keep in mind that based on the experience I'm having with this product so far is what I'm about to say incorrect after all I did experience this it's this isn't fake you know this happened I'm not trying to spark controversy I'm not trying to shout hate this is just what happened it's raw it's for you it's to help the future but I'll just get
complaints anyway I shouldn't even bother but here we go okay if you want to skip past this section where I criticize the not aware and HD 9 now the mounting bracket in particular and to some extent Noctua themselves if you want to skip that entirely then please skip to this and to this timestamp here go to the review description hit the timestamp there if you're a PC user or if you mobile user go to the first comment which is pinned which will have a timestamp there you can click on and skip this rant situation please I urge you to do that if you really don't want to
go through this because frankly it'll make your life a little bit more peaceful and less stressful and Christ we could all do with a little less stress so the mounting bracket on this not to a d9l doesn't work as instructed now I say that with absolute confidence because I've been trying for the last 45 minutes to nearly an hour actually to install this with the fan in the correct position this looks like it's installed correctly like the fan is in the correct position yeah the fan is in the correct position but now the bracket doesn't install completely against the motherboard
because there's no way to get these tools in with the right angle to properly apply the torque pressure to screw the screws into the bracket there's no way of it working that way I thought I thought to myself am I going mental I thought right let's double-check this let's pop online and see what everyone else has put in fact let's first first have a little look at what Noctua and would have you believe the way it should be installed if you look at this image here you can see that - the bottom part of the mounting mechanism you can see the fan sits flush against the base and
is well past these screw heads from the bracket and if you look to the top you can see that the grommet these are brown grommets up here is actually half submerged past the top fin of the heatsink so that sounds that sounds ok to me and that's how it came out of the box and that's the intended installation situation now this is a reviewing a website called tweak town there is a an image of Google image from there from their review and you can see that the grommet is well above the top fin of the heatsink now I haven't read the review but I've looked at many
images on Google search please go and search yourself and they all show that that grommet is sitting nicely above the top fin of the heatsink which means the edge of the frame is above the tips of the heat pipes this becomes a problem when not to acclaim it to be a 110 millimeter cooler if this fan is in the correct position as they designate it it should be and it actually can't fit there because once you've installed the heatsink as per their instructions first without the frame without the fan and those two those two screws become rigid and solid in position and
they can't flex then you cannot get the web's of the fan which I showed you can't get them past those large heads off the screws because they're the web's are too big or the screws are too big and I would have a bet that the screws are too big and the webs are actually were perfectly sized now I showed you before that you have this teeter-totter situation where one web is slot 2 sort of in but the other one is sitting on top of a screw and then the other web is slotted in and then then the top web is sitting on top of the screw but you can't get them both to slide by
because there is genuinely about a quarter to half a centimeter of of clash within that zone so it doesn't work quite like that quite like that I did try to uninstall one screw of the bracket which is not a good idea because you should be applying even mounting pressure and for all I know I've actually been zapped in on my CPU socket now from this uneven mounting pressure which has happened to me in the past and I've tried to install one of the screws and then slip the fan by so that the screw is slightly has a bit more tolerance to it slip the fan by clamp it into place
and then try my best to at an angle install these screws with this tool you can only get so far and it leaves you in a position where one of the screws it cannot actually meet the motherboard or the bracket correctly it's actually half a centimeter proud at the top and it's completely flush at the bottom and I cannot screw this any tighter the amount of pressure I have to apply with the screwdriver is not is not probably to knock doers sort of instruction or specification or probably to anybody's specification so say yes so this is an issue in particular because when I
hear reviewers say now enough designing a PC case and designing a a cooler is actually a very complicated process and it can take many years to get it correct to get it right now here's the problem when so many heat sinks in the past have managed to make successful mounting brackets and they work pretty flawlessly it's very difficult to imagine why not to work and do the same here and here's also a bit of perspective from my experience I've been through University I've got my degree and I've been working in an architectural practice for over two
years now which is not a very long time but it's long enough to go through the majority of the process of designing a building now I work on buildings with project values in the range of 5 - if we're talking that total project value from 5 million to in excess of 300 million pounds now the moment I'm working on a couple of buildings within the range of 20 to 40 million pounds and if myself to other people within my practice - structural engineers and - mechanical engineers Macallan electrical engineers can completely design a twenty to forty million pound building complete designed and constructed within a three-year period then why the hell can't a
heatsink be designed correctly and the instructions explicitly tell you how to install it correctly within a two year period now I hope the doctor didn't spend two years on this because if they did they need to they used to hire some different people they need to hire some different help they certainly need to look into getting a testing team that actually for one of a better word can properly test these and they're mounting mechanisms without looking at the schematic of how to install it correctly with every single nook and cranny perhaps they need to beta-test some of these situations send them out to reviewers and have them and to try and install them
themselves if you can't install one of these coolers within five minutes then you've incorrectly designed the mounting bracket of the cooler in my opinion they're not very big they're not very complicated and it shouldn't take you three calls an hour to still struggle to install them so there we go that's my piece yeah I'm a pot apologies for this that I really don't like ranting too much but I think it's really important that when something like this comes up I flag it up and put my all into explaining why it's so faulty why it's so badly designed why it should be redesigned and particular reasons why you potentially shouldn't buy it this is no longer 110 millimeter cooler
it's actually as far as I'm concerned up to a 120 millimeter cooler so there's 10 millimeters added because they didn't design the screws correctly on here or they didn't design the fans frame correctly as a final note if this dinah tron k17 is within I'm gonna say 5 degrees Celsius the difference in temperature delta T from this CPU cooler the d9l on proneness 5 after the 10 minute test then I will be extremely tempted to go with the with the K 17 over the d9l and I will I as far as I'm concerned if you don't like hassle when mounting your system and you want this to look good and have it flush rather than sticking out and looking awful because frankly I do
not think that this is appropriate that kind of design outcome is appropriate for installation outcome is appropriate when it's supposed to be a little bit more flush and a little bit better looking so I'm gonna continue with a review I'm gonna do my best to install it in a way that actually looks similar the picture that not to provide clearly the instructions do not work they're garbage as well and we'll have to go about this a different way if I find a better way I will let you know right after this and all the best with your installation and I hope this is a very isolated incident its incident in my case but I don't see any defects with the project or the
product in particular so so I don't think that it's a manufacturing issue I think it's a design issue so on with the review so as a last-ditch attempt at making this work I didn't get anywhere so while I was at this stage I decided to remove the heat sink entirely to reapply some thermal paste to ensure we're giving the d9l a regular and fair chance it also gave me a chance to deconstruct the bracket and inspect the CPU sockets to ensure there's no issue with the pins there have been issues we're mounting bracket problems resulted in bent pins I can't directly mark the bending of the pins to the mounting of the cooler but it's been a common occurrence
at the same time so after all of this I decided to just mount the fan sitting on the screw heads and just deal with the cooler being taller then I hope it actually should be now I'm not sure how CPU cooler manufacturers measure the height of the CPU cooler but it appears that from the motherboard PCB the fins of the cooler are around the 110 millimeter level but the heat pipes are more around the 115 millimeter level and the fan is around the 120 millimeter level as installed I can see that if you measure the height from the CPU heat spreader level then the
heat pipes could be at the 110 millimeter level so that's no problem but I can't confidently prove that the fan will fit in the 110 millimeter specification so if you're strongly considering this cooler make sure that you have 120 millimetres or at a push 115 millimeters of CPU cooler clearance in the case that you're looking at if others can prove otherwise then follow their guidance but I can't prove otherwise so we're gonna do a quick noise test before we get into doing thermal testing so right now we're at its bottom level which is about 400 rpm that's about 20% on the PWM fan curves although it's not a curve I'll just strain the algae's of a manual
control so this is 400 rpm so I don't think I can hear the fan over the noise of the hard disk drive running so that's a good sign so we're gonna throw it up to 60% so that should be well halfway between the 20 and 100% so we'll throw 260 now so there's 60% now I've set it about 60 centimetres away from the tip of the microphone so you should be able to get a good idea when I test the other one afterwards I don't think I'll do a comparative noise test between the two because I don't know that might be a bit of a fuss man I may be wrong but anyway so this
is at a thousand three hundred rpm 60% on the PWM fan curve now I can definitely hear that over the sound of the hard disk drive and the power supply unit although that is barely audible so it's noticeable but not too bad now we're going to throw it up to the full 100% which should be about 2000 rpm so fast as I've seen is a thousand nine hundred and eighty which is pretty much thereabouts 2000 rpm it's plus or minus 10 percent anyway so if you get oneness of 1900 rpm or I suppose actually 1800 rpm then technically that is still within the bounds but we're
hitting basically 2000 rpm so this is what that sounds like and this is a range of sixty degrees 60 degrees 60 centimetres from the microphone so that should give you a decent idea of what it'll sound like and I'm doing my total general talking voice so you know nothing too bad I guess I did do before a mouse clicking thing you can hear the mouse clicking over that then that's not too bad it's actually quite quite mouse as well so yeah so it's pretty good to me but anyway so let's get onto some thermal testing we've got prime95 we've got GTA we've got fire strike you've got all sorts going on and we'll run through those we've got some new grass set up for those so
there should be a huge smorgasbord of information coming your way in terms of thermals , so just before we get into the thermal results I'm going to show you the thermal paste spread so we all know how the cooler dealt with the amount of thermal paste added I'll be doing this for all future cool reviews as it gives us peace of mind that there was enough of and a good thermal paste application on the cooler itself there's a little access to the edges of the thermal paste application on the base plate and looking up to the CPU heat spreader there's a line of access at the top but overall it's not a bad application with a full coverage now something I need to point out for full disclosure is that I needed to rerun the test for the hyper 212 Evo
I've had a couple of 125 millimeter coolers outperform the hyper 212 Evo in the past and I thought it was just the case of some well-designed coolers but the diene IL joined the ranks at outperforming the hyper 212 evo by certain margin and we'll show that in a second so out of curiosity I decided to rerun the hyper 212 Evo tests and they saw improvements from the original score of about 4 degrees on average in all tests which made a little more sense than the original school I rewound the test to double-check the scores again to make sure they were solid and this is why I'm now recording the D mounting so we can double check I didn't screw up
here now frankly the thermal paste application didn't turn out perfectly but not too badly this is very likely down to mounting the cooler to a vertical motherboard but a great mounting solution should be able to compensate for this this is what likely caused the issue previously but the cooler has had two attempts now which is more than most so let's move on to the thermal testing results just before we move on though I want to know from you guys should I remove my review of the hyper 212 Evo based on the test results not being solid there was a lot of useful information in that video but the test results which is potentially most important part wasn't
solid so in your opinion should I remove it let me know in the comments and if there are enough there that I feel that yes the useful information doesn't outweigh the faulty testing then I will certainly remove it and I'm more than happy to do so just let me know guys so first step is the prime 95 small FFTs 10 minute torture test to squeeze the highest performance out of the coolers what you can see here is the CPU temps in blue the CPU cooler height in purple and in the background a recording of the test not the exact run of this test this is just footage from a
recording of the test separate to the tests on these coolers the graphs are ordered by sized smallest at the top and tallest at the bottom and you may be able to spot a blue dotted line which represents the CPU temps trend line you can use the trend line to spot if a particular CPU cooler is doing well for its size all the tests are performed at maximum fan speed to avoid any fan curve weirdness I don't think either of us want to try and work out the exponential performance improvements or losses caused by a steadily increasing fan curve and finally the temperatures are presented in a delta T format which basically means the ambient temperature
of the testing room has been subtracted from the raw temperature of the components or at least the center of the component this allows us to make a more direct comparison between the coolers test results to a certain degree so with the formalities out of the way the nhd 9l seems to be nicely on top of the competition even beating the hyper 212 Evo standing at 159 millimeters tall even after his retest I've got a few theories about that but we'll get through the rest of the test results first going through the fire strike benchmark a third and final gray bar is now visible which represents frames per second it's great because it doesn't really hold much
interesting information and is probably best being ignored until some sort of edge case appears in the future the Dene are now performed suspiciously well here as usual I perform the test twice as standard and a third time if necessary to see if any anomalies crop up but no this was a result for graphics test one and to be fair graphics test 2 shows a similar result so this clearly shows us the d9l is the most capable of the coolers available here at the low CPU load end the physics test also yields some great results from the d9l and is performing exceptionally well for a cooler of its size and lastly from fire strike the combined test shows a comparative
performance improvement from the m9 I perhaps the extra load allows the design of the m9i to work more effectively and within the margin of Tolerance the d9l is leading the pack again Unigine heavy reveals some similar results to the initial fire strike tests and the d9l is just in the lead by just over 1 degree centigrade cooler than the hyper 212 Evo keeping in mind the large disparity between the cooler sizes also notice that the pre rock slim doesn't seem to be too competitive with the slightly higher temper ujin's superposition presents a win for the hyper
212 Evo at last but the nhd 9al is up for second place it's also worth noting that the NHL 9i at the top of the page is performing well at this test and other similar low CPU intensive benchmarks this is most likely down to the tiny proximity of the heatsink fins to the CPU which makes more efficient use of the fins over the base plates cooling capability running through dirt 3 and dirt showdown presents two pretty similar results of the d9l excelling in both and the last few benchmarks continue the story the d9l is several degrees cooler in rise of the Tomb Raider hitman and GTA 5 so the question is considering the knock to where NHD 9 L is so much
smaller than the cooler master hyper 212 Evo how is it performing equal to or even better in most applications regardless of cpu load before we can answer that we need to look into these two coolers and understand the differences in the characteristics so checking out the two coolers here there are about four different characteristics that are mainly worth looking at so first things first thing is the heat pipe layout second is Finn's amount size off third thing is fans and the fourth thing is the base plate and the differences between their so we'll start off with the sort of simple ones which I feel potentially aren't as as important we'll work our way up to
relatively the most important one oh of course the size of the box is extremely important characteristics there you can see that clearly the larger box is the best performer therefore we should base all of our things on bigger is better obviously not so first things first base plate we have a sort of clamp style base plate here which sort of you know has two materials that clamp the heat pipes into position and then you means you have to have heat transfer through the base plate into the heat pipe so that's you know two levels of getting the heat through to the heat pipes and on hyper 212 Evo we have direct fin contact which should in theory be a better
solution and I'm pretty sure that is proven somewhere I haven't seen any sort of channel prove that because I suppose you'd have to mod the base plate of two hyper 212 Evo to do such a thing then you need some mod the mounting mechanism then it gets messy so I haven't seen myself but I'm pretty sure it's true it makes sense theoretically instead of having more material in the way of them so second thing is the fan now the differences in fans so the hyper 212 Evo has a 1600 rpm fan or up to 1600 rpm fan which provides a hundred and twelve meters cube per hour of air flow roughly that 112 meters Cooper out the d9l has a 92 millimeter fan so quite
a bit smaller than 120 millimeter fan and goes up to 2,000 rpm providing an airflow of around 79 meters cubed per hour so that's 30 meters cube or just over 30 meters cube per hour slower or less sorry less airflow being provided by the d9l standpipe 212 evo so you would have thought by those two first metrics face plate high pursuit overview has got a better base plate and fan hyper 212 Evo has got a fan that provides more airflow so those two metrics are there that seems to be the most sensible way okay next metric is fins so fins it turns out that the d9l I mean if you looked at these and went you know which one has more you might think well
happy to do Evo is clearly at all a fan that's all the units and it's click on more the D il has two stacks it maybe that has more okay it turns out that the d9l has 2/3 of the fin surface area than the hype 212 evo does so by those three characteristics you'd have thought that the hyper 212 Evo would be the better cooler turns out not so what's the only other major difference between the two well it turns out well obviously it's the fin or the fin the heat pipe layout so on the hyper 212 evo and like many other tower coolers there are two stacks of the site so that means that the center portion is really relying on source secondhand 36 second I'm smoking it's like
secondhand thermal transfer so you've got the transfer them from the heat pipe to the aluminium fin and then you're relying on the center or the edge of the aluminium fin to transfer the heat across to the center of the fin to utilize the central the central portion of all of these fins so that's you know that's sort of you're relying on you're relying on more more transfer across across material to utilize the surface area which is ever a good thing whereas the d9l actually directly delivers or more directly delivers the heat to the fins in sort in zones so you don't have overlapping zones of thermal transfer from the from the heat pipe to the fin instead
you have an even spread across the fin so you're not relying on say a cluster of like the hyper 212 Evo is a cluster of heat pipes here to transfer the heat across via the fin you're actually relying more more so on the heat pipe itself to transfer it to localized zones evenly across the fin all the way down the stack so all across here you're utilizing the fans air flow that's producing the central area not so much but the areas around the edge where the fan is traveling all the fan blade is traveling in pushing air out faster you will be utilizing so you can see that the fan zone here and here where the fan is spinning fastest top and bottom is not being utilized but the size
it is so it would it would appear that if you were to perhaps look and we will be testing this on many coolers to come at but stars of coolers that have heat pipes laid out like this and heat pipes laid out like this and we'll see which ones have better performance characteristics now there could be other factors involved and most likely there are the heat pipes being used the size of them the material the diameter of the internal part the heat pipe to the outs an external part of the heat pipe the thickness of the wall all these sorts of things can be factors to consider but
the ones that we can look at and see and speculate on those are the main ones and those of what is what I would say would be the main factors or at least the heat pipe layout is in my opinion is the main factors to the performance and gains of the d9l now moving on to the pros and cons so pros of the d9l acoustics spot-on great fan of great fan Choice and thermals spot-on great thermals we've already discussed those things and they're pretty obvious now coms clearly i've discussed at length the bracket that's a con it's a negative not not a con I mean it's a a negative
in my opinion I think if it's that difficult okay let's say let's say there anything you design you should try and design to be foolproof so a fool like me or anyone else can come along and and use it and you know use it intuitively you know without it being too difficult the difficulty is is that this was very difficult for me or in fact impossible technically for me to to set up the way that Noctor would want it and have this fan below the tips of the he pipes or in line with the tips and heat pipes so by that standard surely there would be that there should be a better design developed to make this more foolproof so I think I've gone over it and to AB nauseam at this
point I think that's a word but anyway I've gone over it a lot of this rate but I won't go over it for too much longer I believe there is a better design for this and there is something that doesn't have such tight tolerances between the components that are given and something that will be easier to use all round those screw heads or inverted screw heads essentially it's inverted screws the heads of those screws are just too tight to the web's I'm sure that there are people that can mount this correctly I'm sure it's probably just myself but if it's so difficult for a fool like me to do then it should be improved and by changing it to make it easier to do for the fool for a fool
such as myself or a layman then that is not a negative that's not a bad thing that's actually a more inclusive design let's say that let's say that there's somebody who perhaps has issues with you know has practical issues who actually finds it difficult to construct these things just arms or practical merits they might find this extremely irritating to work with and I might make them angry and you know that's that's not fair there are so many cool like cooler mounting techniques I mean the hyper 212 Evo isn't exactly a gem in this regard but at least it's slightly
more accessible doesn't look quite as good perhaps but it is more accessible and there are much better examples of coolers and they're mounting techniques so so just because I feel this should be improved doesn't mean that that's a negative overall it just isn't as good as it could be so I mean I suppose it is but anyway so perhaps another potential negative in terms of aesthetics of course this is very subjective I don't the fan looks a little odd just sticking at the top a bit in my opinion it just looks a little bit strange I think it should be flush with the fins or you should
maybe cap the top off and make it look a little bit more presentable it doesn't have to be over-the-top gamer ear a key or anything like that just something that is a clean finish to the top would be nice to see in fact you could even have a pop up and over the top you know just to cap it off nicely and that would be quite quite nice and I'd say a missed opportunity and I've said the same thing about cry rigs heat sinks CPU coolers is the thermal paste now I didn't test the thermal paste I'm sure it's got great contact ibbity or at least a higher than average conductivity because it's an octal product and I and I believe them to want to produce the best
product they possibly can the difficulty is is that the amount they give you for considering compared to the size of the tube is a bit of a joke now that sounds a little bit aggressive to start with and kind of it but I'm not asking for more thermal paste I'm asking for less plastic of the tube or less tube yeah I'm asking for a smaller tube and now I know that not do I want to have this you know a great user experience perhaps maybe for people who are practically sort of a challenge you find it you know it difficult to work with the small things small things in tight places and things like that that sounds bad but anyway I know that a larger tube would be
much better for them which is a good thing but the amount of plastic that is used to achieve that small amount of thermal paste set me know to get it to my door so I can actually use it is over the top now I know it goes against all of knock Dewar's sort of user experience or guidelines and all sort of stuff I presume they have guidelines for stuff but I prefer to see a small pouch which you cut the top off or rip and squeeze out now I know that's not an attractive way of using a product and I know it's not perhaps the nicest way and it's not as foolproof as having a large tube but it does reduce the plastic a huge amount and I think we all know a big issue with how much plastic we use and perhaps that will be a more
environmentally friendly way of producing your products now I believe not to err to be or to pursue an environmentally friendly product line I mean they use cardboard instead of using closed cell foam and things like that in their packaging which is fantastic and all I ask is to go a step further and fight perhaps find maybe even just use a smaller tube for your thermal paste applicator so yeah well eastward ones that come with your products like this and don't require so much thermal paste so that's pretty much it sorry for going on so much about that if you want to purchase these products then feel free to check out the Amazon affiliate links in the
video description those will be able to show you the price in your region I've got about eight or nine different regions covered so hopefully you find everyone there if it's a good price and you pick it up that will be giving the channel a small kickback and we will earn a small amount from that purchase between four and twelve percent I believe and that will go towards doing things like getting in more products being able to review more interesting products in more interesting ways perhaps but yeah that is not a direct that's not a sponsor from Amazon but it's just a small kickback from your purchase which can be used to do pretty cool things.
Noctua NH-D9L, Premium CPU Cooler Fan (Brown) review
this Noctua NH d9l heatsink onto my motherboard for demonstration purposes the motherboard is an asus z2 70g now to unbox this you just push on this and then open it up flip it upside down and that was easy now there's another part you have to unbox boy one thing about Noctua is that they have multiple pieces to unbox nah it's crazy I'm not stupid okay so right off the bat when you do unbox you get this very tiny heatsink and I will discuss why I'm doing this heatsink later now here is where all of the components are the brackets the the thermal pays and even the instructions here's the Intel bracket screws and a 90-degree Phillips head now before installing this got to take this little cardboard box out in between the heatsink
now there's only one of them which is good and now we have to take the bottom cover off first off on the motherboard we have to install this which if you look at the bottom right here it says engraved LGA 1150 X that means it works for 1155 1156 and 1151 and 1150 so one thing about Noctua is that they make heat sinks that are compatible with older sockets so that's really really nice so just carefully put that underneath there now for the LGA 1150 X you will want to open this bag and take the black parts out and install them first the black pieces are called spacers so you just put them in each corner just like that now after that we want to put in the brackets
which are these pieces now people usually tend to put it right here and orient the heatsink like this but it is strongly recommended to orient it like this right here so we're gonna do that like so just like that and now we want to put in these little guys right here these pieces are only if you have LGA 2011 so don't even worry about it so I'm just gonna loosely put them in first you now it is time to open this common parts bag so we can retrieve the thermal paste so here's the thermal paste now the the cap I had to unscrew so let me just carefully put in the thermal paste just like a grain of rice that size is perfect just like that now for the fun part time to install our
new NOC - what heatsink but in order to do that you have to open these brackets to get the fan out right there and the other one you'll notice that the fans are also attached to the screws that we need to put this in so just gently gently take it out so here it is I like to call this not to a signature bracket cuz apparently all their Noctua products are just like it apparently you have to be careful when screwing this in you wanna do small parts left and right rather than doing one part on one side cuz it'll just angle it and prevent the other screw from screwing in so note to self now you don't need to screw this in too tight or screw it in too much but you do want to screw it into whether heatsink will not move so that's pretty good don't worry about the
motherboards shaking it's just on the box now it's time to install the fan we want the fan blowing air out that way so I'm going to install out on this side and that the CPU cable will be hanging away from it so gently put it in just like so latch it on that side one thing I love about that NH d9l is that it does not conflict with Tom memory so if you want like a compact heatsink that does not conflict with memory this is your solution now another nice thing about it is I have an old 80 millimeter fan right here but if you put it on this side of course I'm not gonna install it but look at that perfect okay so let me put this back in my chassis and I will start up
the computer alright so this is what the finished product looks like it fits really really well in the Antec p50 I believe the maximum CPU height is about a hundred and thirty millimeters but this not to a heat sink I don't know what to say double thumbs up for them alright I've popped the chassis back open because I don't really know what's gonna happen so I will know what to do and besides first time installing heat sinks I feel like it's bad luck so it's time to fire up the machine alright that's a good sign now I want to go into the BIOS to see if we get good
temperatures so there's the post beep which is a good sign and look at that 33 Celsius that's actually pretty impressive one thing I should probably tell you is I switched to air cooling because liquid cooling in my opinion is not reliable and I know air cooling has or air cooling lasts butter so that about wraps it up on the NHD ninel installation if you want me to do benchmarks please leave a comment below give it a thumbs up thumbs down share with your friends and I will see you next time now while you are on your computer a lot of you tend to
have problems with it such as slow performance a lot of viruses anything like that before you take it to the repair shop or consider buying a new one come to my website .
Noctua NH-D9L, Premium CPU Cooler Fan (Brown) review


To find out more from Amazon link below


 review Noctua NH-D9L, Premium CPU Cooler Fan (Brown) review NH d9...)
Post a Comment