

Thermaltake Level 20 MT Motherboard Sync ARGB ATX Mid Tower Gaming Computer Case
Thermaltake Level 20 MT Motherboard Sync ARGB ATX Mid Tower Gaming Computer Case
DESIGN

Thermaltake Level 20 MT ARGB Mid Tower Chassis
Thermaltake Level 20 MT ARGB is the premium mid tower synchronized with motherboard in the level 20 family. Level 20 MT ARGB features enlarged side panel window, ATX motherboard support and a power cover.
The Level 20 MT ARGB comes preinstalled with three 120mm 5V ARGB LED front fans and one 120mm rear fan. The front fans are addressable to deliver 16.8 million-color RGB illumination and unparalleled ventilation. This model comes ready to sync with RGB capable motherboards from Asus, Gigabyte, MSI and AsRock.
The Level 20 MT ARGB takes our latest case innovations and wraps them in an ultra-modern style that’s utterly unique in the case market today. Stand out from the crowd with the Level 20
TT Premium
To continue achieving the corporate mission of delivering the perfect user experience, Thermaltake developed “TT Premium” with the essence of combining supreme quality products with a new logo design. TT Premium is far more than just a guarantee of quality. Behind the name, it represents the passion in DIY, Modding and Thermaltake’s desire to be the most innovative brand in the PC hardware market. To satisfy the demand of the high-end PC users, TT Premium follows its core values of Excellent Quality, Unique Design, Diverse Combinations and Boundless Creativity to provide a high performance PC product for every enthusiast.

Trio Built-in 120mm 5V ARGB LED Fans
Preinstalled with three 120mm 5V ARGB LED front fans featuring hydraulic bearing, 9 addressable LEDs and 16.8 million-color illumination to guarantee high airflow and custom system designs to show off your PC design skills.
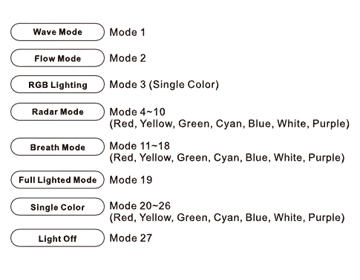
The 5V ARGB LED fans can be controlled using a simple interface built into the I/O panel that cycles through 7 different lighting modes and a range of different color options.
Long press on RGB button for 3 seconds , fans will blink twice which now are controlled by MB software, and vice versa.
Sync with Motherboard RGB Software
Designed to synchronize with ASUS Aura Sync, GIGABYTE RGB Fusion, MSI Mystic Light Sync and AsRock Polychrome. It supports motherboards that have a 5V addressable RGB header, allowing you to control the lights directly from the above-mentioned software without installing any extra lighting software or controllers. For more details, please visit ASUS, GIGABYTE, MSI and AsRock official websites.
Aura Addressable Header
Asus
Digital Pin Header
GIGABYTE
JRAINBOW Header
MSI
Addressable RGB LED Header
ASRock
Addressable RGB LED Header
BIOSTAR

Built-in 5V RGB Switch Board
Thanks to the built-in 5V RGB switch board, the Level 20 MT ARGB is able to deliver the addressable RGB lighting customization through the I/O port RGB button or the synchronization with ASUS Aura Sync, GIGABYTE RGB Fusion, MSI Mystic Light Sync and ASRock Polychrome motherboards.
Power Cover Design
The Level 20 MT ARGB is designed with a power cover, which can be used to organize unused cables to make for a tidy-looking system.
Dust Reduction
Fitted with a superb top filter, side filter and bottom PSU filter. Providing excellent protection and reduction against dirt and dust.

Top Filter

Bottom PSU Filter

Side Filter

Tempered Glass Window
The left side of the Level 20 MT ARGB features a full length 4mm thick tempered glass panel, which is more durable and less prone to scratches and dust than acrylic panels.

Superior Hardware
The Level 20 MT ARGB supports up to ATX motherboards, CPU coolers up to 170mm in height, VGA lengths up to 366mm without radiator on the right side and PSU sizes up to 170mm in length.

Excellent Cooling Capability
Preinstalled with three 120mm ARGB fans and one 120mm rear fan for optimal cooling performance, this case can house up to three 120mm front fans, one 140mm or two 120mm fans on the top and a radiator size up to 360mm. This allows the user at the same time to build a complete high-end system to suit their needs.
Radiator Supporting List
Radiator Compatibility List
|
|||||
120
mm |
240
mm |
360
mm |
140
mm |
280
mm |
|
Front
|
●
|
●
|
●
|
-
|
-
|
Top
|
-
|
-
|
-
|
-
|
-
|
Rear
|
●
|
-
|
-
|
-
|
-
|
Side
|
●
|
●
|
-
|
-
|
-
|
All-in-One Compatibility List
(Water 3.0 and Floe series) |
||||||
Performer
|
Pro
|
240
Series |
360
Series |
140 Series
|
280 Series
|
|
Front
|
●
|
●
|
●
|
●
|
-
|
-
|
Top
|
-
|
-
|
-
|
-
|
-
|
-
|
Rear
|
●
|
●
|
-
|
-
|
-
|
-
|
Side
|
●
|
●
|
●
|
-
|
-
|
-
|


Fan Supporting List
Fan Compatibility List
|
|||
120mm
|
140mm
|
200mm
|
|
Front
|
3
|
-
|
-
|
Top
|
2
|
1
|
-
|
Rear
|
1
|
-
|
-
|
Side
|
2
|
-
|
-
|
Bottom
|
2
|
-
|
-
|
Thermaltake Compatible Fan
|
|||
120mm
|
140mm
|
200mm
|
|
Pure Fan Series
|
●
|
●
|
-
|
Luna Fan Series
|
●
|
●
|
-
|
Riing Fan Series
|
●
|
●
|
-
|
More InformationP/N CA-1M7-00M1WN-00
SERIES Level 20
CASE TYPE Mid Tower
DIMENSION (H X W X D) 455 x 204 x 471mm
(17.9 x 8.0 x 18.54 inch)
NET WEIGHT 6.75 kg / 14.88 lb
SIDE PANEL 4mm Tempered Glass x 2 (Left & Front)
COLOR Exterior & Interior : Black
MATERIAL SPCC
COOLING SYSTEM Front (Intake):
120 x 120 x 25mm Addressable RGB fan
(1000rpm, 27.2 dBA) x 3
Rear (exhaust):
120 x 120 x 25 mm fan
(1000rpm, 26 dBA) x 1
DRIVE BAYS
-ACCESSIBLE
-HIDDEN
1 x 2.5’’(HDD Bracket); 2 x 2.5”
2 x 3.5’’ or 2.5”(HDD Cage); 1 x 2.5”(HDD Bracket)
EXPANSION SLOTS 7
MOTHERBOARDS 6.7” x 6.7” (Mini ITX), 9.6” x 9.6” (Micro ATX), 12” x 9.6” (ATX)
I/O PORT USB 3.0 x 2, HD Audio x 1, RGB Switch x 1
PSU Standard PS2 PSU (optional)
FAN SUPPORT Front:
3 x 120mm
Top:
2 x 120mm, 1 x 140mm
Rear:
1 x 120mm
Right Side(In front of M/B Tray):
2 x 120mm
Bottom(On the power cover):
2 x 120mm
RADIATOR SUPPORT Front:
1 x 360mm
Rear:
1 x 120mm
Right Side(In front of M/B Tray):
1 x 240mm
CLEARANCE CPU cooler height limitation:
170mm
PSD length limitation:
170mm
VGA length limitation:
260mm(With radiator on the right side)
366mm(Without radiator on the right side)

Thermaltake Level 20 MT Motherboard Sync ARGB ATX Mid Tower Gaming Computer Case
Thermaltake Level 20 MT ARGB Closer LookThe first evidence of this being at the more affordable end of the range is the weight of the unit… whilst its predecessors tip the scales around the 20kg mark, the MT ARGB comes in at a much more manageable 6.75kg. This makes unboxing and general handling of the chassis a much easier proposition.


At first glance, the MT ARGB shares many of its design cues from the other models in the Level 20 range. Tempered glass side panels adorn the front and left side, with the silver accented curved edges framing the front aspect of the case.
That’s pretty much where the outer design elements end though, with a fairly unremarkable top & rear panel giving us our first idea how Thermaltake have started to make this Level 20 variant much more affordable.

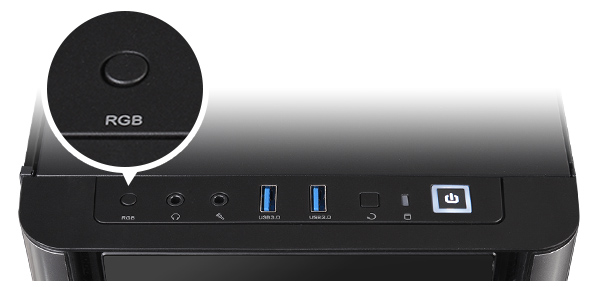
The front IO is reasonably well equipped, and simply laid out. The standard features are all here, including two USB 3.0 headers plus an RGB button to controller the built-in lighting features. Further back on the top of the chassis, we have a magnetic dust filter covering mounting points for two 120mm fans… and only fans! There is no clearance for a radiator up top, so only fans will fit.

Removing the front panel gives us a closer look at the MT ARGB’s biggest feature, namely three pre-installed addressable RGB fans. With the front consisting of mainly glass, these will be on full show when the build is finished. One strange “feature” I spotted immediately though, is that there is no dust filtration to the front of the chassis. There are what looks like strips of filter on the front panel, but these sit next to the fans, not in front of them!
The tempered glass side panel comes off in the more traditional way than most other glass panels. As the glass is framed on two sides in steel, thumbscrews are located at the back of the case, and the panel can then be removed.

The main chamber includes everything you would expect to find in a case at this price point. The PSU shroud is perforated to the top and has a cut-out for you to “show off” your PSU of choice. An SSD mount sits towards the front, next to a further cut-out, this time should you wish to mount a 360mm radiator up front. To the right of the motherboard mounts we have space for a 240mm radiator, which vents out of the rear panel.


Removing the rear panel, and we find that the 240mm radiator mount that we just mentioned, is somewhat blocked by the included controller. It’s easily removed, but it feels like its inclusion was an afterthought, as opposed to having been designed around it.
The controller is a bonus addition though and includes spare ports to add additional fans as well as connect it directly to your motherboard. The perforated rear panel has a magnetic dust filter to the interior, like the one situated on the roof of the case.
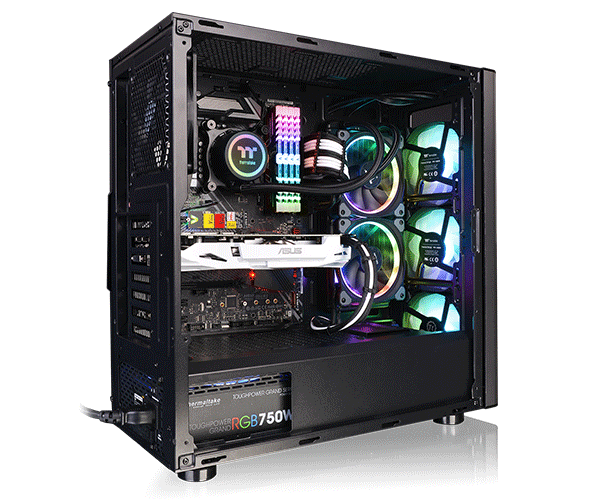
Thermaltake Level 20 MT ARGB Build
CPU – Intel Core i3-8350k
CPU Cooler – Thermaltake Floe Riing 240
Motherboard – Asus ROG Strix Z370-F Gaming
PSU – Thermaltake Toughpower Grand RGB 850W
GPU – GeForce GTX 1050 TI 4GT OC
Memory – Micron Ballistix Tactical Tracer RGB


The build for the most part went without a hitch, with the exception of decent cable management. Yes, during a test build I don’t take anywhere near as much time & effort to tidy up excess cables, but there is literally nowhere to stash cables easily. There is very little clearance between the motherboard tray and the side panel, and with the drive cages installed, space under PSU shroud doesn’t help much.
The end result does look good however, and when I forced on the rear panel, no one sees the cables anyway!

The Thermaltake Level 20 MT ARGB Review: The Verdict
The Thermaltake Level 20 MT ARGB is somewhat of a strange addition to the range. Whilst it brings a Level 20 looks to a more affordable price point, still isn’t budget by any means. For that price though, you get three addressable RGB fans included… something that was lacking from the higher priced premium cases. On the other hand, underneath the glitz is a pretty basic chassis, that lacks any kind of progressive features at all.
The MT ARGB isn’t a bad case, and when built it looks very nice. At the price point it has lots of competition, but if you are in the market for such a case, I wouldn’t rule it out.
What’s hot:
Three addressable RGB fans included
Controller allows you to sync up all your lighting
Has the looks of the Level 20 range
What’s not:
Underneath the glass, ARGB & design elements, it’s a fairly basic chassis
Front intake has no useful dust filtration
The front panel is restrictive, with tiny 1cm strips of mesh on either side of the glass section. Deceptively, these strips aren’t in the path of airflow and don’t act as filters. There isn’t any filtration at all in front of the fans, which instead pull air through the narrow gaps behind the edges of the front glass panel. There’s also a wider gap hidden at the bottom of the front panel, typical for cases with sealed designs like this.
The rest of the Level 20 MT seems to be an attempt to make-up for the closed-off front. There are cutouts big enough for two fans on the steel right-side panel of the case, so that extra intake fans or a radiator could be installed, as long as the graphics card isn’t too long. This intake is filtered, unlike the front. There are also fan mounts along the top of the PSU shroud, which is definitely a desirable feature and should allow for much better GPU air cooling. A bottom-to-top airflow pattern is additionally encouraged by a vent at the top of the case: however, since the bottom of the case is almost entirely sealed, any fans mounted here will have to pull air from the front panel.
There’s almost no room at all for cables. We’re used to removing unused hard drive bays as a matter of convenience, but in this case, it was a necessity. It’s hard to imagine where cables could possibly go with two hard drives installed under the shroud. There’s already very little clearance between the side panel and the chassis, and since part of the side of the case is taken up with the vents, there’s even less area available for them. This also makes it difficult to get the steel side panel in place, since it’s the old-fashioned kind with a steel lip at the front and tabs along the top and bottom that don’t want to slide in if the panel is even slightly bowed out.
The fan controller is the biggest sticking point with this case, for a couple of reasons. For one, it partially blocks the cable cutout that we would have otherwise used for the 24-pin power cable. That can be solved by unscrewing the controller and reinstalling it once the cable is through, but it’s frustrating to have it in the way at all. It also has the same weakness that Lian Li’s 550X controller did, in that it uses special 5-pin connectors for combined fan and RGB signals so that the fans can’t be plugged into standard headers. These connectors do cut down on cable clutter, but at a cost: unlike Lian Li’s controller, there’s no PWM cable, so there’s no way whatsoever to control the speed of the three front fans other than soldering together an adapter. There are cables for external RGB control, and some credit is due here--there are adapters for ASUS, MSI, and Gigabyte pinouts, so the ARGB aspect should work well. The rear exhaust fan is non-RGB and just uses a standard 3-pin plug, which means that it can’t be connected to the controller and set to the same speed as the other fans. Normally that would be a negative, but the other problems mentioned previously cancel it out.
The lack of fan speed control is a big oversight, especially for anyone hoping to install a radiator behind these fans, because the single locked RPM is low. A 360mm radiator can indeed be wrangled into place at the front of the case, as long as it can fit in the 13.2cm wide gap in the PSU shroud. It would also have to be installed tubes-up to fit, which we don’t recommend for long term use with a CLC.
Almost everything mentioned so far in this review is negative, so it’s worth taking a moment to clarify that we don’t hate this case. The look, the build quality, and the ease of installation are fine but unremarkable. It’s in an unfortunate position where the features of the case that stick out happen to be flaws.
Case Testing Methodology
GN Case Testing Bench (Sponsored by CableMod)
Component
|
Courtesy Of
|
|
Video Card
|
MSI GTX 1080 Gaming X (OC Mode)
|
MSI
|
CPU
|
Intel i7-6700K @ 4.4GHz
|
GamersNexus
|
CPU Cooler
|
MSI Core Frozr L
|
MSI
|
Motherboard
|
MSI Z170A Gaming M7
|
MSI
|
Memory
|
Corsair Vengeance LED 32GB 3200MHz
|
Corsair
|
SSD
|
Samsung
|
|
PSU
|
Corsair RM650x
|
Corsair
|
Cables
|
CableMod Pro Mesh Cables
|
CableMod
|
Case
|
This is what we're testing!
|
-
|
The video card is configured to run at 55% fan speed at all times.
Prior to load testing, we collect idle temperature results for ten minutes to determine the unloaded cooling performance of a case's fans and air channels. Thermal benchmarking is conducted for 1400 seconds (23 minutes), a period we've determined sufficient for achieving equilibrium. The over-time data is aggregated and will occasionally be compiled into charts, if interesting or relevant. The equilibrium performance is averaged to create the below charts.
Load testing is conducted using Prime95 LFFTs and Kombustor “FurMark” stress testing simultaneously. Testing is completely automated using in-house scripting, and executes with perfect accuracy on every run.
We recently validated our test methodology using a thermal chamber, finding our approach to be nearly perfectly accurate.
Thermals & Noise
We’ve made testing cases without their front panel part of the standard test suite now, so that we can have an understanding of how much they’re bottlenecking performance. Other than that, the only additional test we performed was to move the upper and lower intake fans over to the side intake vent. This actually caused some air to exit through the front panel, which doesn’t hurt performance but is a waste of air that should instead be flowing backwards through the case.
Realistically, the options for improving airflow are limited. It’s nice that Thermaltake has included so many fans, but it makes it less likely that customers will want to add additional ones, so we only used the stock fans for testing. We could emulate Lian Li’s O11 Dynamic by completely sealing the front panel and putting two fans on the side intake, but then we wouldn’t be showing any ARGB fans through the front panel, which is a major selling point of the case. Even moving two to the side intake and leaving one in the front is pushing the boundaries of what a user that cares about the appearance of their PC would do. We could leave the three LED intake fans in place to keep air from leaking out the front and install fans in the side intake, but at that point there would be six case fans running just to get an acceptable amount of air moving.
CPU Torture

Before looking at comparative data, we’ll look at just the Level 20 MT. CPU temperature in the torture test was 58 degrees Celsius over ambient for the stock configuration, but dropped significantly -- by about 11 degrees -- by removing the front panel. We’d like to see this closer to the 6-7-degree mark. It’s natural that a front panel will inhibit cooling, but there are reasonable levels of inhibition. Despite the air escaping from the front, moving the two fans to side intake lowered temperature by roughly 4 degrees, down to 54.1 degrees over ambient. Removing the front panel completely was a more significant improvement, down to 47 degrees. The side vent can be used to mitigate limitations of the front panel while still enabling that ARGB front look.

58 degrees over ambient is relatively warm for the CPU when compared to the rest of the cases on our chart, but it’s not yet in runaway thermal territory. It’s on the level of the Dark Base Pro 900 (version 1), similar to the stock Define C and Define S2, and a bit better than the Alpha 550 and In Win 303. Compared to a previous Thermaltake case, it does worse than the View 71. Regardless of whether or not the intake fans are blocked, the 120mm exhaust fan is decoupled from the fan controller and therefore capable of running at its full 1400RPM in the MT, which keeps temperatures from spiralling out of control.
GPU Torture

Moving on to GPU testing, we saw a stock GPU torture result of 59 degrees over ambient, seeing benefit from the side intake fans with a reduction to 56 degrees over ambient. As GPUs are heavily reliant upon their thermal performance, every few degrees puts us closer to higher clocks. Removing the front panel caused an even bigger drop in temperature on the GPU than it did on the CPU, down to 46.5 degrees over ambient. In the stock configuration, it seems likely that the intake fans are biased slightly towards the GPU since the largest available inlet for air is at the bottom of the front panel, but the rear exhaust fan primarily benefits the CPU. Any benefit to the GPU is by way of removing radiative heat off the backplate.

Here’s the comparative chart. GPU temperatures aren’t the hottest we’ve ever recorded, but they are nearly the warmest among the sampling of cases on our chart. The Bitfenix Enso and Walmart cases chart higher, for what that’s worth, but 59 degrees is about as hot as our GPU can get before throttling to keep itself cool. Nearby contenders would include the Lian Li O11 Air, which functionally requires removal of the dust filter to actually allow airflow. Another nearby item is the In Win 805 Infinity, one of the worst-performing cases on our charts as it has literally 0 front airflow. This isn’t great positioning for the MT. Going to side intake reduces thermals to a point of competing with the Define R6 and original H500P. Not great.
3DMark

3DMark raised temperatures slightly higher than torture testing did. It equals the Bitfenix Enso in this test, which is an unpleasant place to be. The perforations in the top of the PSU shroud might help a little to alleviate thermal concentration, but our PSU shroud was crammed full of cables and a hard drive cage that blocked air coming from the lowest intake fan.
Blender

Blender CPU rendering ran with an average CPU temperature of 38.7C dT. Without the additional stress of the torture workload and with relatively little heat being generated by the GPU, this CPU temperature fits comfortably into the middle of the chart between the NZXT H500 and Silverstone KL07.

GPU rendering averaged 29.9C GPU dT, also a better temperature relative to other stock cases than was indicated by the torture test. The stock configuration isn’t so bad for lighter workloads, where the trickle of air is still sufficient to drive heat out of the case.
Noise

39.4dBA isn’t excessively loud, but it is when you keep in mind that every other stock case test is performed with the fans running at full speed. There’s only one speed that the three intake fans can run at, and that speed isn’t ideal for either noise or airflow.
Conclusion
is a sensible price for a case with three ARGB fans and two glass panels assuming basic design tenets are followed. Thermaltake isn’t trying to rip anyone off, but the case is let down by the design of the front panel. If there were a larger air gap and a filter over the fans, it would be fine, and if the fans could be controlled at all or even if some 5-to-3-pin adapters were included, it would be fine. Neither of those are things that Thermaltake cheaped out on, they’re just facets of the design where form took priority over function, despite possibilities existing for both simultaneously. It’s becoming popular to have LED fans behind a tempered glass panel in the front of cases, but if the fans can’t pull air then they’re only there for decoration, and there are cheaper ways to put LEDs in a front panel.
The case is overall disappointing at its price-point.
Conclusion:
This case is beautiful. There is no other word for it. It's not just looks, though. Some case makers make a dead sexy case and forget the fundamentals like cable management, air flow, room to build, dust covers, etc. Thermaltake have thought of everything! There was only one point they really let me down on. That was the rainbow colours on the audio connection. In their defence though, they are not the only ones doing it. I say it every time I see it. People that splash out on a nice case want it to look nice inside and out and those little wires take away from it.
Stand out point: This was easy for me. The ARGB button. For those who still do not have a motherboard that supports ARGB, they can have their bling too.
Pros:
Cable management
Air flow
Power supply shrowd
Three ARGB pre-installed fans
Dust covers
ARGB switch on the panel for those without a motherboard that supports ARGB
Easy to build with
Tempered glass side
Vented motherboard side
The case looks great
Nice packaging
Great value for money
Cons:
exposed rainbow wires on the audio connection
They got a .Platinum Award for this product

Main Features:
Preinstalled with three 120mm 5V ARGB LED front fans featuring hydraulic bearing, 9 addressable LEDs and 16.8 million-colour illumination to guarantee high airflow and custom system designs to show off your PC design skills.
The 5V ARGB LED fans can be controlled using a simple interface built into the I/O panel that cycles through 7 different lighting modes and a range of different color options.
Packaging and Unboxing
The Thermaltake Level 20 MT ARGB is shipped inside a cardboard box finished in the black color theme. This goes to show their TT premium branding and packaging.
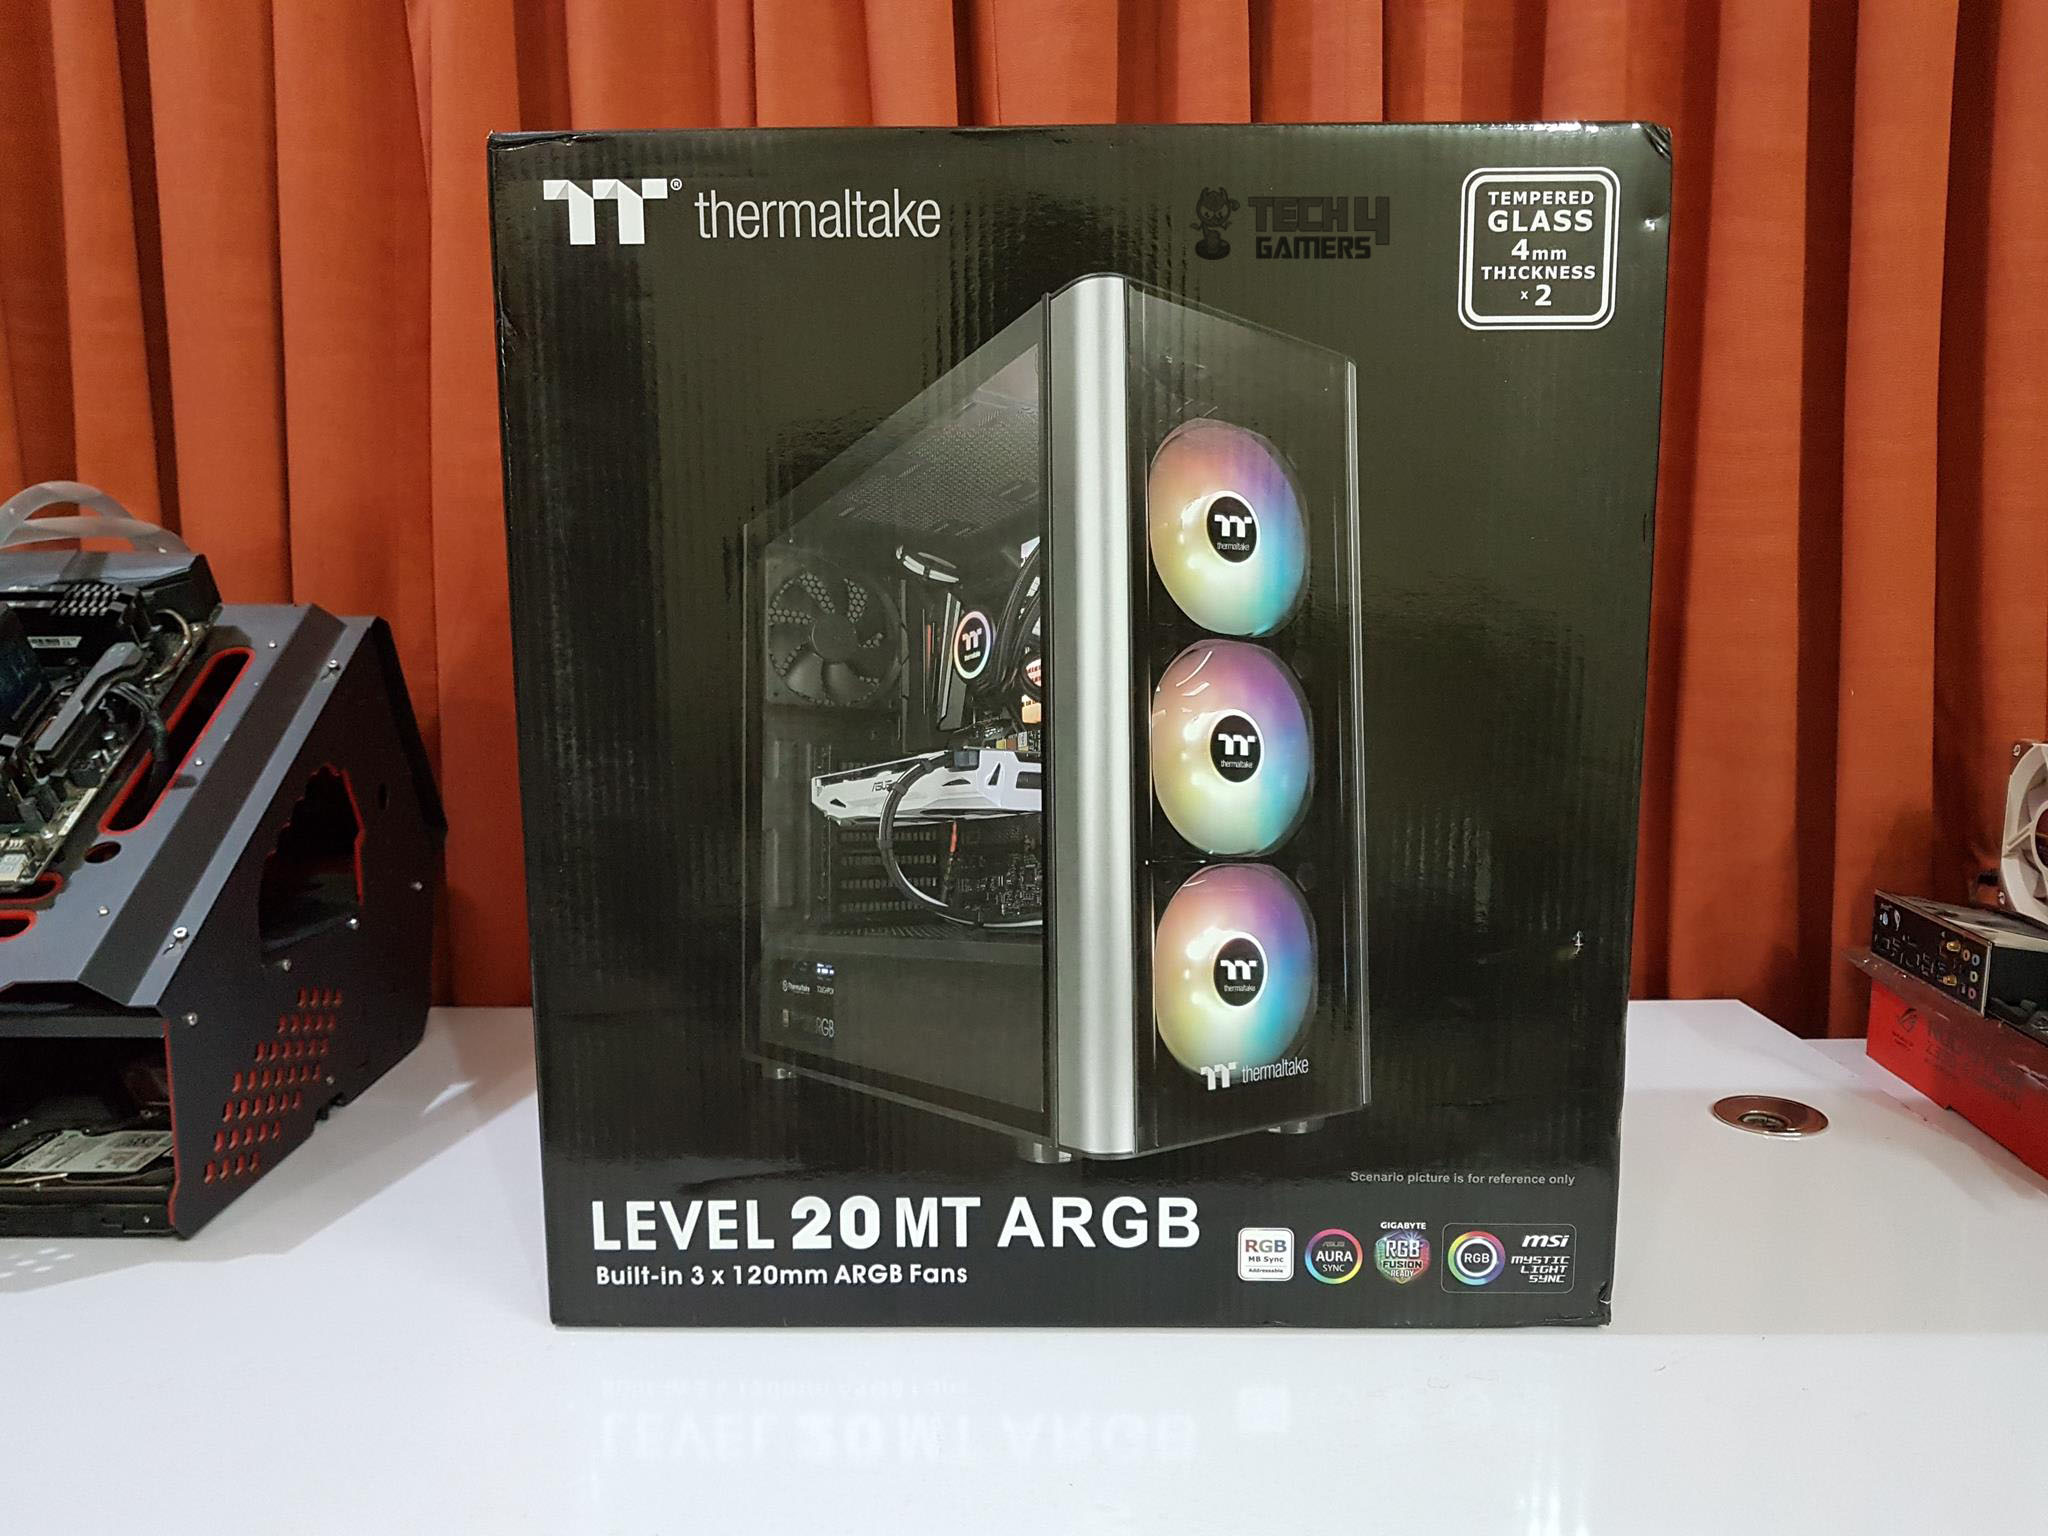
The front and the rear sides are identical in layout. TT premium brand logo is printed on the top left side. There is a picture of the chassis showing the addressable RGB lighting solution. Level 20 MT ARGB is printed at the bottom left side. ARGB lighting compatibility with motherboard manufacturers’ onboard lighting solution is printed on the bottom right side. The top right side indicates that the chassis has 2x 4mm thick tempered glass panels.
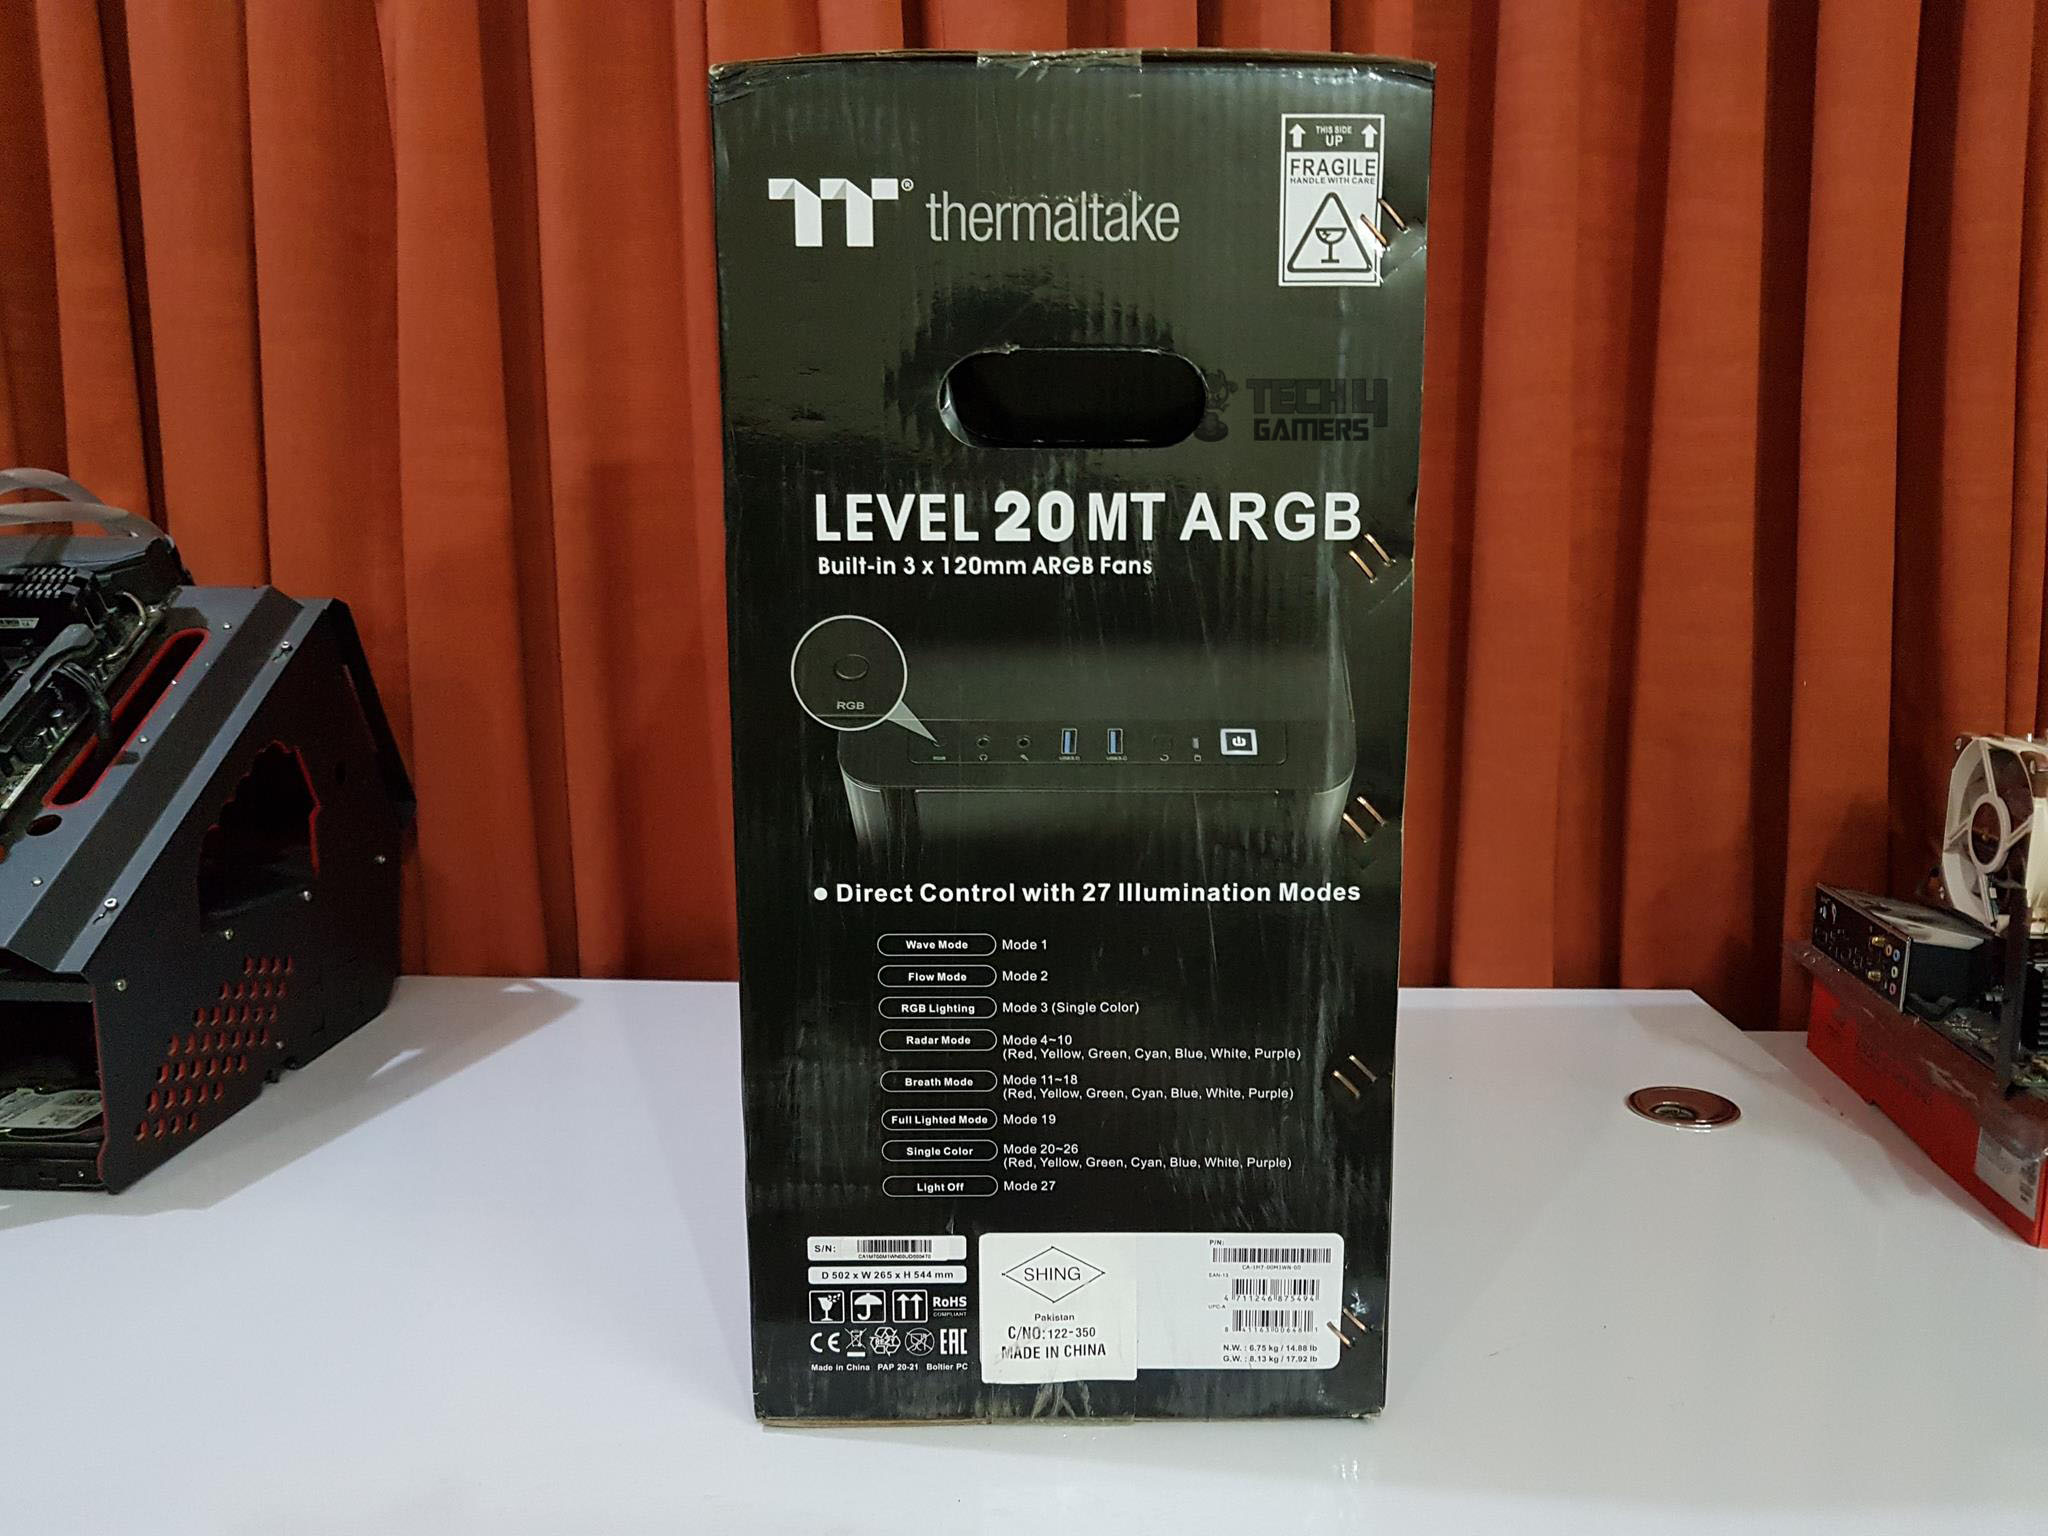
This side of the Thermaltake Level 20 MT ARGB packaging box has TT premium brand logo printed on the top left side. Fragile warning sticker is pasted on the top right side as the chassis has 2x tempered glass panels. Level 20 MT ARGB is printed right below the cutout to carry the box. The lower section showcases the 27 illumination modes using a single button on the I/O panel. There are multiple stickers at the bottom showing the Part No, EAN, UPC, Serial No, etc information. The chassis is made in China.
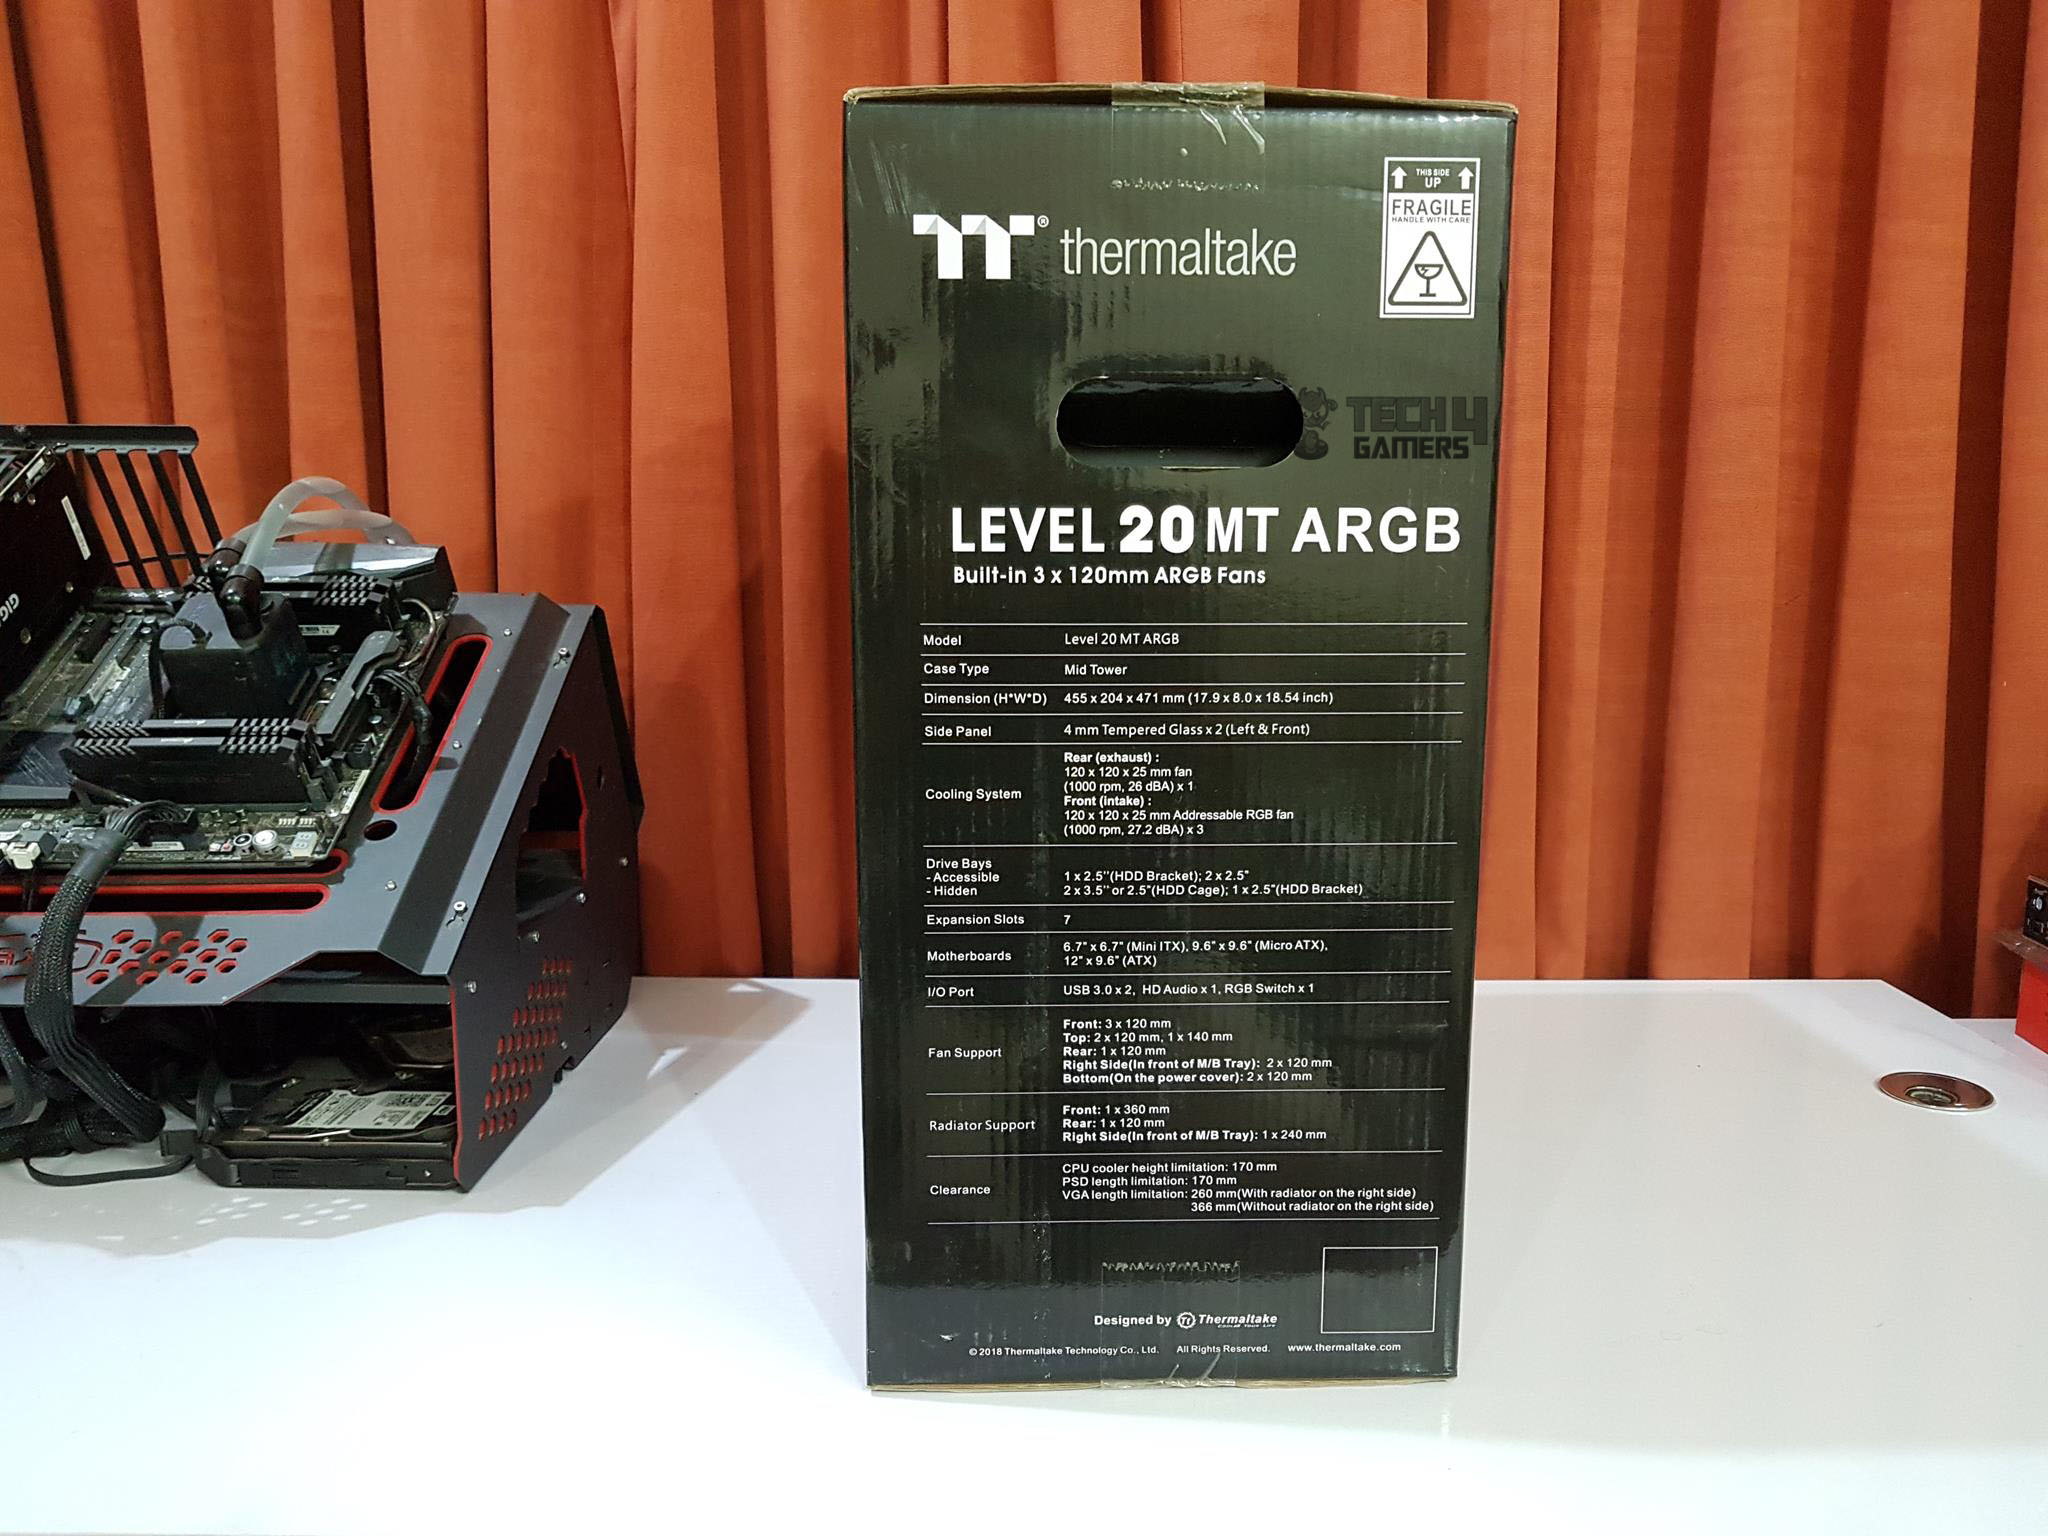
This side has a TT premium brand logo printed on the top left side. Fragile sticker is pasted on the top right side. The specifications of the chassis are printed in the tabular format on the main section.
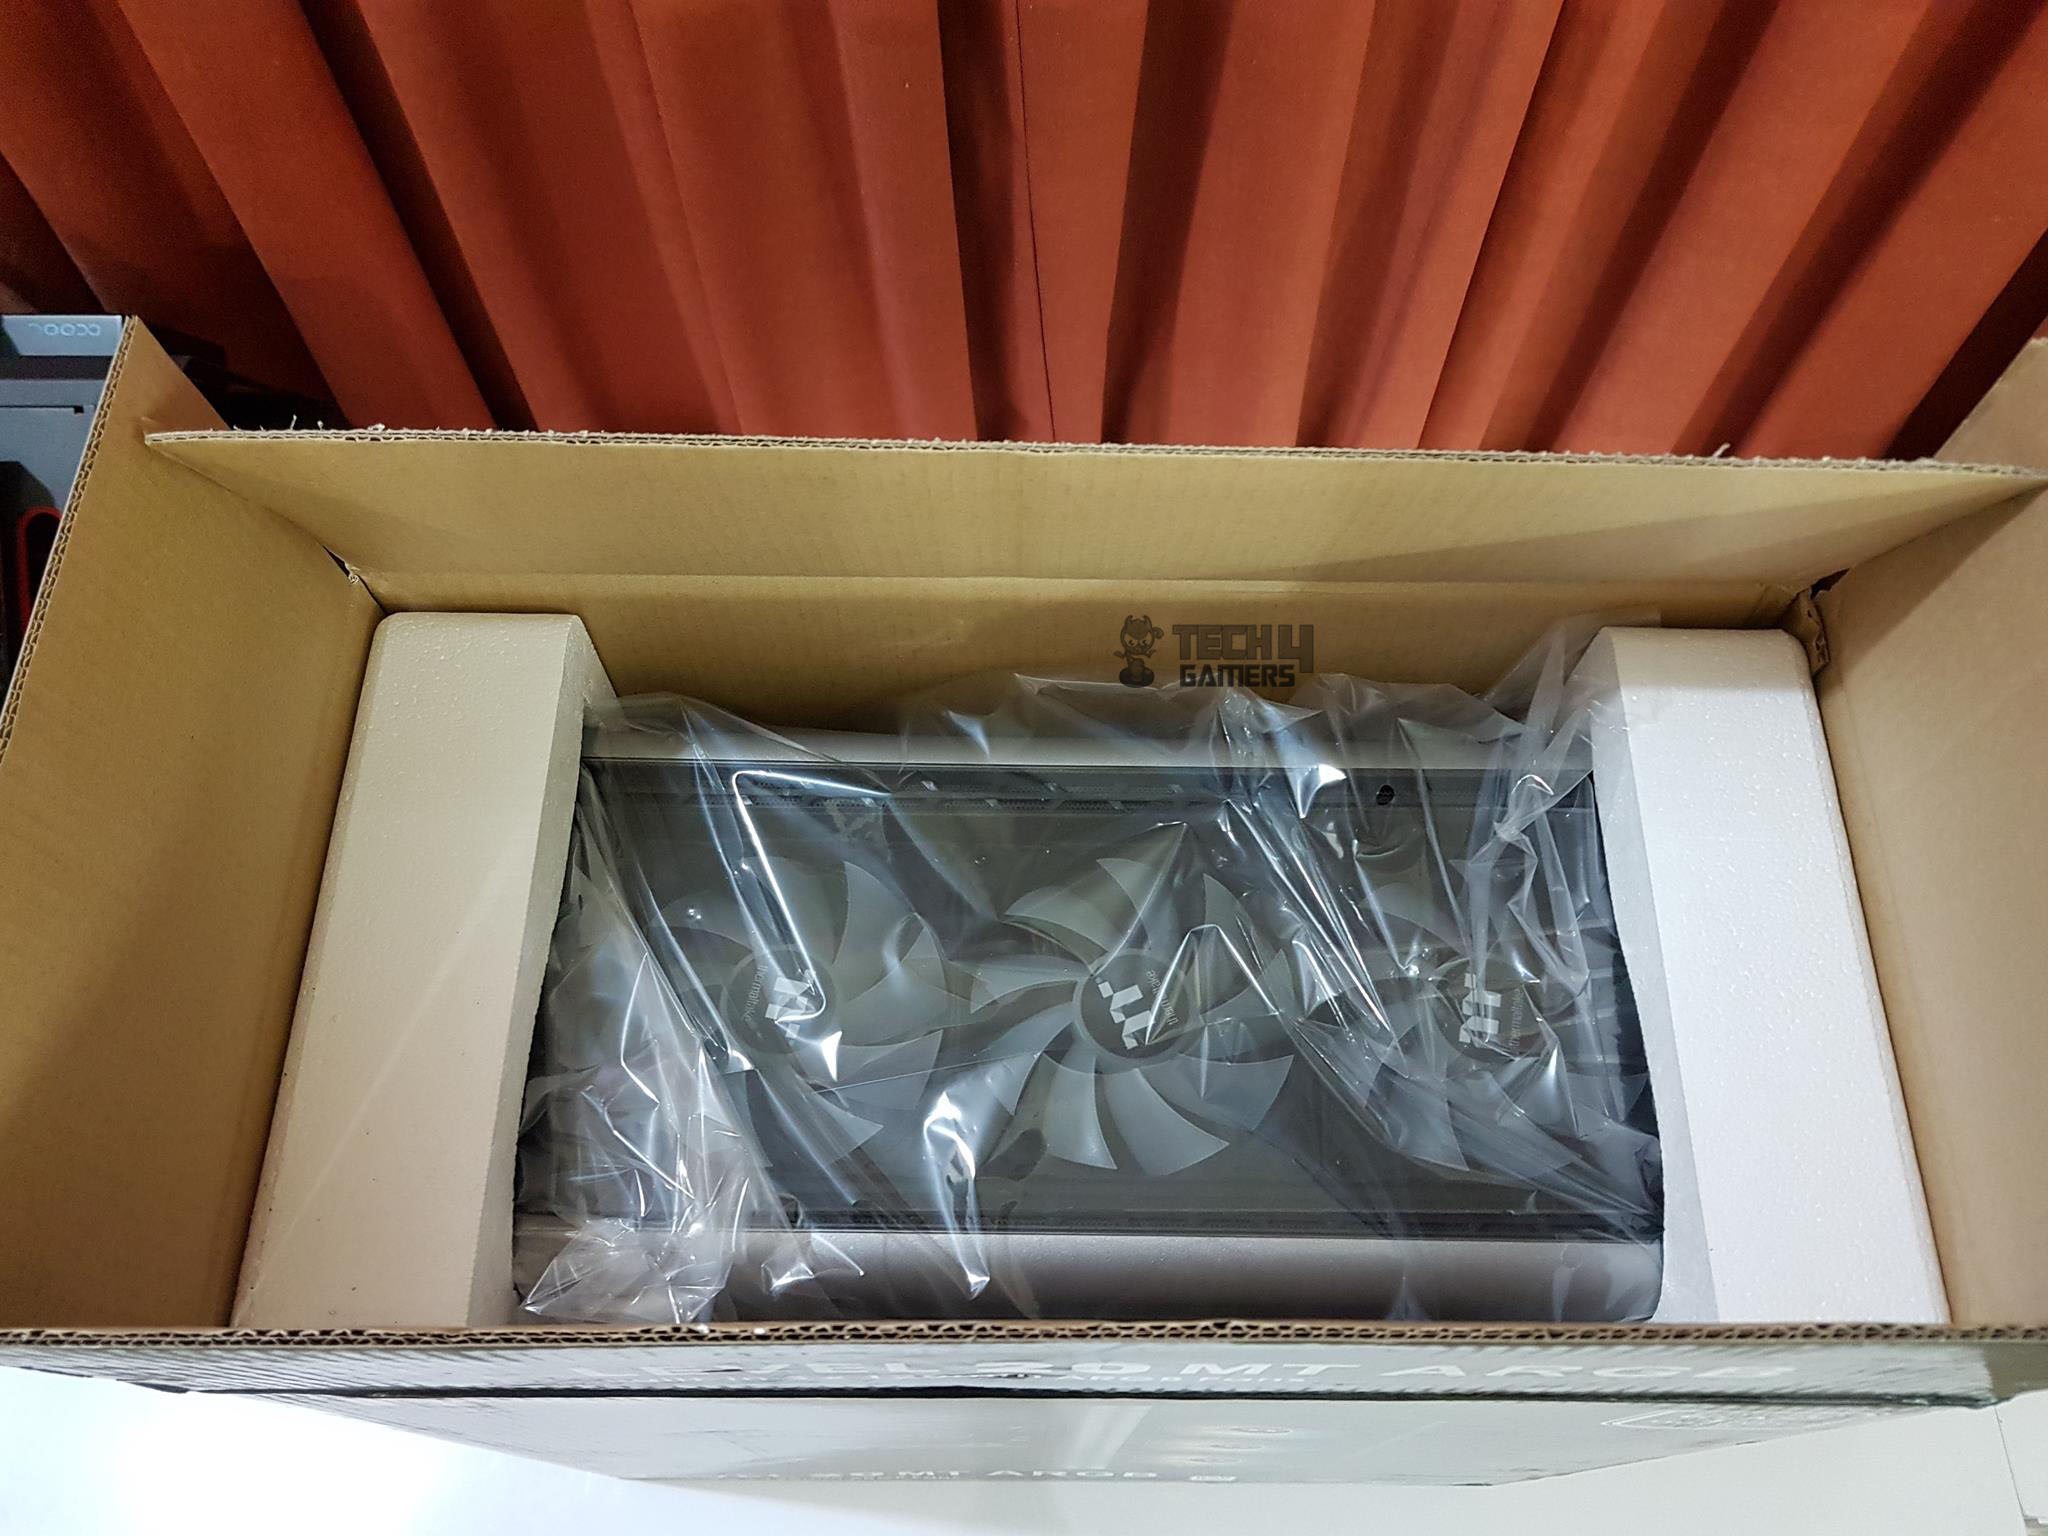
Opening the box will show the chassis wrapped inside transparent sheet and tucked between the two Styrofoam pads in the white color. The front side of the chassis is facing up.
Contents
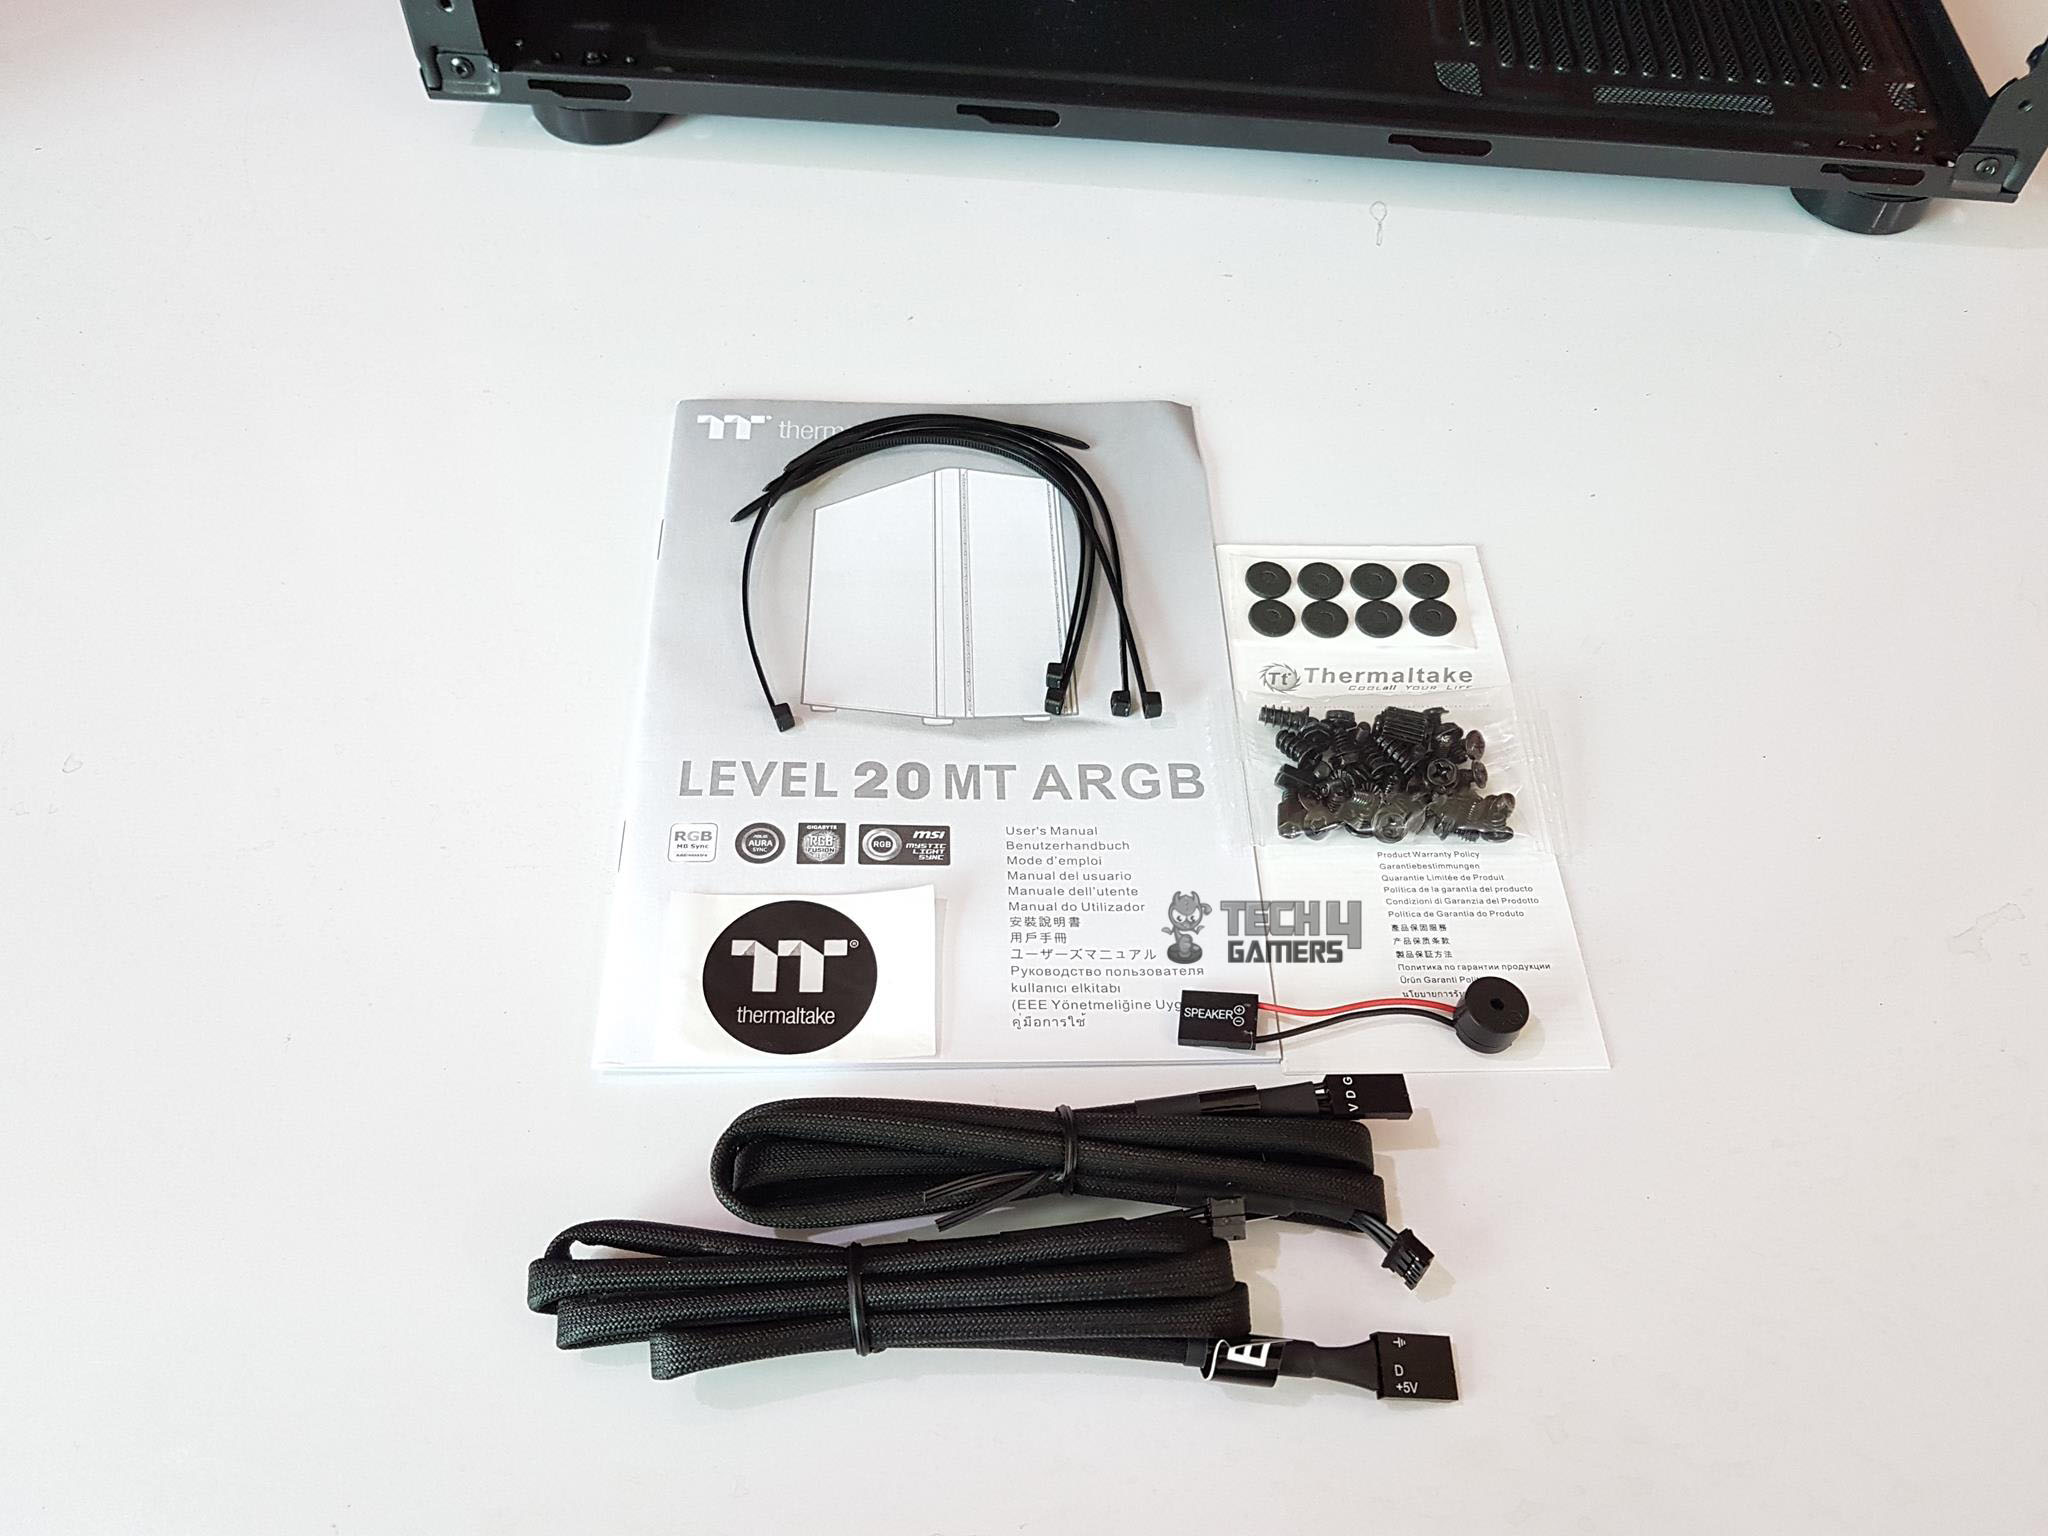
These include:
Various screws to install motherboard, PSU, storage drives, fan
User Guide
Cable Ties
Standoff with tightening tool
Warranty Manual
TT Premium sticker
2x Lighting Sync Cables
Speaker
Rubber mounts for storage drives
Closer Look
The Thermaltake Level 20 MT ARGB is a mid-tower having a dimension of 455x204x71mm with a net weight of 6.75KG. Its main frame is made of SPCC material and it features two TG panels as well. The exterior and interior are finished in black color. Before digging into the design elements of the chassis, let’s take a look at what Thermaltake is saying about it. “Thermaltake Level 20 MT ARGB is the premium mid tower synchronized with the motherboard in the level 20 family. Level 20 MT ARGB features enlarged side panel window, ATX motherboard support, and a power cover. The Level 20 MT ARGB comes preinstalled with three 120mm 5V ARGB LED front fans and one 120mm rear fan. The front fans are addressable to deliver 16.8 million-color RGB illumination and unparalleled ventilation. This model comes ready to sync with RGB capable motherboards from Asus, Gigabyte, MSI, and ASRock. The Level 20 MT ARGB takes our latest case innovations and wraps them in an ultra-modern style that’s utterly unique in the case market today. Stand out from the crowd with Level 20.”
Let’s start with the front side.
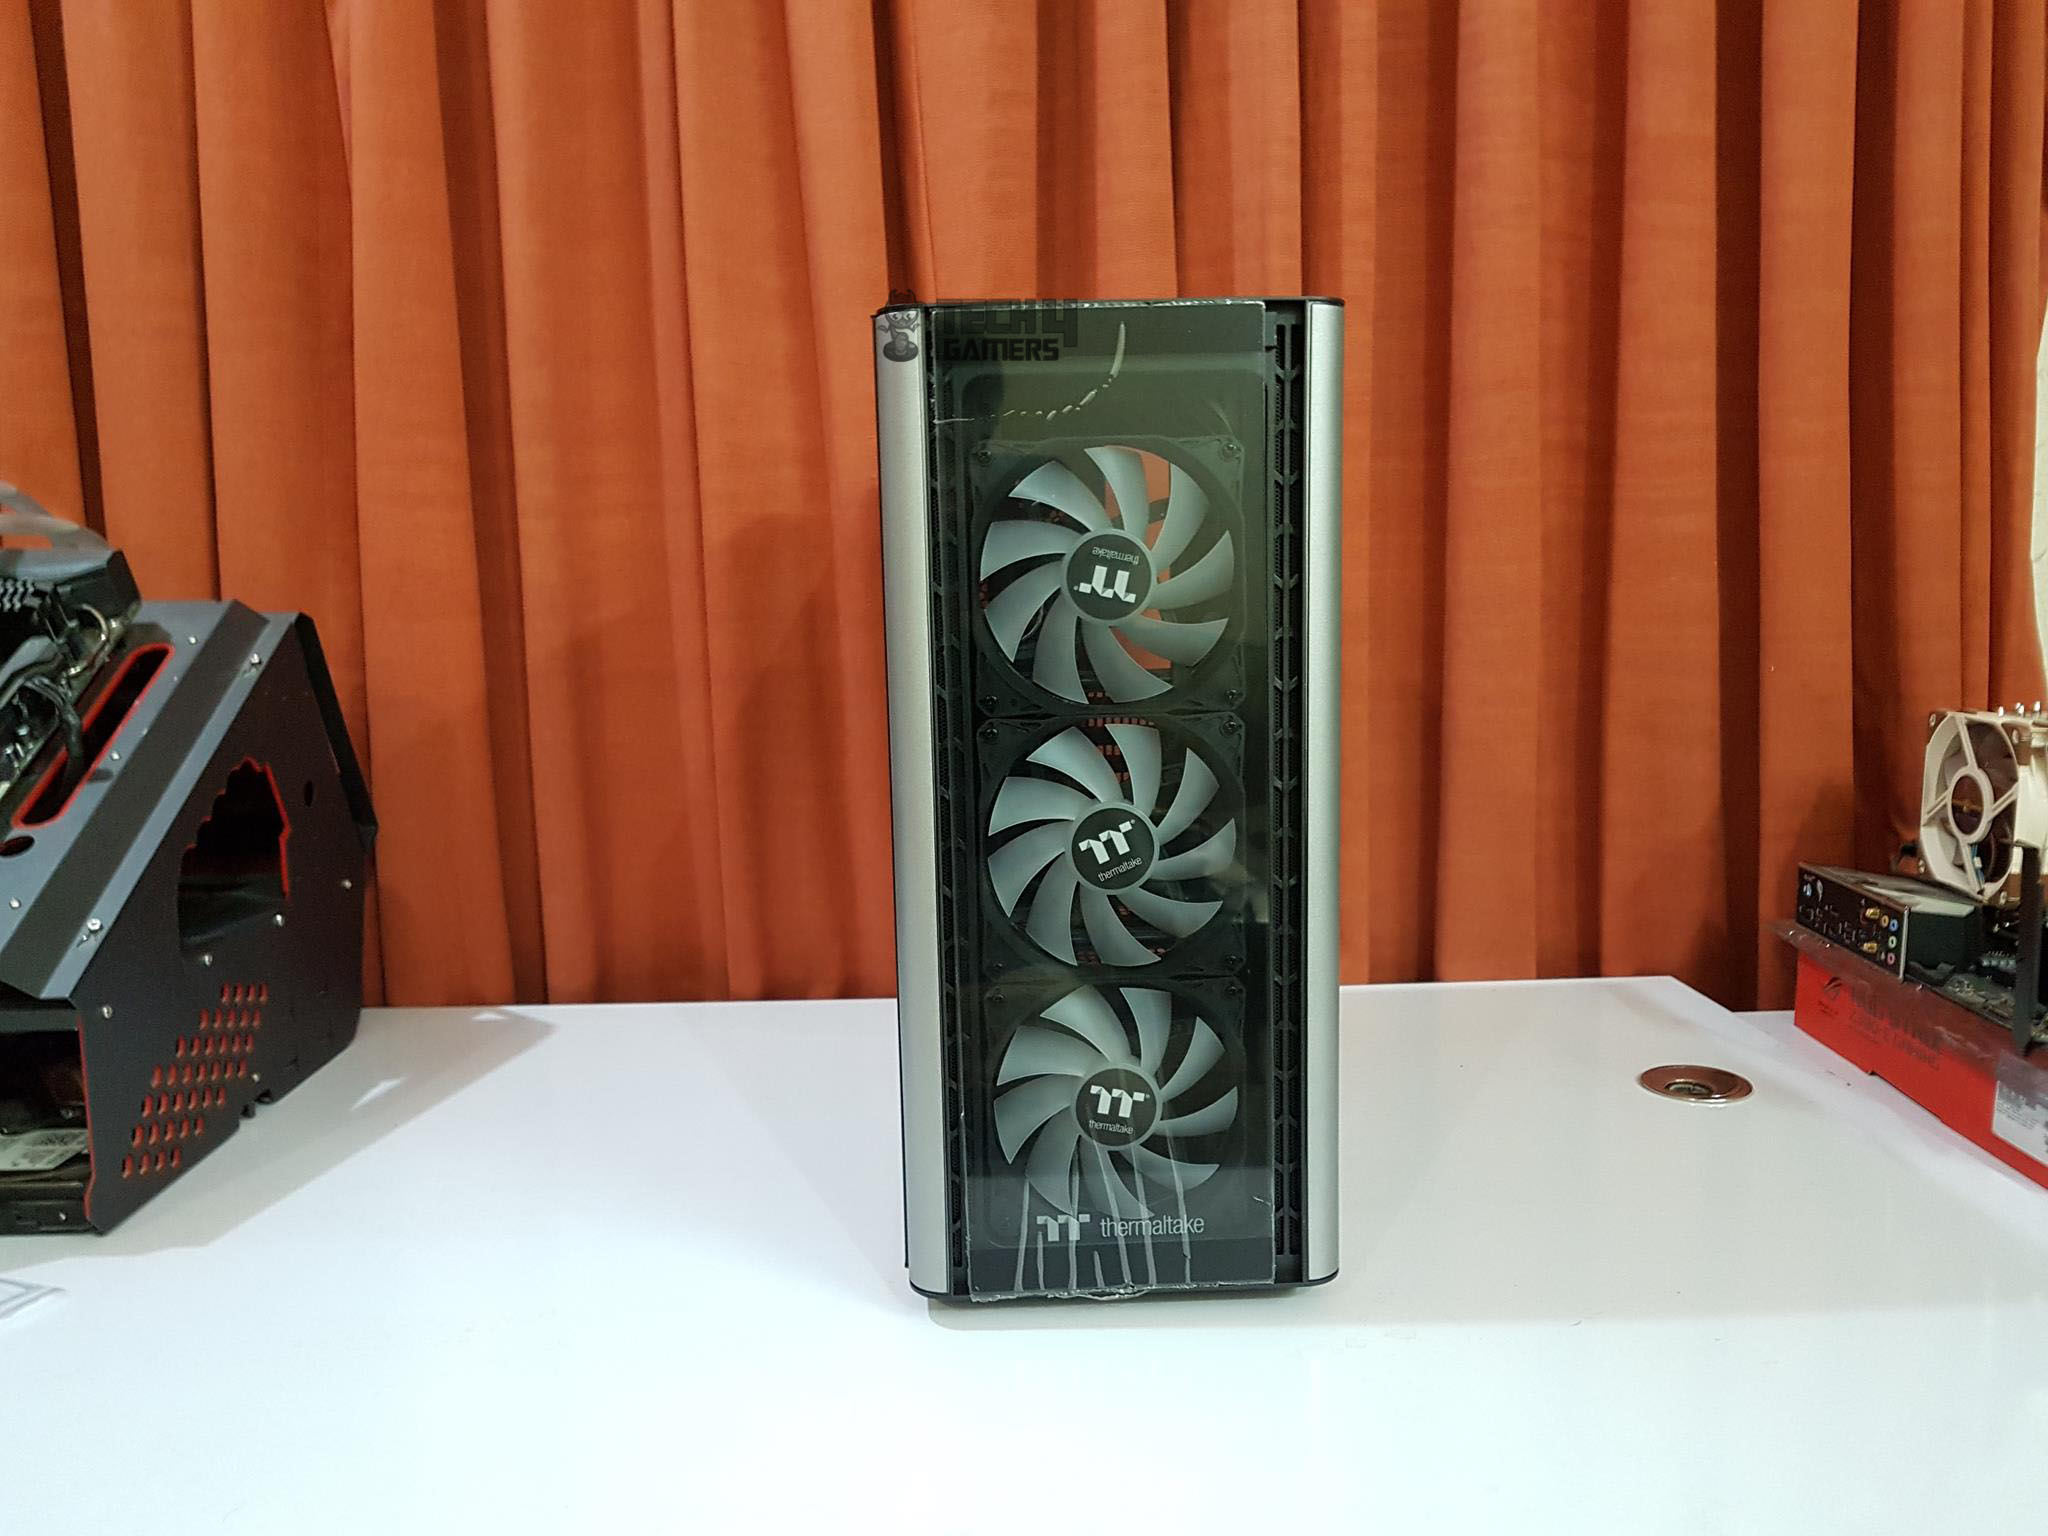
The front side of the Thermaltake Level 20 MT ARGB is one heck of a spectacular view. We have two silver rounded angular sides that make you think they are brushes aluminum which they are not. There is a 4mm thick tempered glass side panel covering the 3x ARGB 120mm fans. While this is a spectacular site indeed, there are multiple design drawbacks here. Looking closely you will see that the TG panel is installed in an offset design with the right side having a more vented area (though still less by any standard) as compared to the left side vented area. This design will make you think that this is an intake area on the front panel. There is a less than 3mm or so gap between the glass panel and the fans themselves. This is also an air intake area and surprisingly it is not filtered whereas those narrow vented sides have dust filters on them. I am not sure what those narrow dust filters are supposed to do when more than 360mm of space is uncovered! Another design drawback is that the TG panel in installed using two dual-sided adhesive tapes and panel can easily fell off. In fact, in my case, it indeed gets loose from the top side and fell off though I was lucky enough to catch it while it was mid-air otherwise it would have been shattered. Mind you this is when the chassis was in the ambient of 42°C which could have an effect on the adhesive tape. There is a TT premium brand logo and name at the bottom of the TG panel. Speaking of the fans, with such restrictive airflow design, there was a need to install high static pressure fans but these stock fans are not high static pressure optimized as our thermal testing has suggested.

The front panel is removable. To remove it, hold the panel at its bottom side and pull it off. It will take some force and this force can also loosen the TG panel. The above picture shows the inside of the front panel.
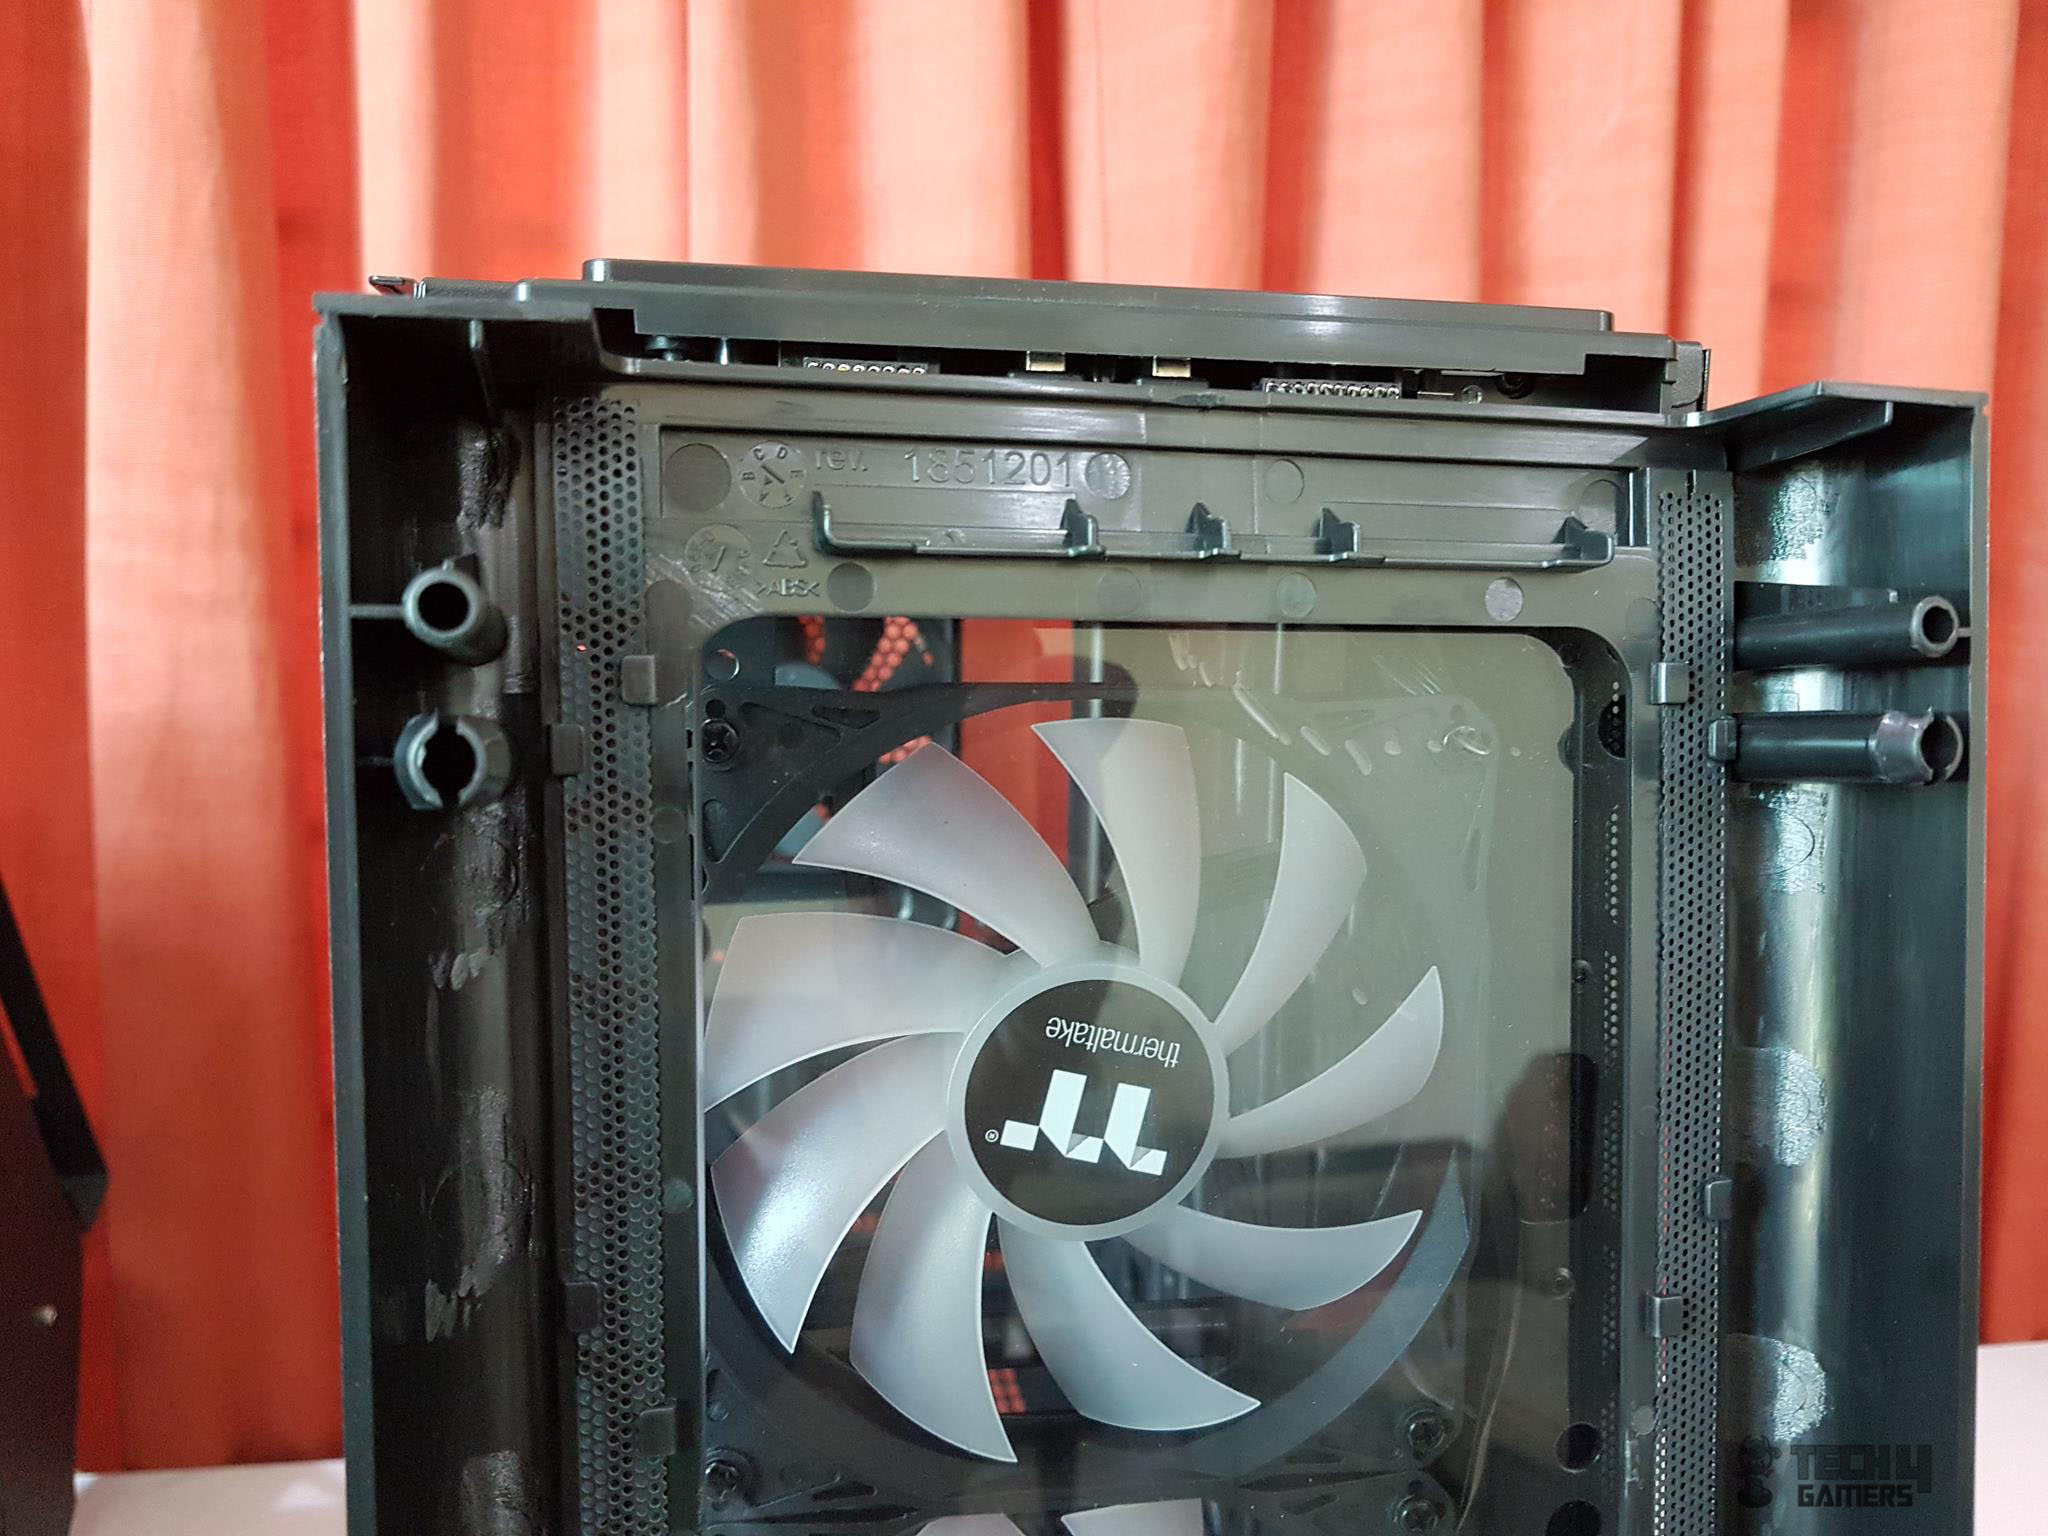
The above picture is zoomed in to show you how narrow these vents are and dust filters covering these narrow vents. There is no dust filter right behind the glass panel to cover the possibly largest air intake position on the front.
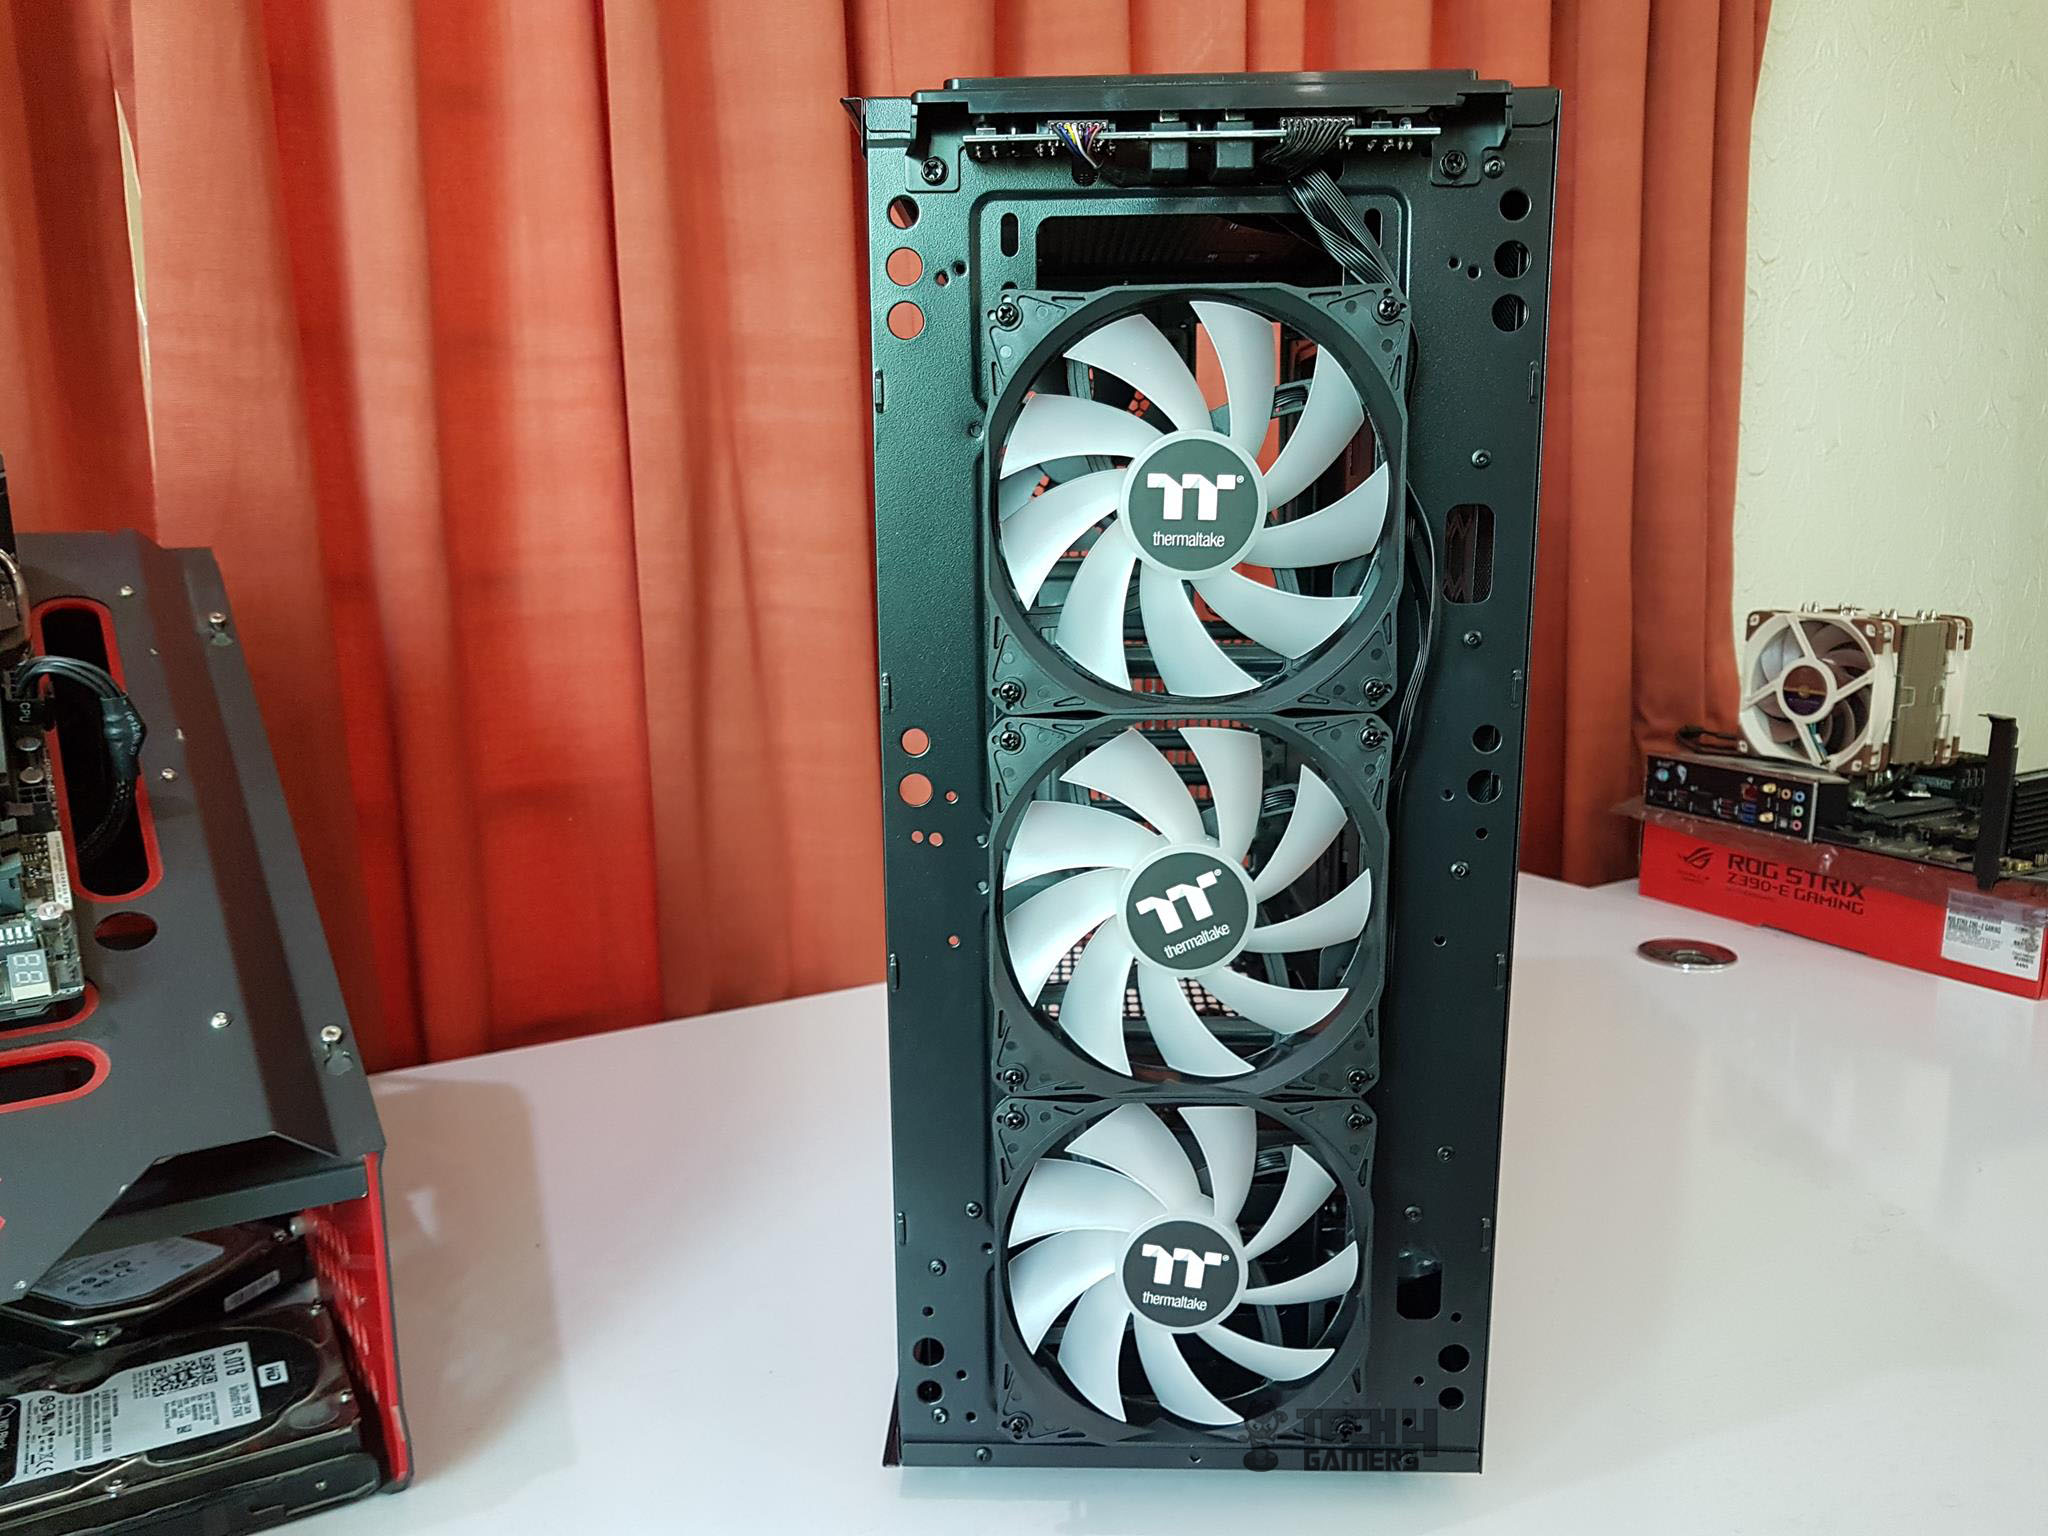
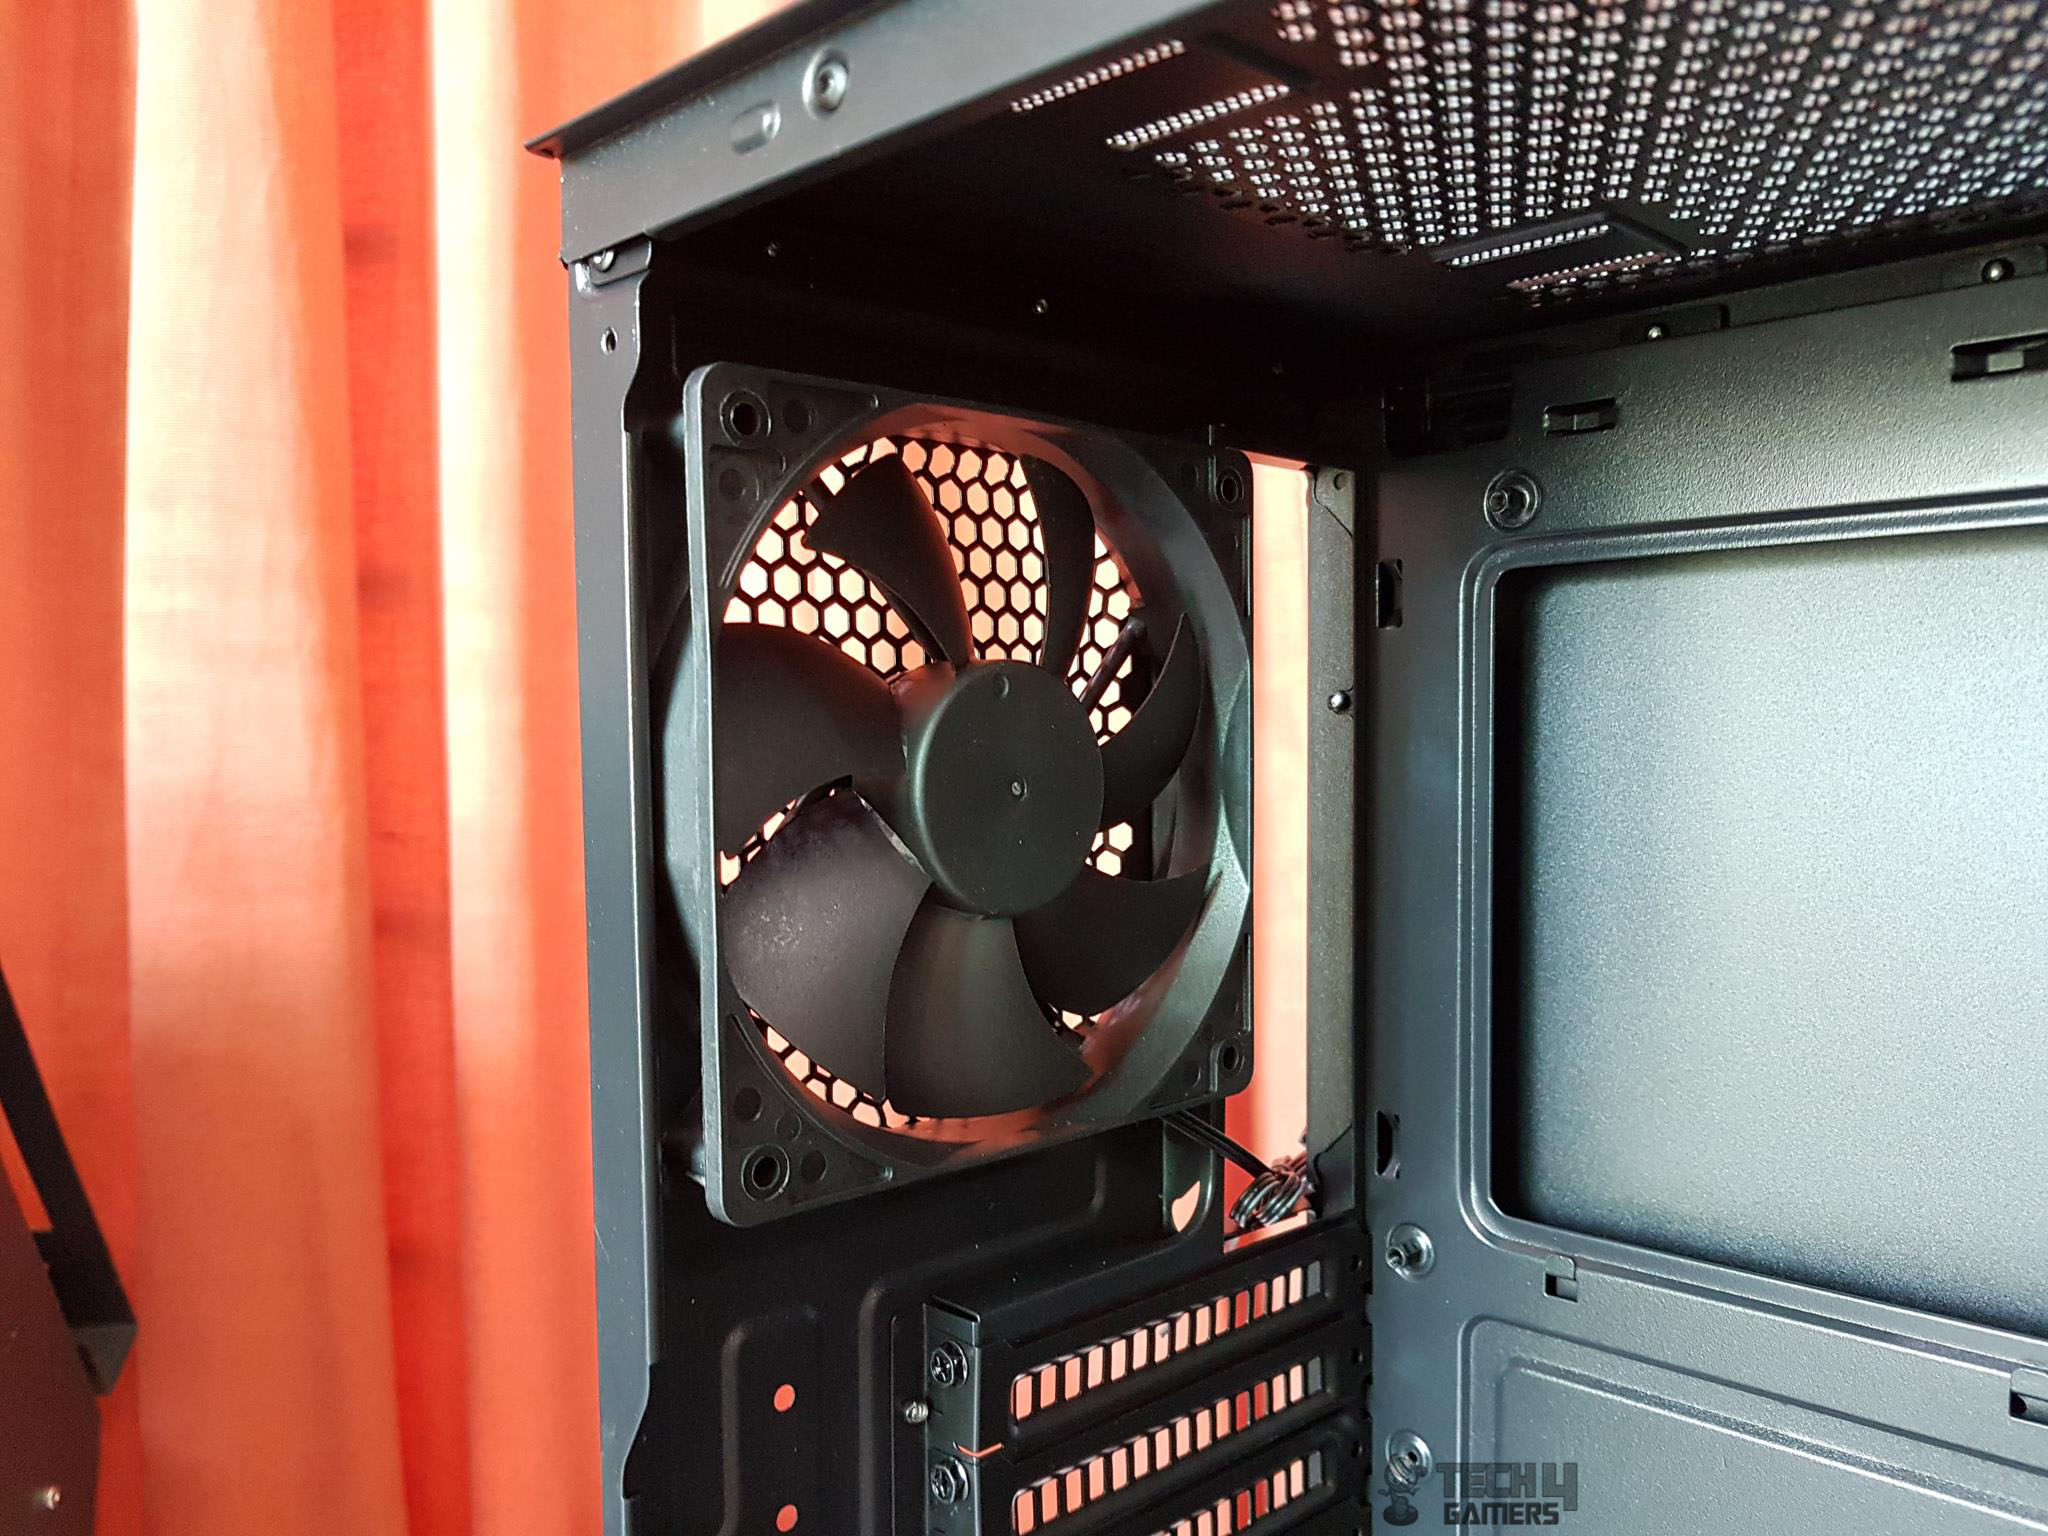
Let’s take a look at the main front side with the front panel removed. We can see three 120mm fans on the front. These are ARGB fans meaning they feature addressable RGB lighting. The front side can only house up to 3x 120mm fans and up to 360mm radiator. There is no support for 140mm sizing on the front side. The I/O panel on the top is removable as can be seen in the picture. There are two cutouts on the right side to pass the cables through though Thermaltake is not using them as all the cables of the fans are passed through from the top side.
Let’s take a look at the rear side of the Thermaltake Level 20 MT ARGB.
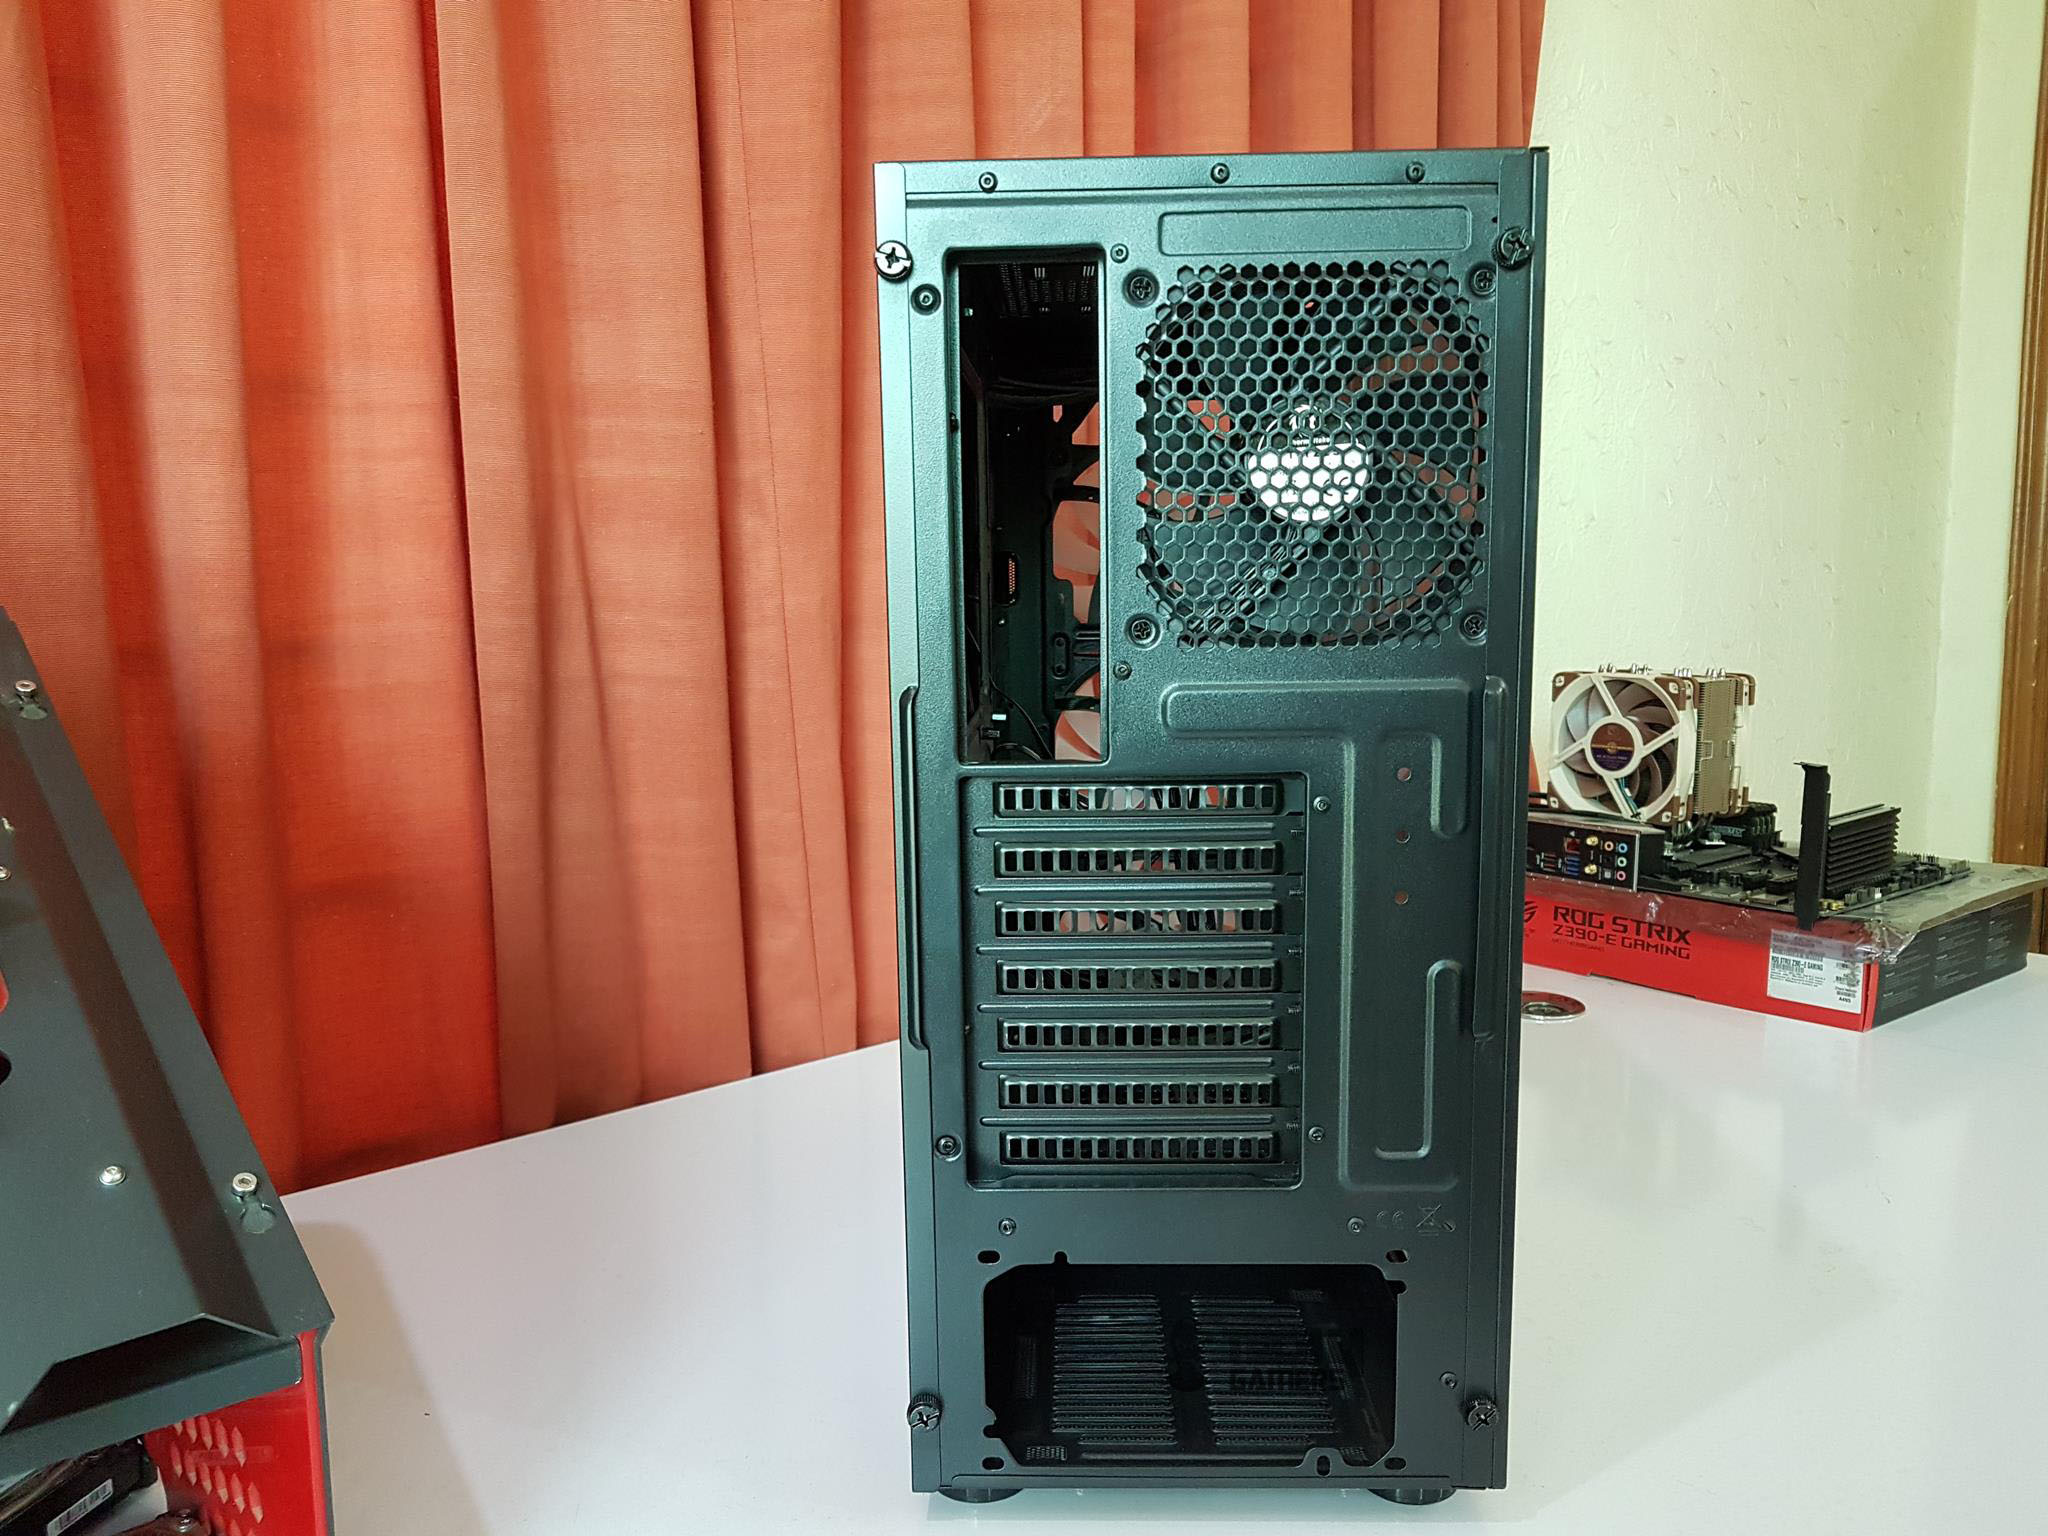
There is a large size cutout for the motherboard’s rear I/O shield. On its right side, we have vented portion for the 120mm size fan (pre-installed). Please, note that we can’t adjust the height of the fan. In the middle, we have 7 PCIe slots with vented covers. Area to its next is solid design without any vents. At the bottom, we have a standard ATX PSU mount. As can be seen, both side panels are secured using screws which are not thumb screws but have bulky heads and they are not captive either. The middle side of these panels suggests that they are to be slided out.
Let’s take a look at the bottom side of the Thermaltake Level 20 MT ARGB:

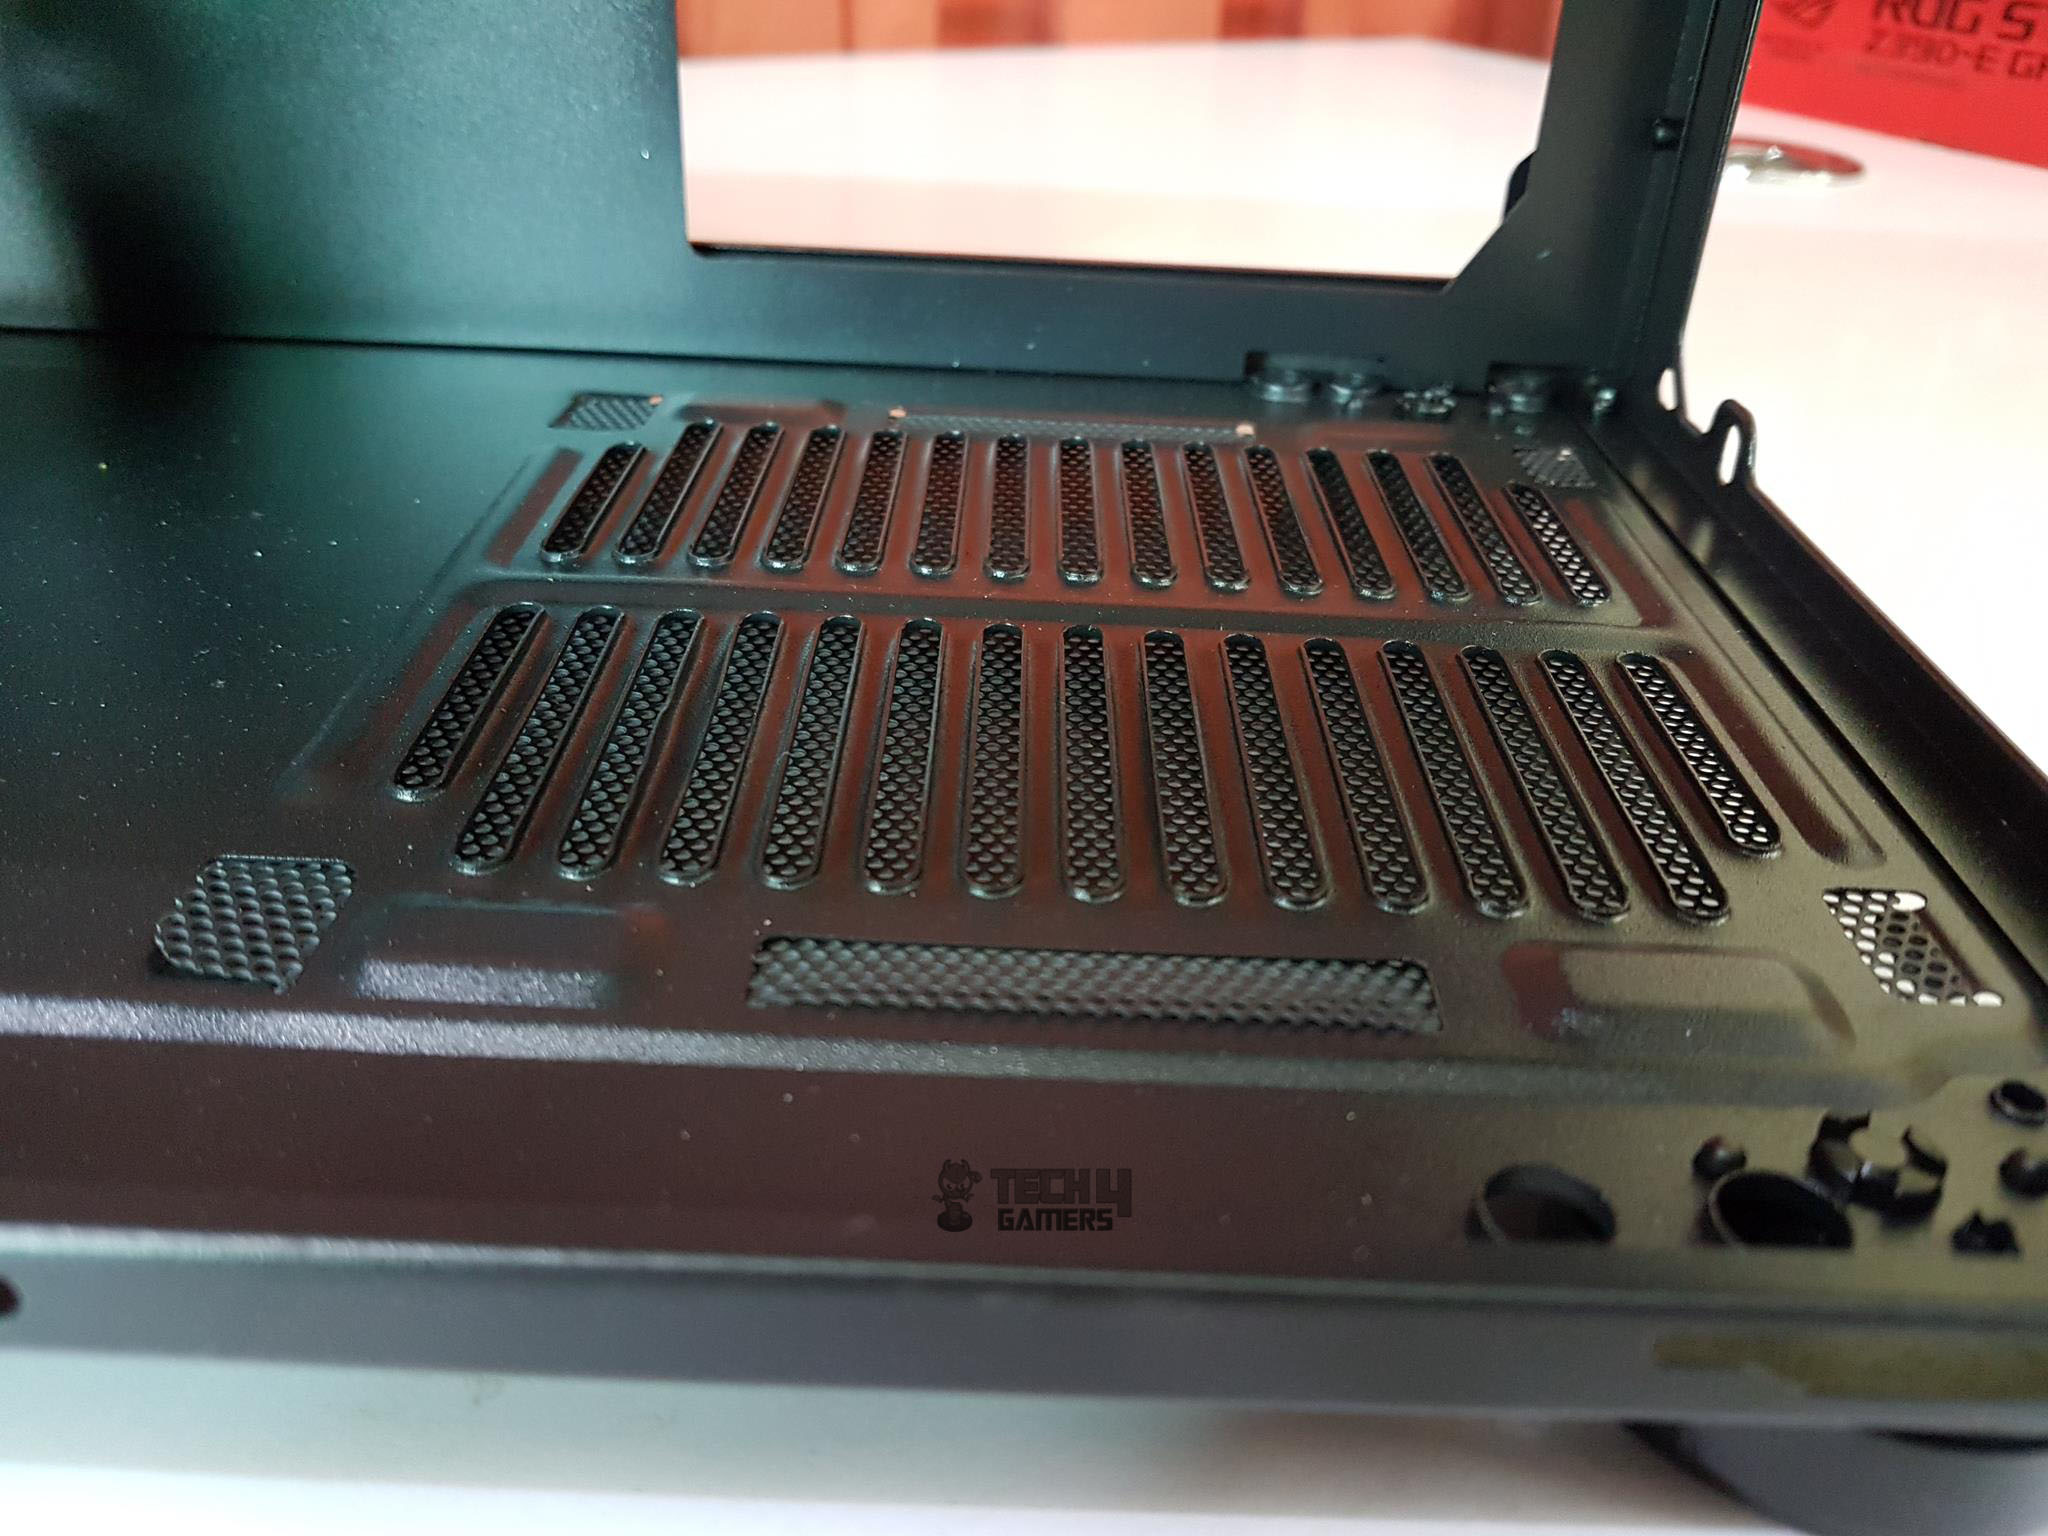
We can spot 4 circular large size feet of the chassis at the bottom with the rubber mounts at their end to avoid scratching the surface on which the chassis will be placed. There is a non-magnetic dust filter on the PSU mount. While this dust filter is easy to remove, it is not that easy to install! It is washable.
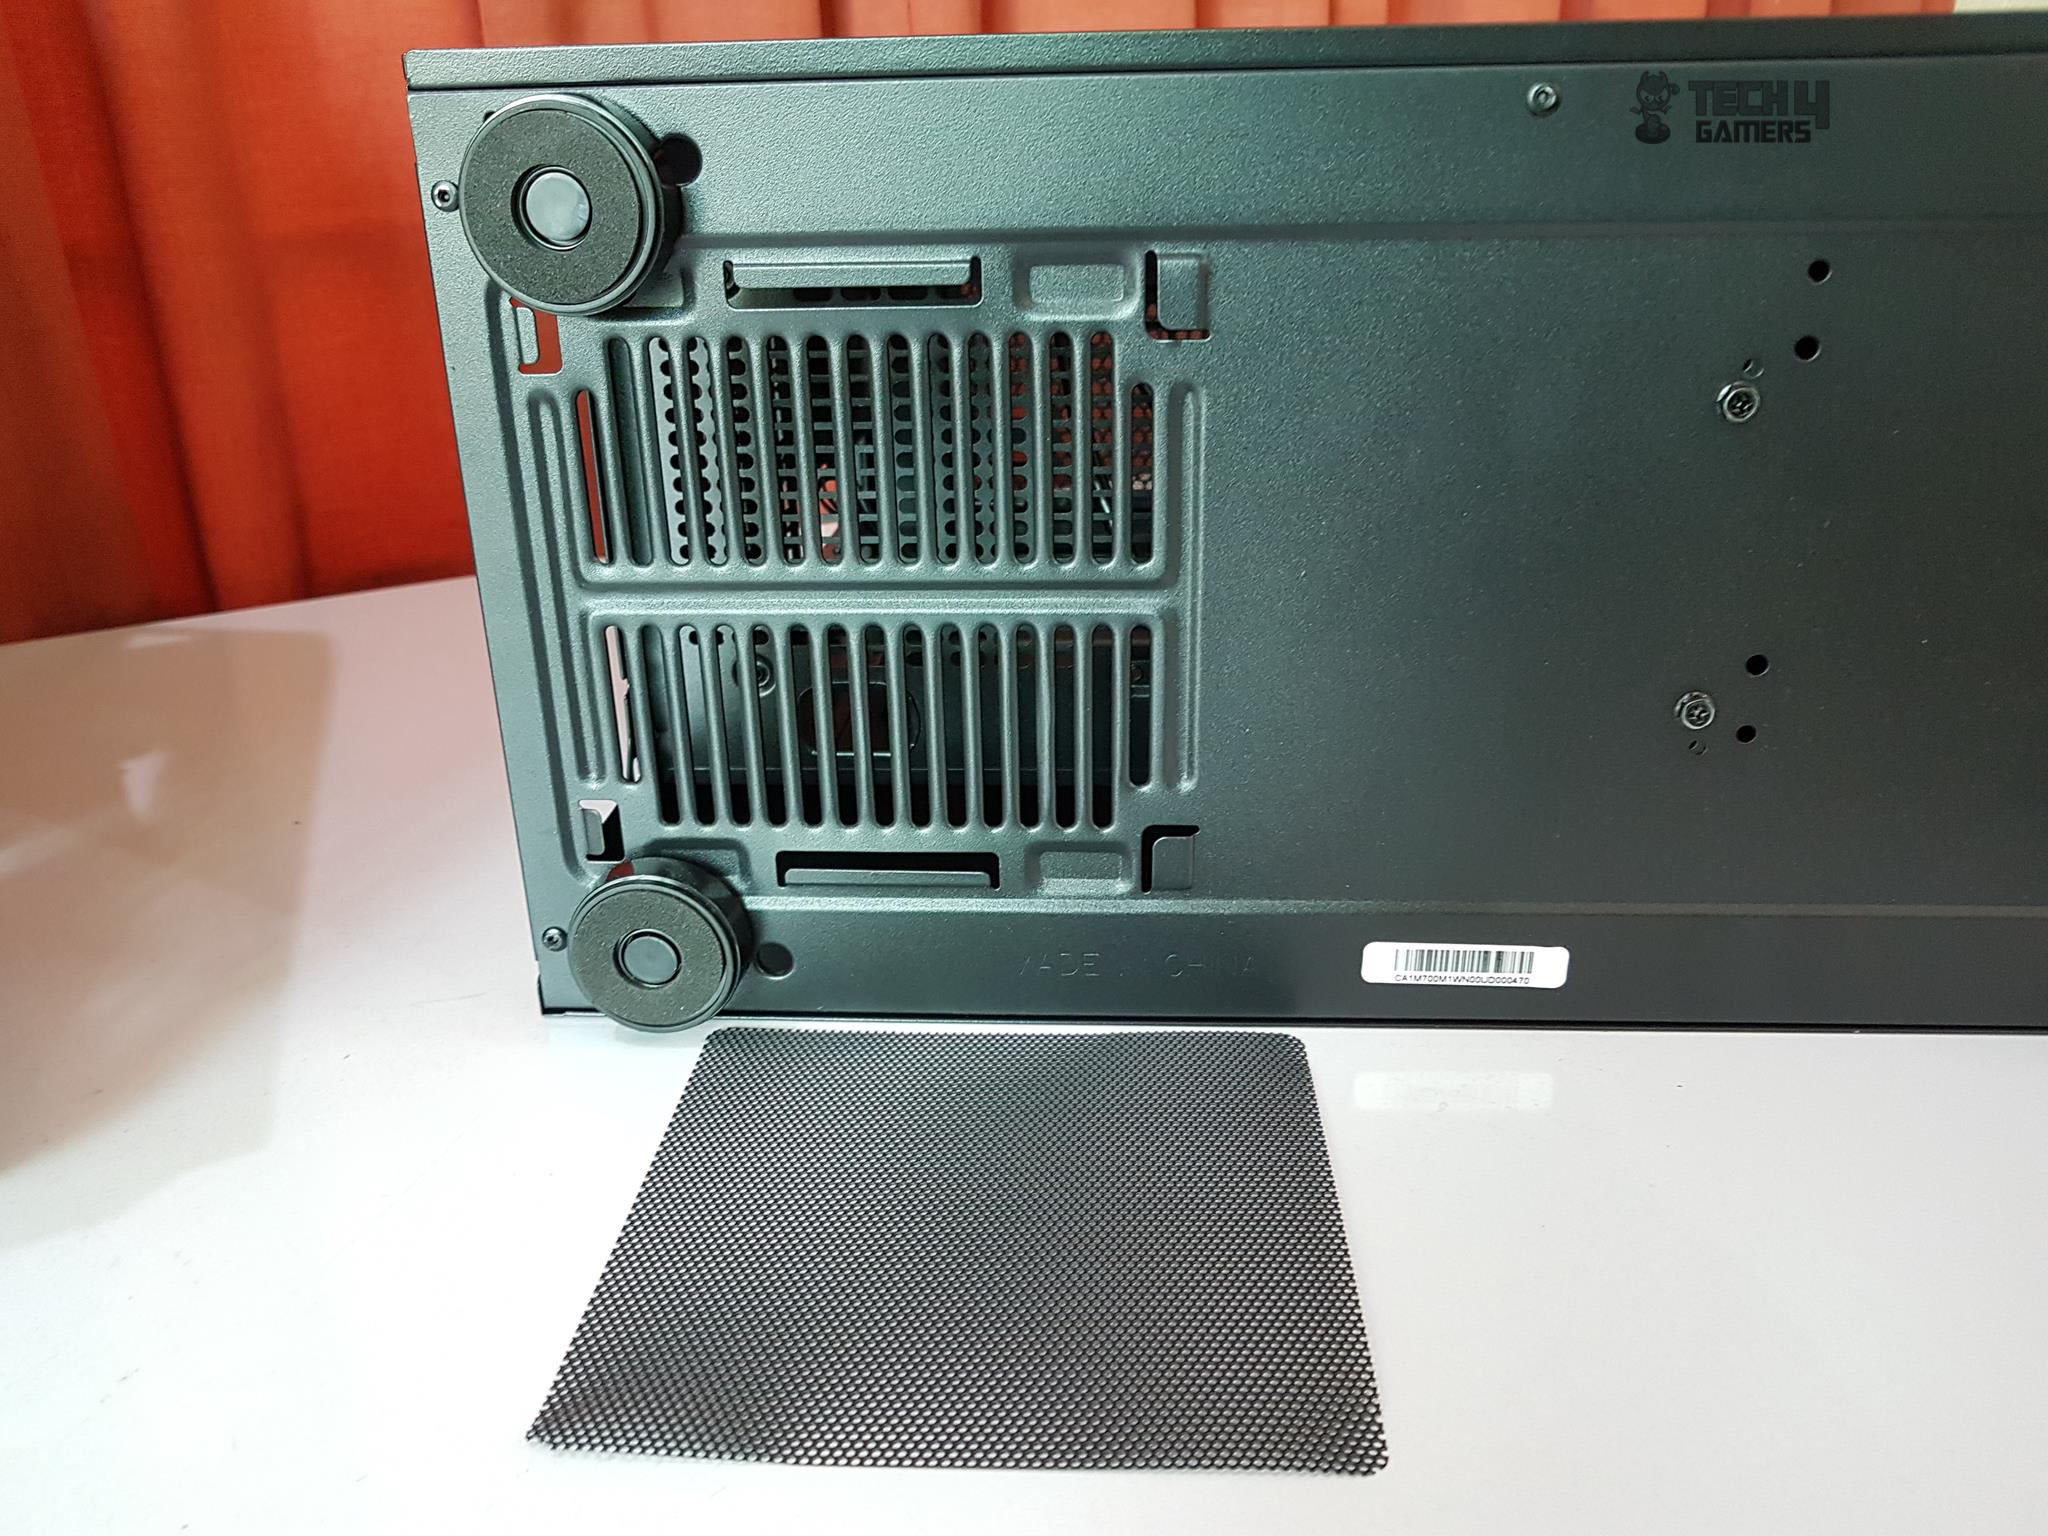
The above picture shows the dust filter removed. The vented PSU mount is now fully exposed.
On the right side at the bottom, we can spot 4 screws. These are holding the drive cage of the chassis. The drive cage can be removed to make space for the PSU cables. The user is supposed to remove these 4x screws and 4x screws on the top side of the PSU shroud.
The far right side at the bottom of the chassis has a large cutout which is another air intake side for the front. This is also where you will place your fingers of the hand to have some grip while removing the front panel.
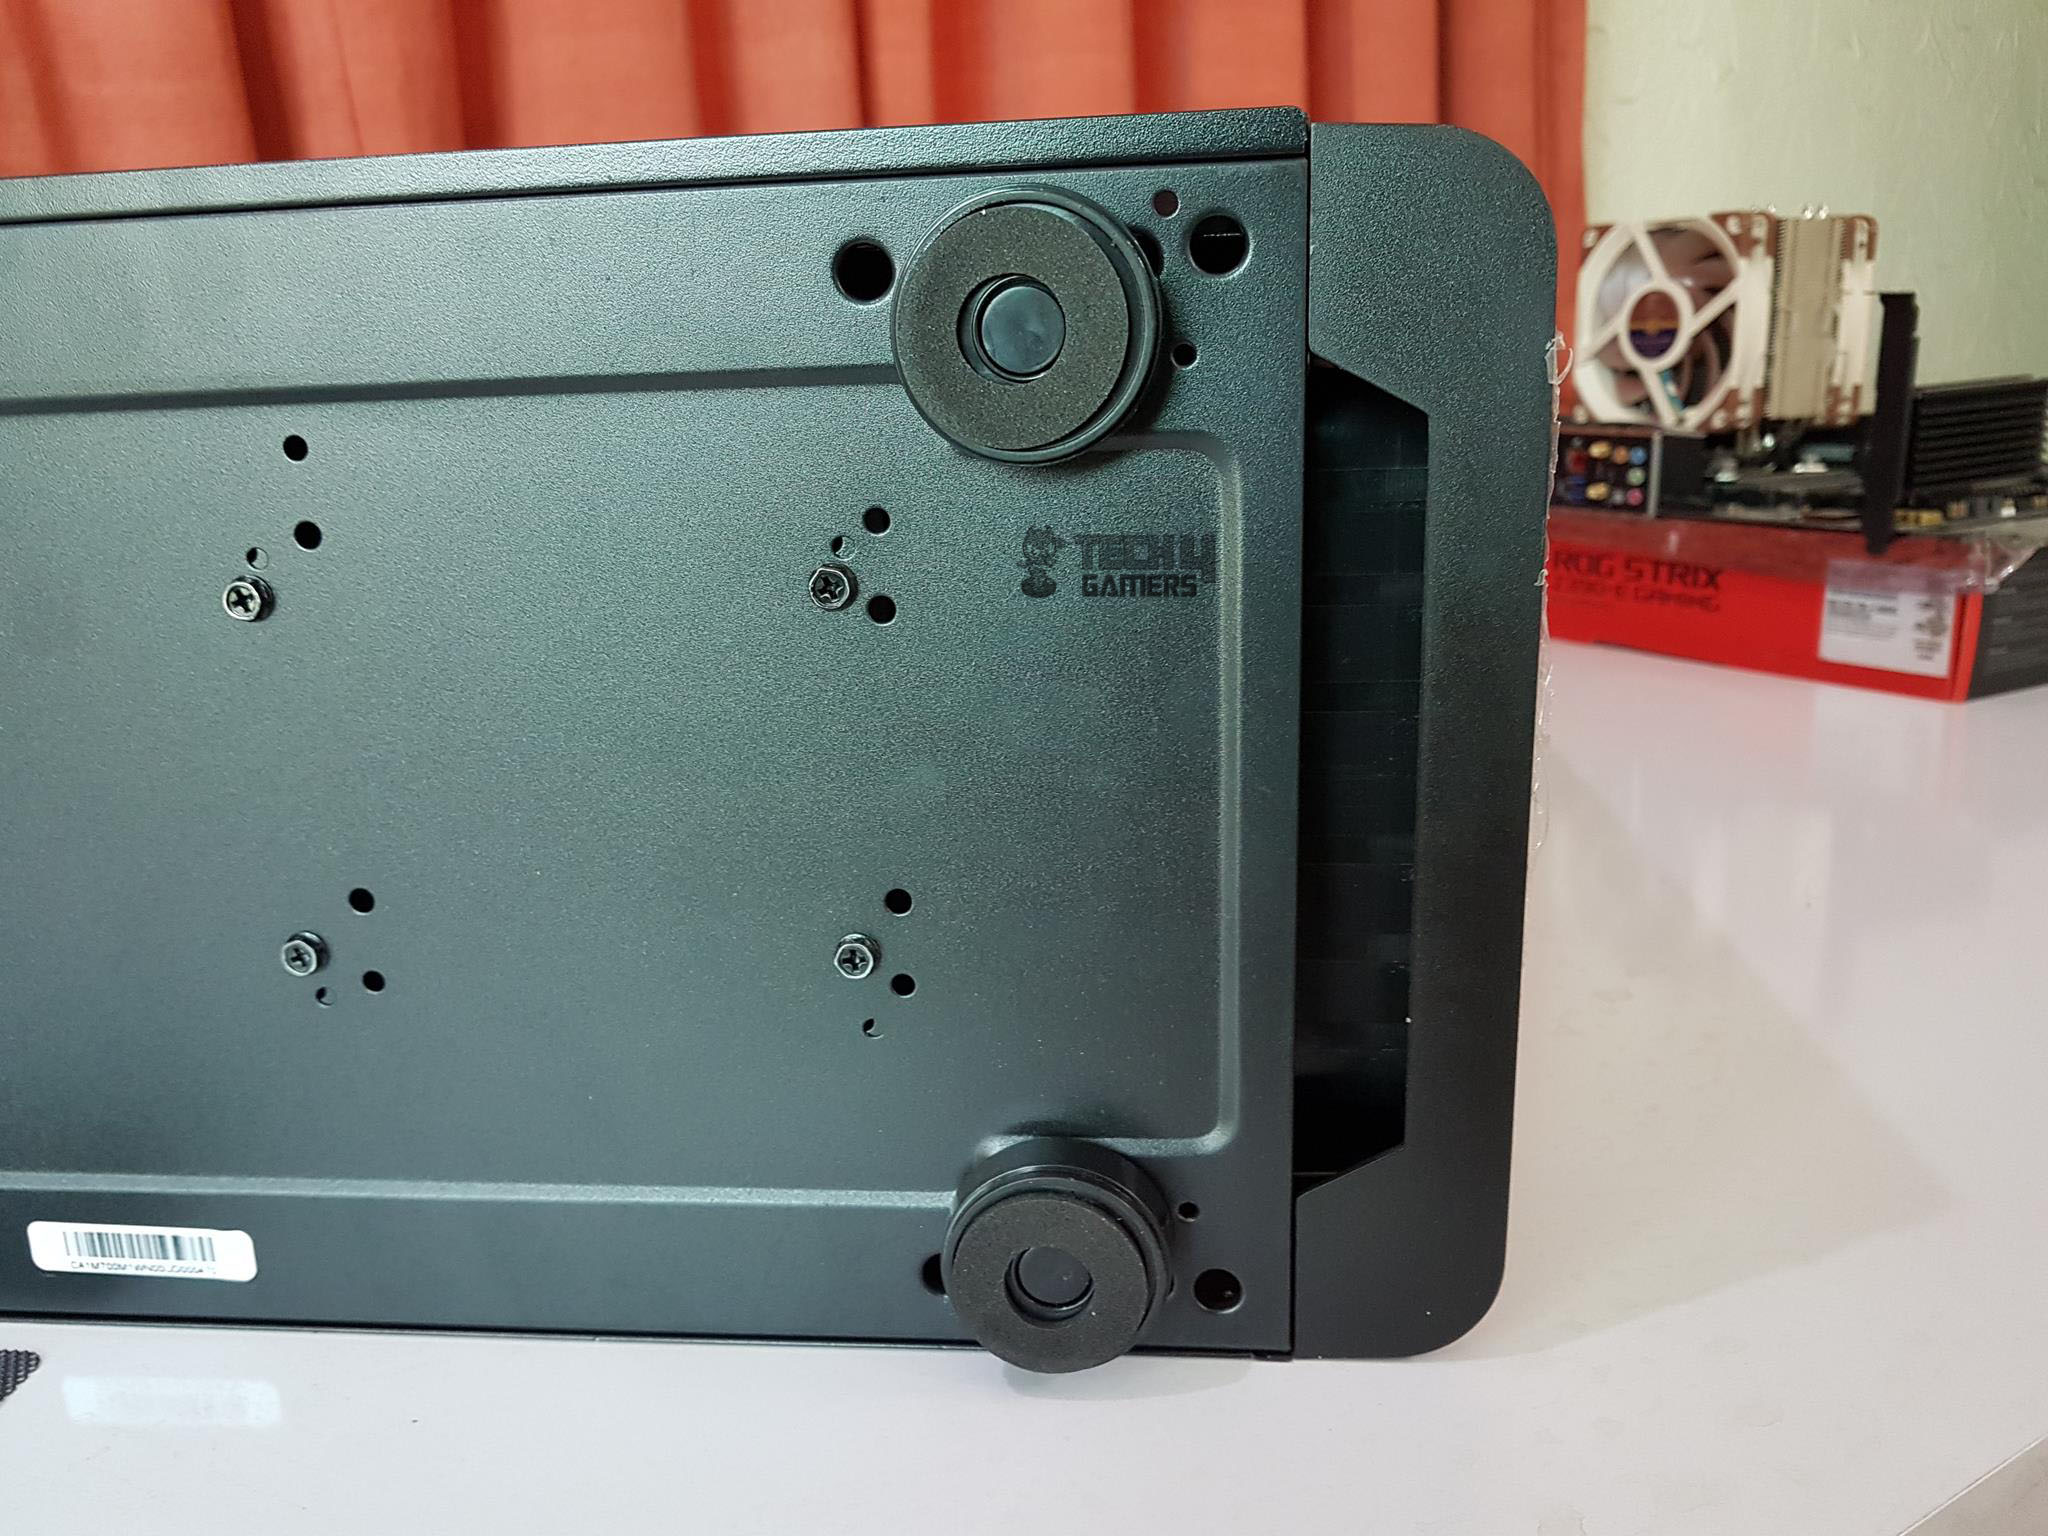
Let’s take a look at the top side of the Thermaltake Level 20 MT ARGB

The top side of the Thermaltake Level 20 MT ARGB has I/O panel on its leftmost side which is designed in a way that it is independent of the top side’s frame hence can be removed. There is a magnetic dust filter covering the 120/140mm fan mounts.

The above picture shows the top side with a magnetic dust filter removed. The fans can be adjusted as Thermaltake has provided rail system to slide the fans for flexible mounting.
Let’s take a look at both side panels of the chassis from the exterior.

The side panel features 4mm thick tempered glass. It is installed using two screws at the rear side of the chassis. The top and bottom frames of the chassis are bit protruded to rest the panel in between them. When the screws are removed the panel does not fall off and it slides out a bit on the front side’s axis giving the impression that it might be hinged which it is not.
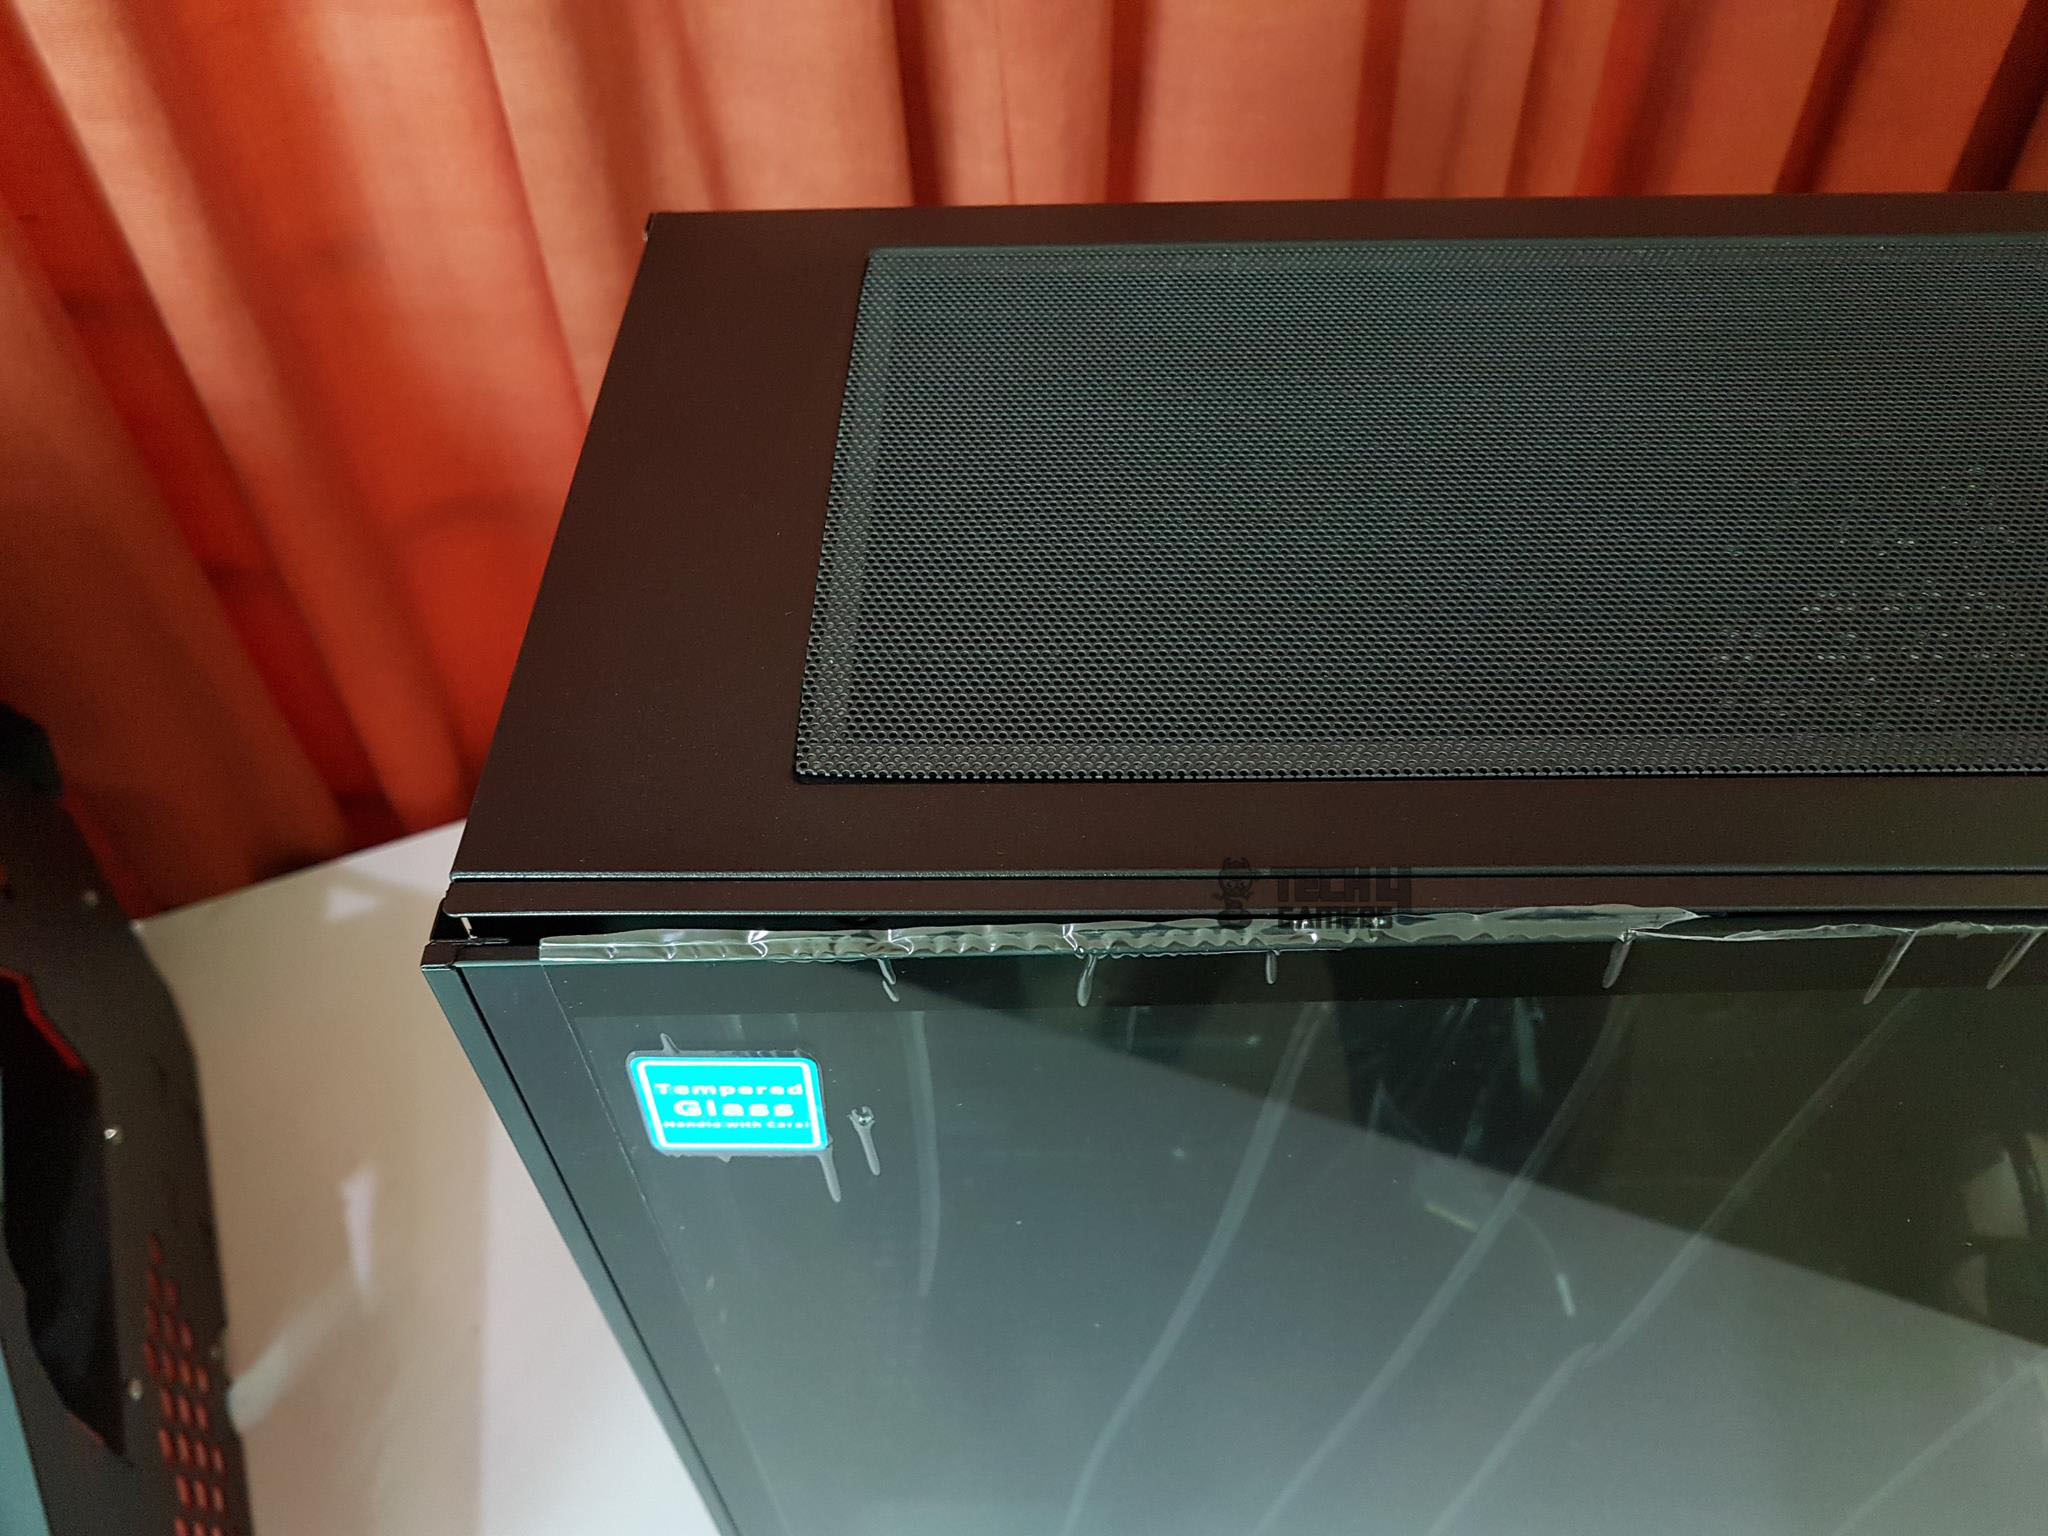
This is a design element and Thermaltake has done a nice job in the handling of the panel. There is a blue sticker warning the user that the TG panel is on.
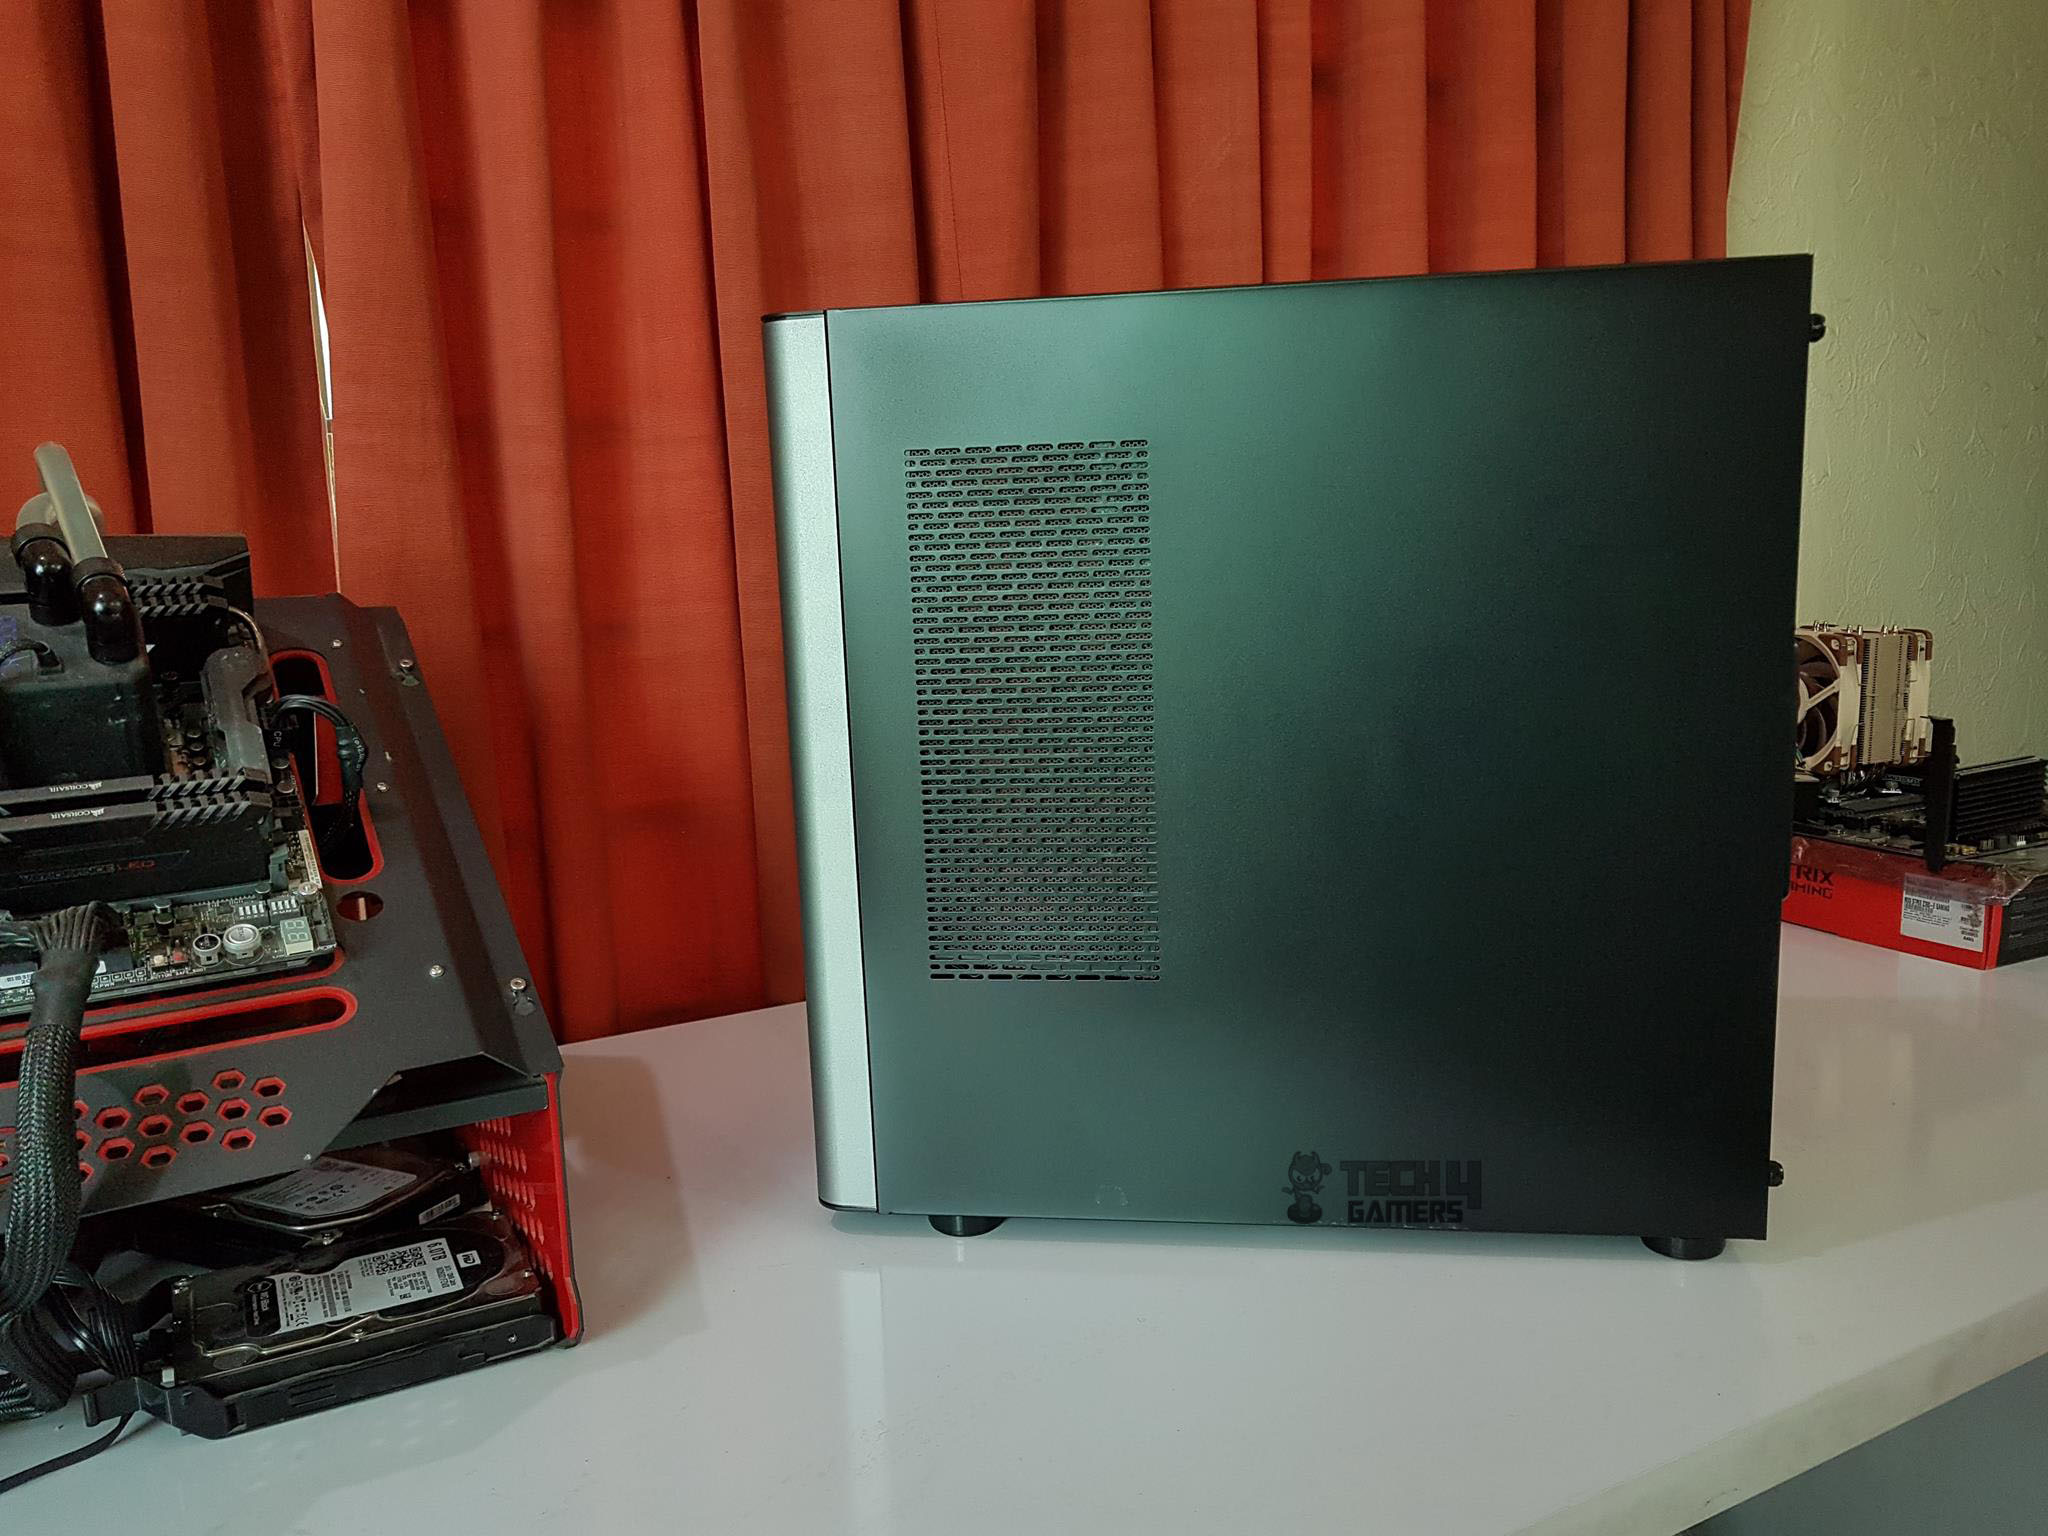
The right side panel is a solid body except that there is a vented portion on the left side. It has a magnetic dust filter from the inside. This is the area where the user can install up to 2x 120mm fans or 240mm radiator on the inside. This side can also be taken as air intake side.
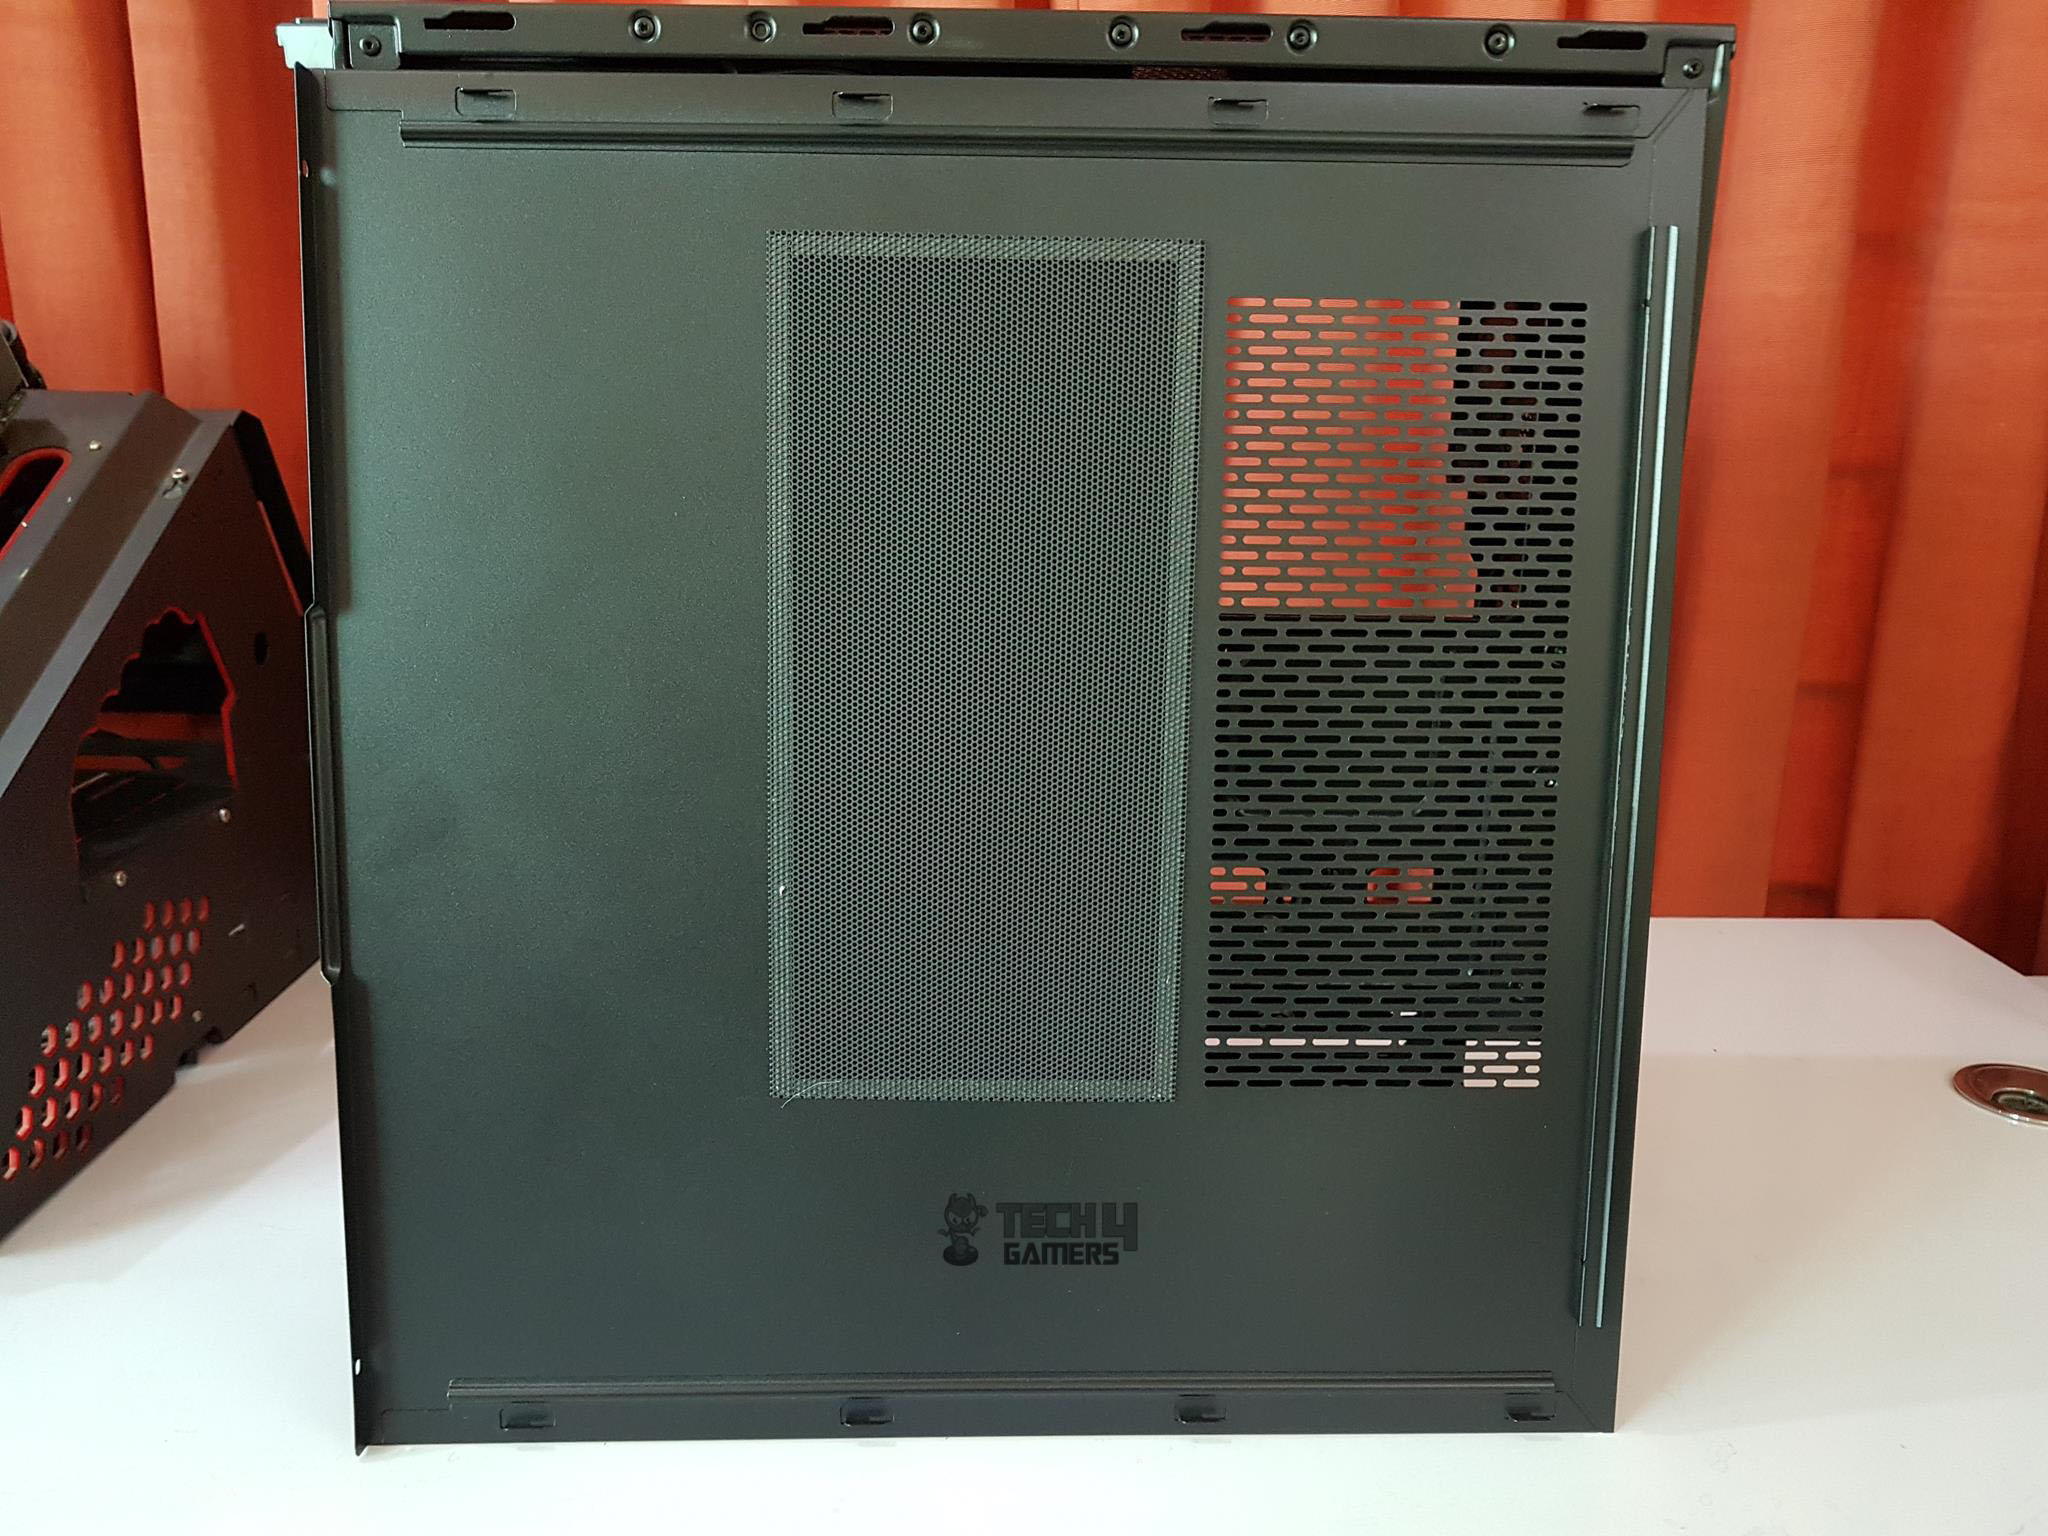
The above picture shows the inner side of the panel with a magnetic dust filter removed from the vented portion to show them both.
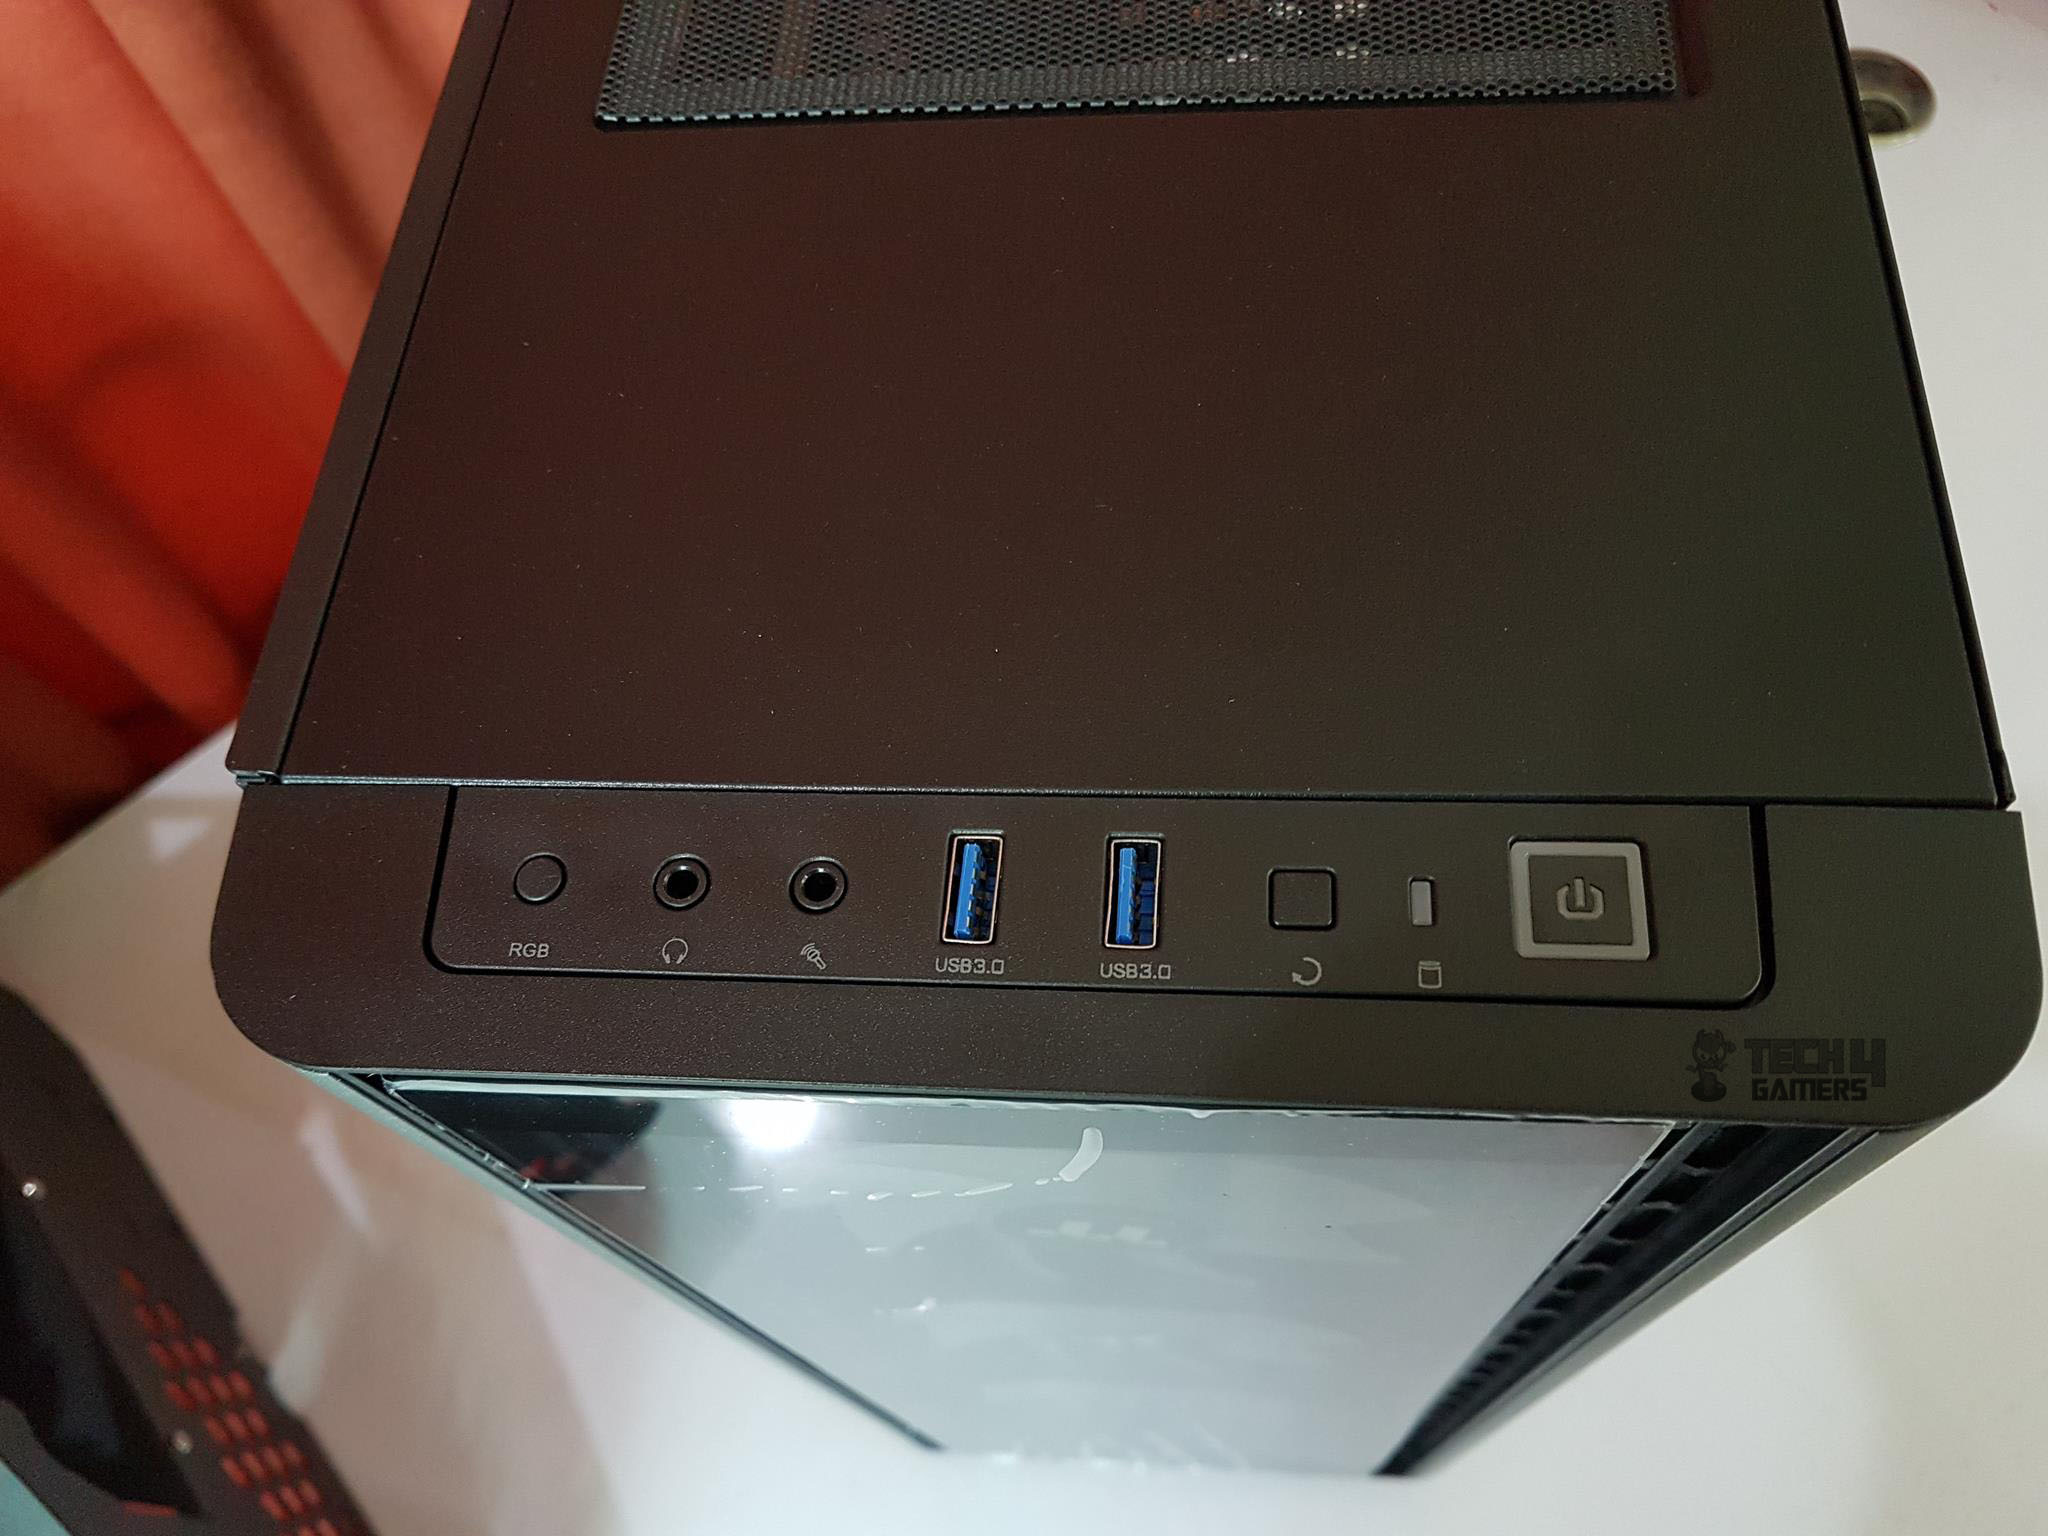
The top I/O panel includes:
RGB Switch
Headphone jack
Microphone jack
2x USB 3.0 ports
Reset button
LED Indicator
Power button
Now that we have discussed the exterior of the Thermaltake Level 20 MT ARGB, it is time to take a look at the interior and see what bells and whistles it has.
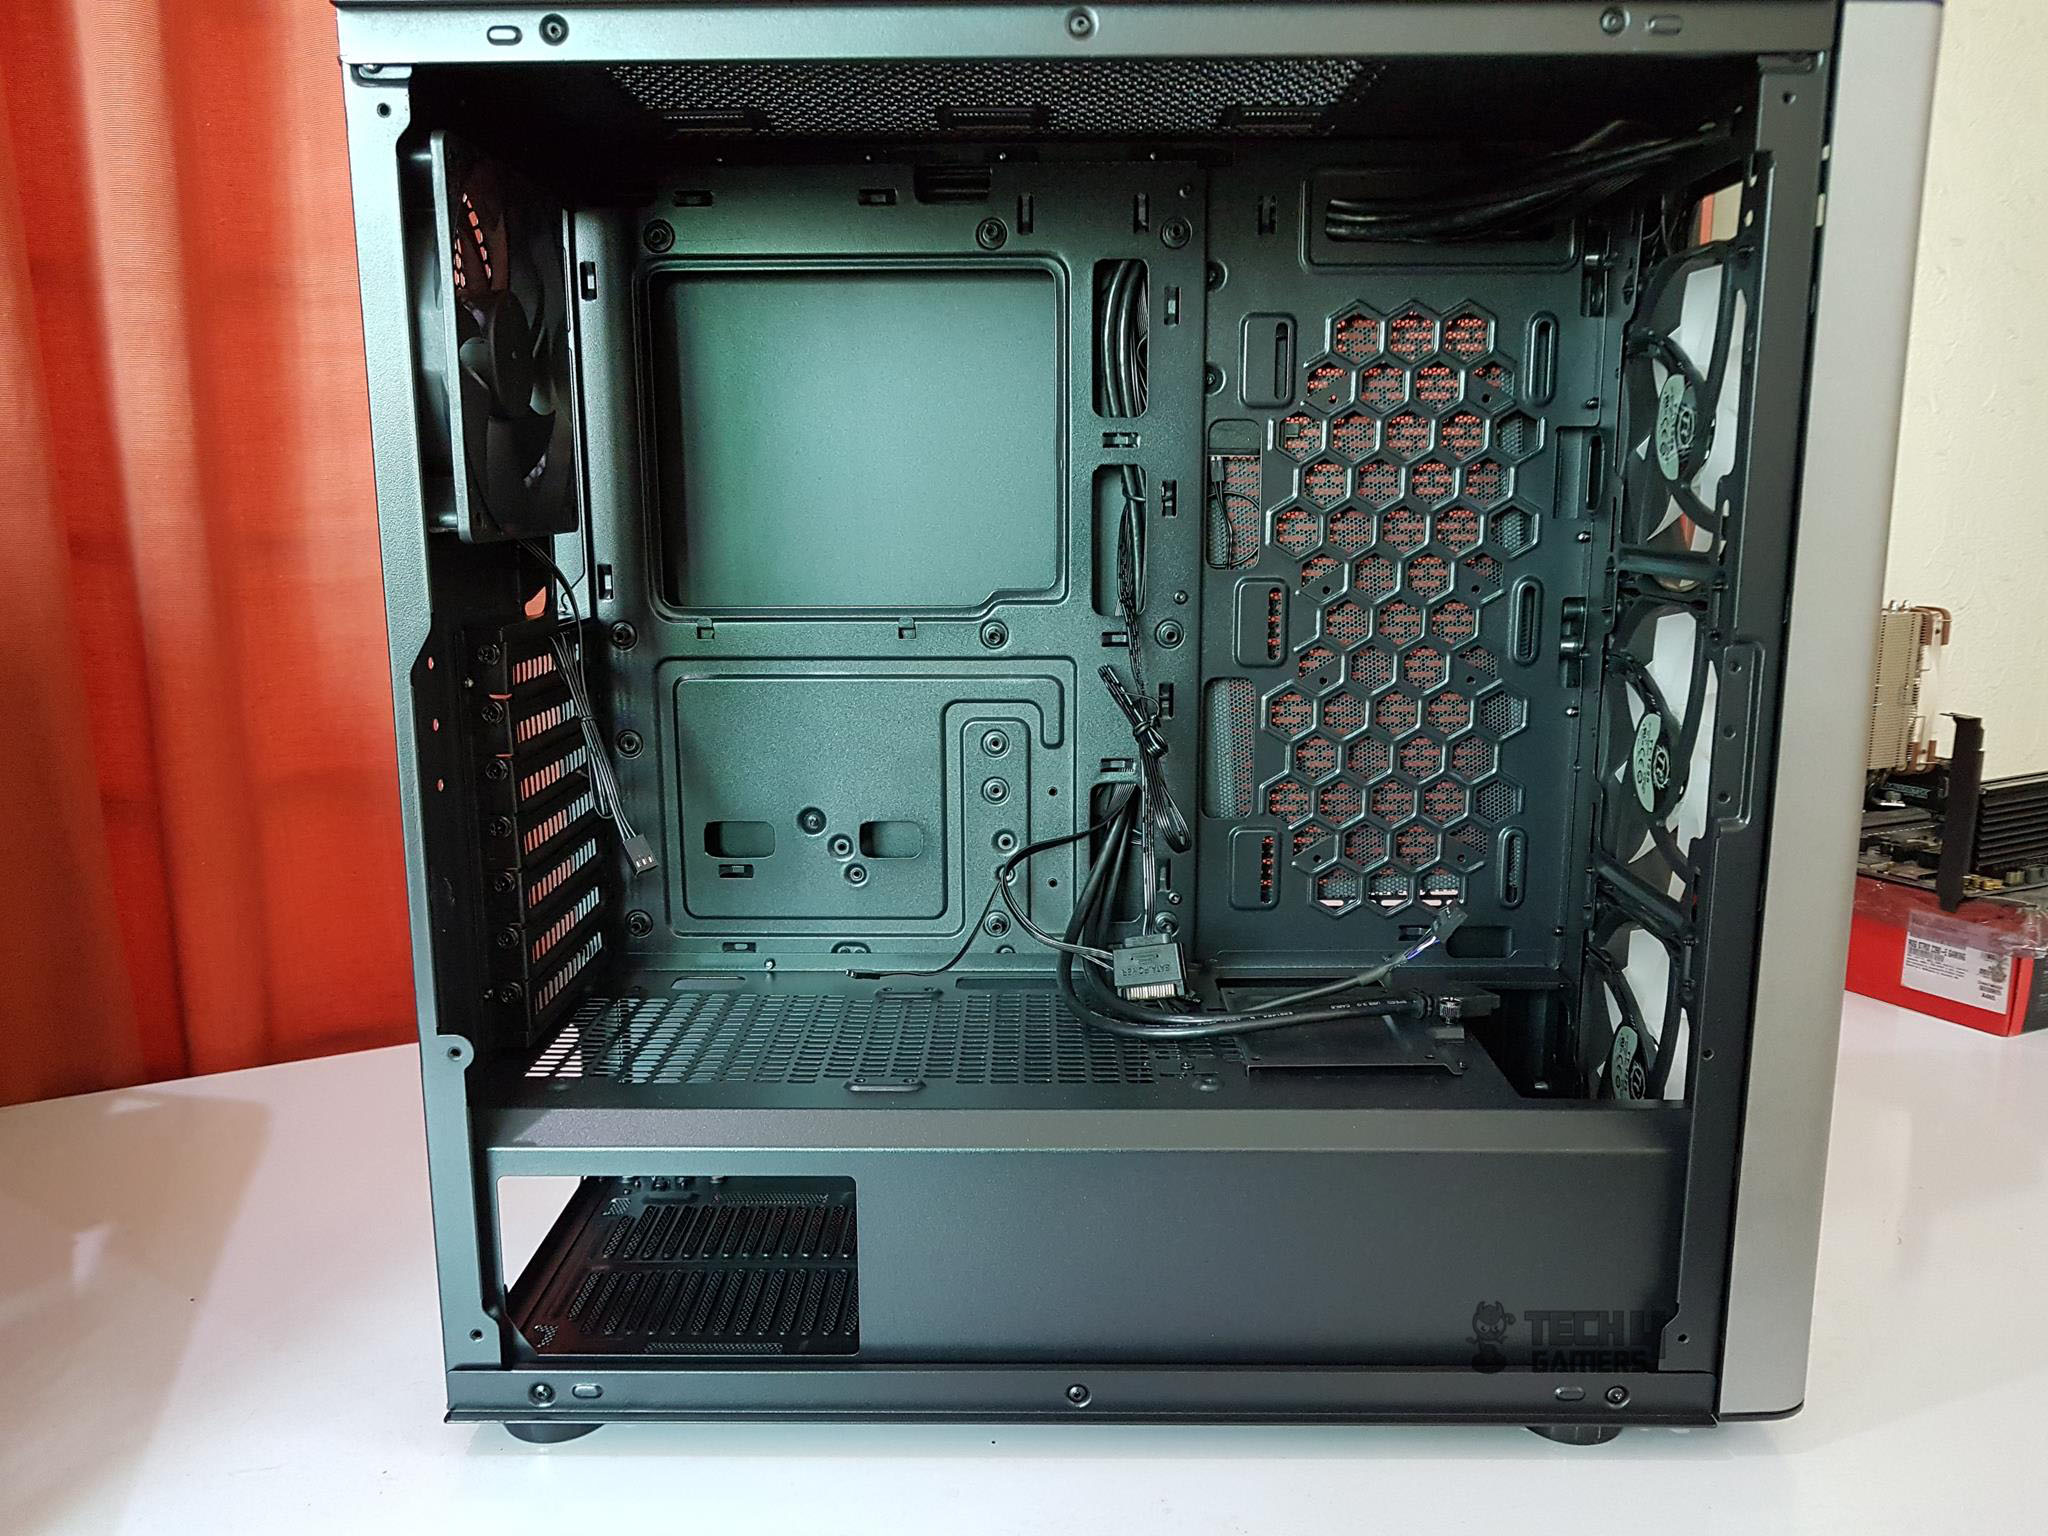
The above picture shows the inner side of the chassis in totality. This is a compact mid tower but space is judicially utilized except the top which has been remedied by giving the front side for housing the AIO. We have a solid motherboard tray with no flex. There is a large cutout on the motherboard tray for ease of CPU cooler installation. For cable passing, there are three cutouts on the right side of the tray as well as two more cutouts further to the three cutouts. All of these don’t have rubber grommets. There are two more cutouts on the top of the tray to pass EPS cable and other cables like fan’s power and LED cable. 9x standoff are pre-installed which is thankfully a right decision.
The Thermaltake Level 20 MT ARGB comes with one 120mm fan (non-RGB) at the rear making the total count of 4x preinstalled fans. The rear fan has 7 blades and has a 3-pin power cable which the user needs to plug into the power source like fan header on the motherboard or directly to the PSU. The user can install a 120mm radiator on the rear though it seems like only a slim rad would fit. Alternately, this fan can be connected the switchboard on the backside of the chassis as that has one 3-pin header on it, not in use.

The Thermaltake Level 20 MT ARGB has 7 PCIe slots with vented and reusable/removable slot covers. Surprisingly, they did not use the thumb screws on these slots.

There is a provision to install up to 2x 120/140mm size fans on the top side of the chassis. There is less than 28mm of displacement from the top side to the motherboard’s top. Say bye bye to installing any AIO up top. The only possible positions for the AIO are the vented side on the motherboard tray which can only house up to 240mm AIO or the front side which can house up to 360mm AIO but with restrictive air flow. The top side can only be used for the fans.

The above picture shows the vented side inside the chassis marked with the red color lining finished in honeycomb design. This is where the user can install up to 2x 120mm fans or 240mm radiator/AIO. This side has proper dust filter on its rear hence can be used as intake if using fans or exhaust if using radiator depending upon the user’s requirement and configuration.
There is a cutout on the top side of this vented area from where the system cables have been routed towards the rear side.
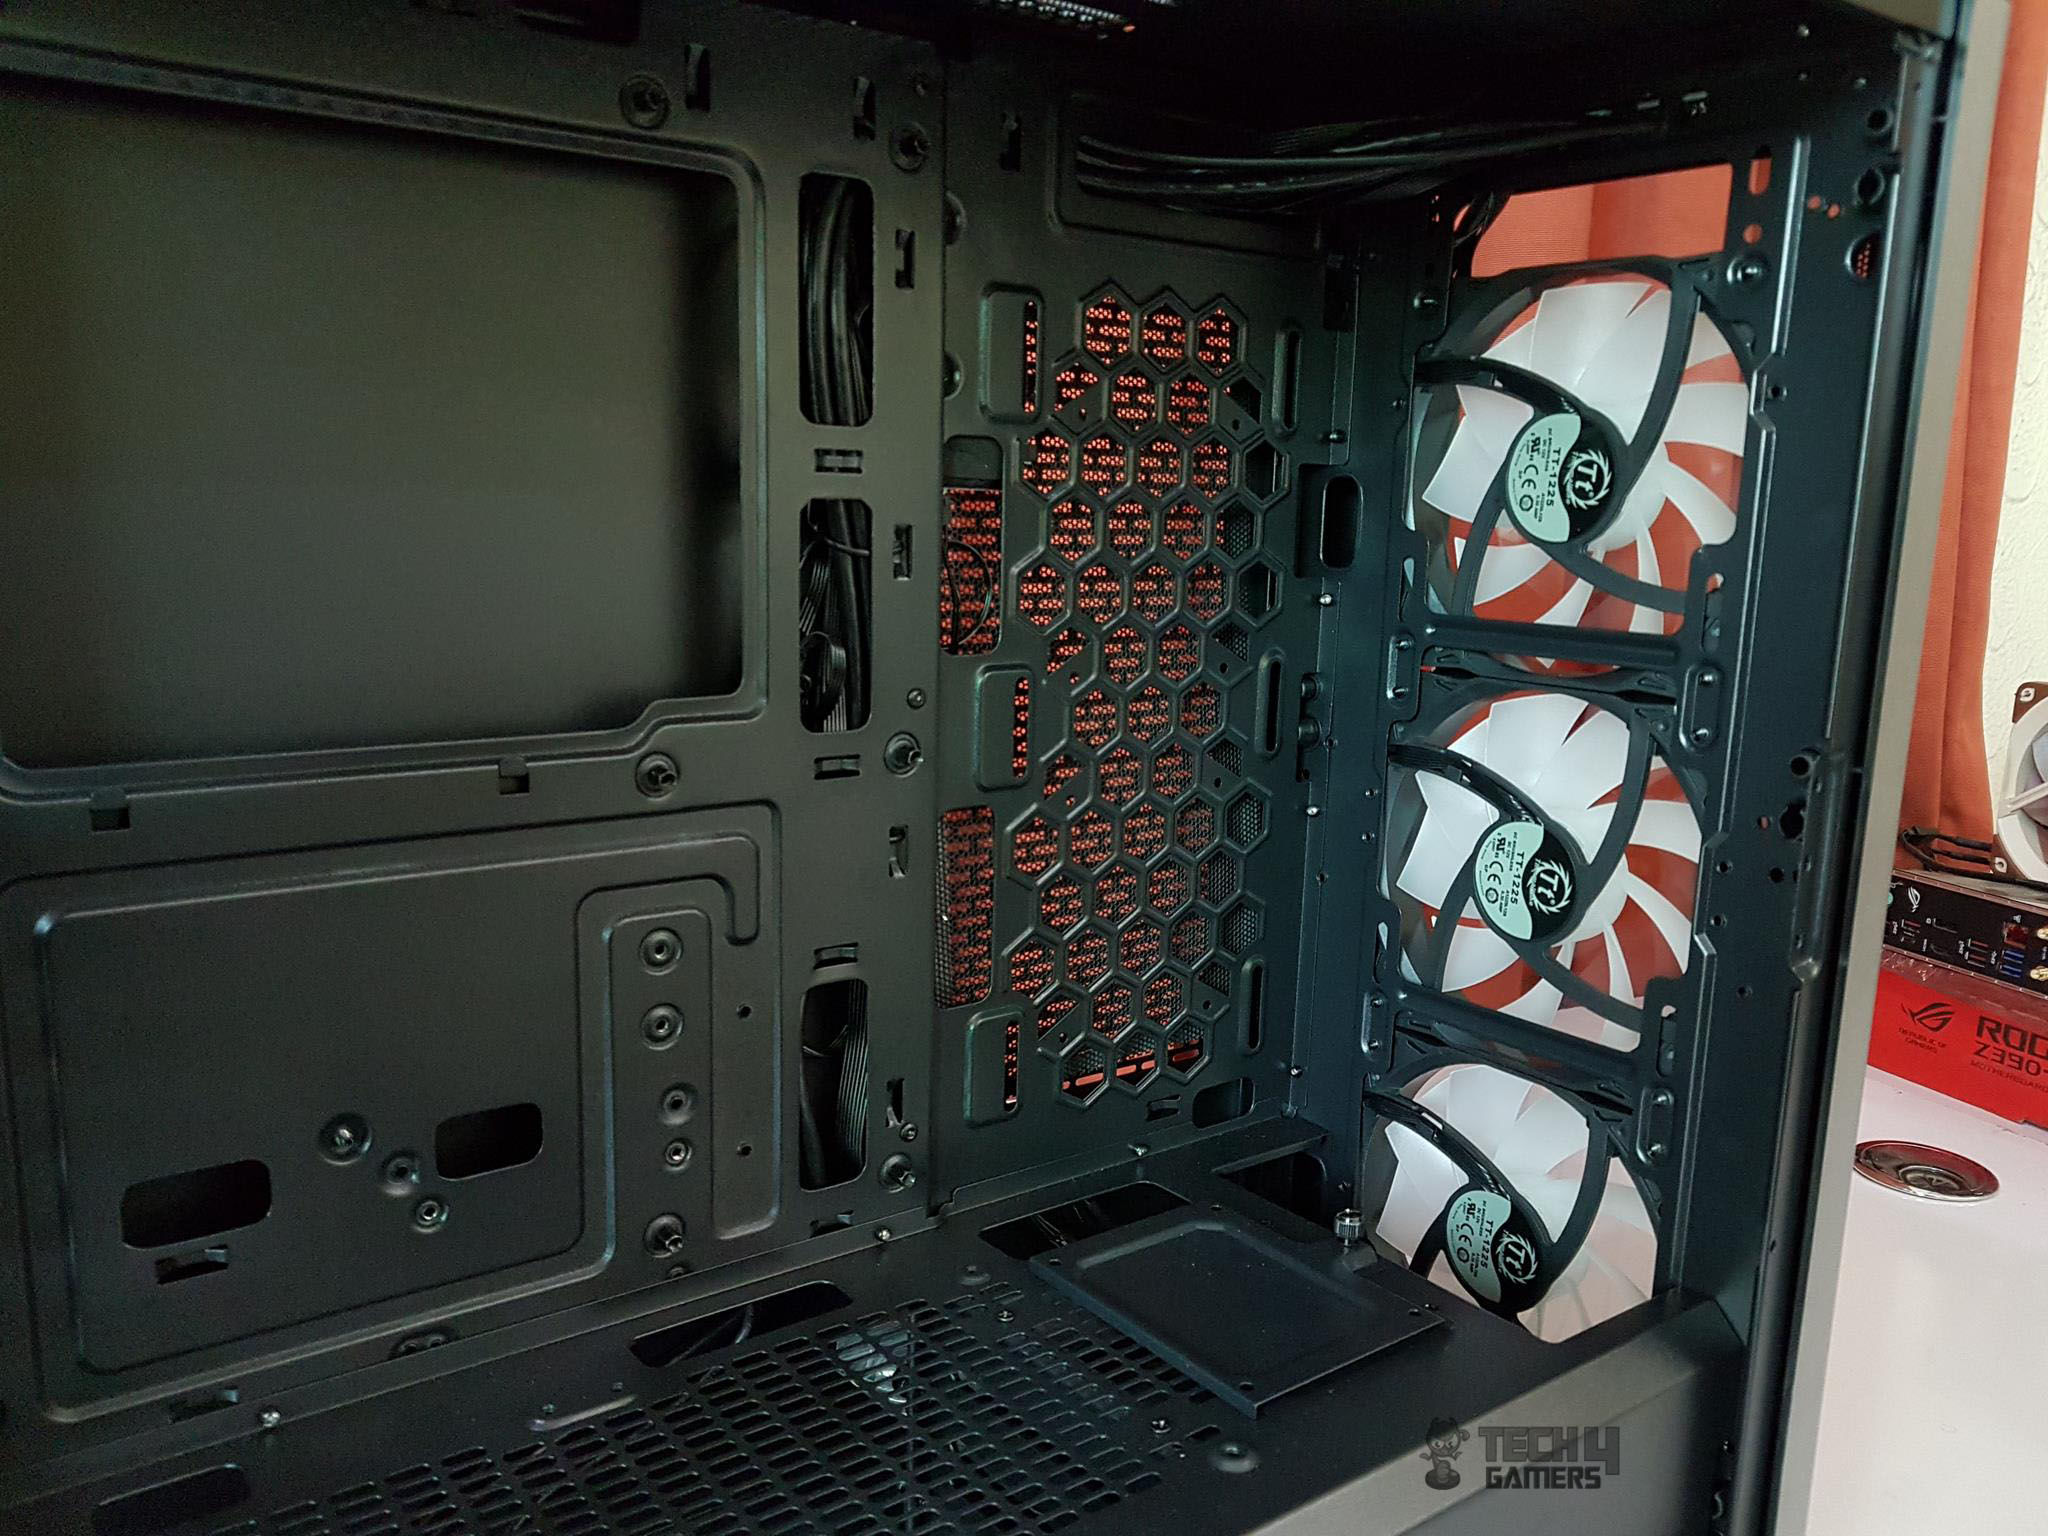
Taking a peek on the front side from inside of the chassis we can see the backside of the 3x 120mm ARGB fans. The fans’ height can be adjusted. There is a gap between the front rail and the PSU shroud which is not covered. This gap is approximately 57mm from tip to tip. This is the critical information if you are looking for what thickness of the radiators it can house.
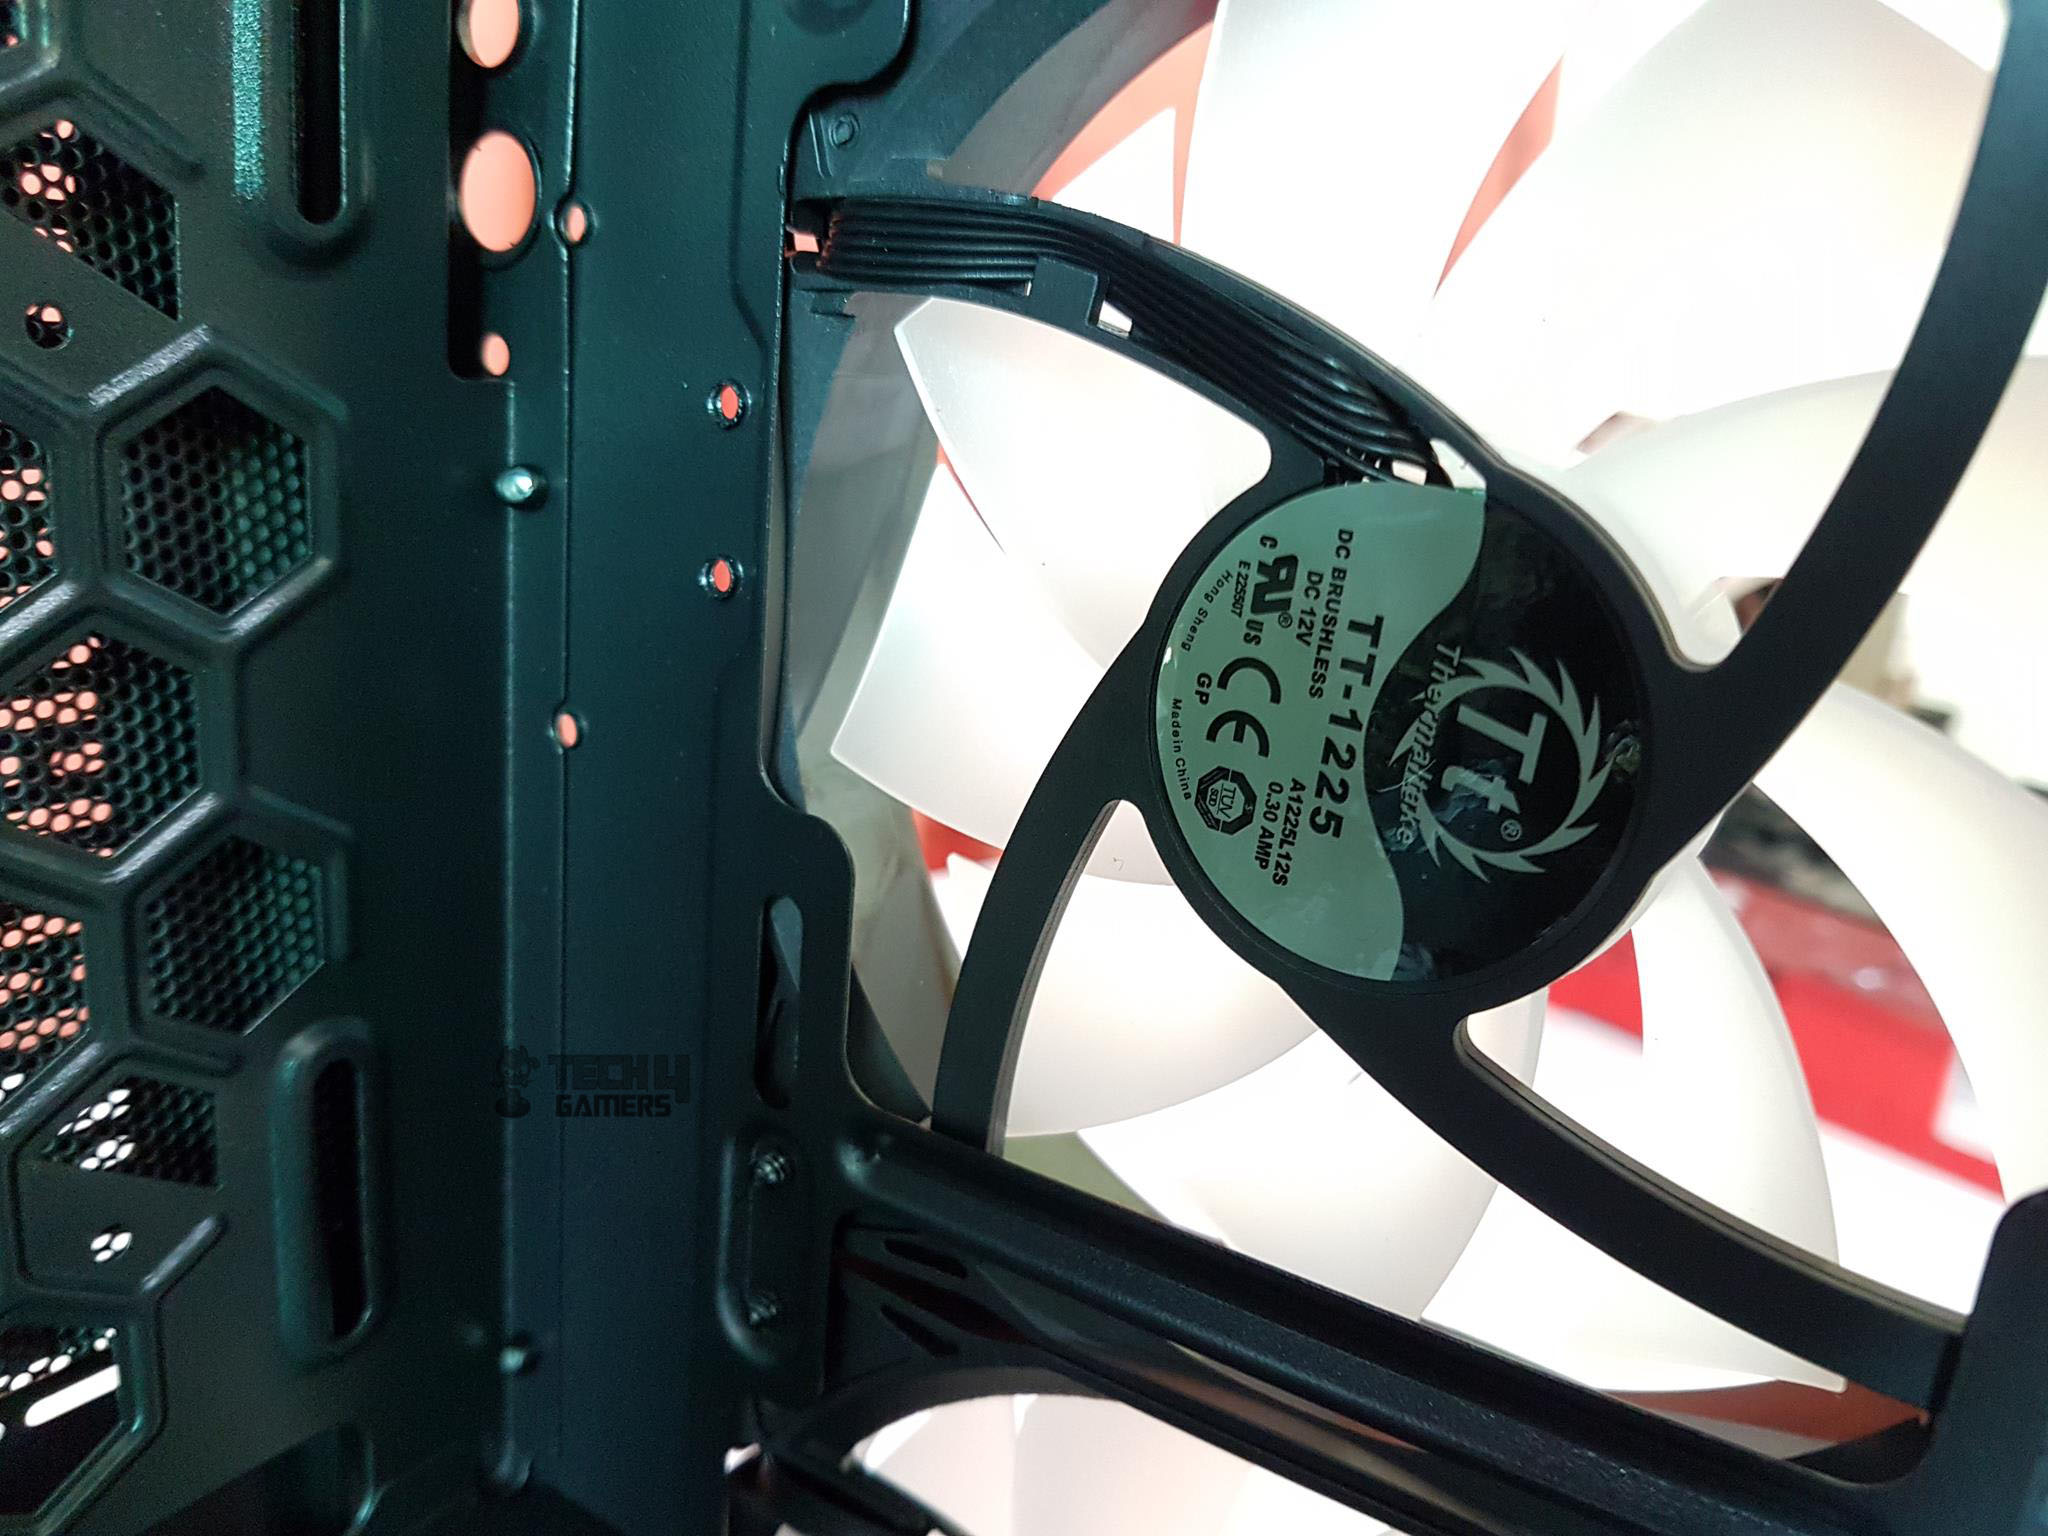
The above picture shows the info label on the front mounted fan. It is using DC Brushless motor at 12V using 0.30Amp.

The above picture shows the top side of the PSU shroud. We have a 2.5” drive bracket pre-installed on the right side of the shroud. This placement is a wise move given its location from the cable management perspective. The main section of the shroud is vented and looking closely one can spot mounting positions for 2x 120mm size fans. Now, this is an interesting perspective. Having two fans throwing air on the graphics card is definitely a good idea but the question remains at large where do these fans would draw the fresh air? The bottom side of the chassis is a closed design with the only vented area located on the PSU mount. This area will be blocked once the PSU will be installed leaving no room for these two fans (if installed) to draw fresh air. There are three cutouts on the shroud’s top located closer to the motherboard side which is really nice to have. None of these has rubber grommets. The 2.5” bracket is secured using a thumb screw and can be easily taken out.
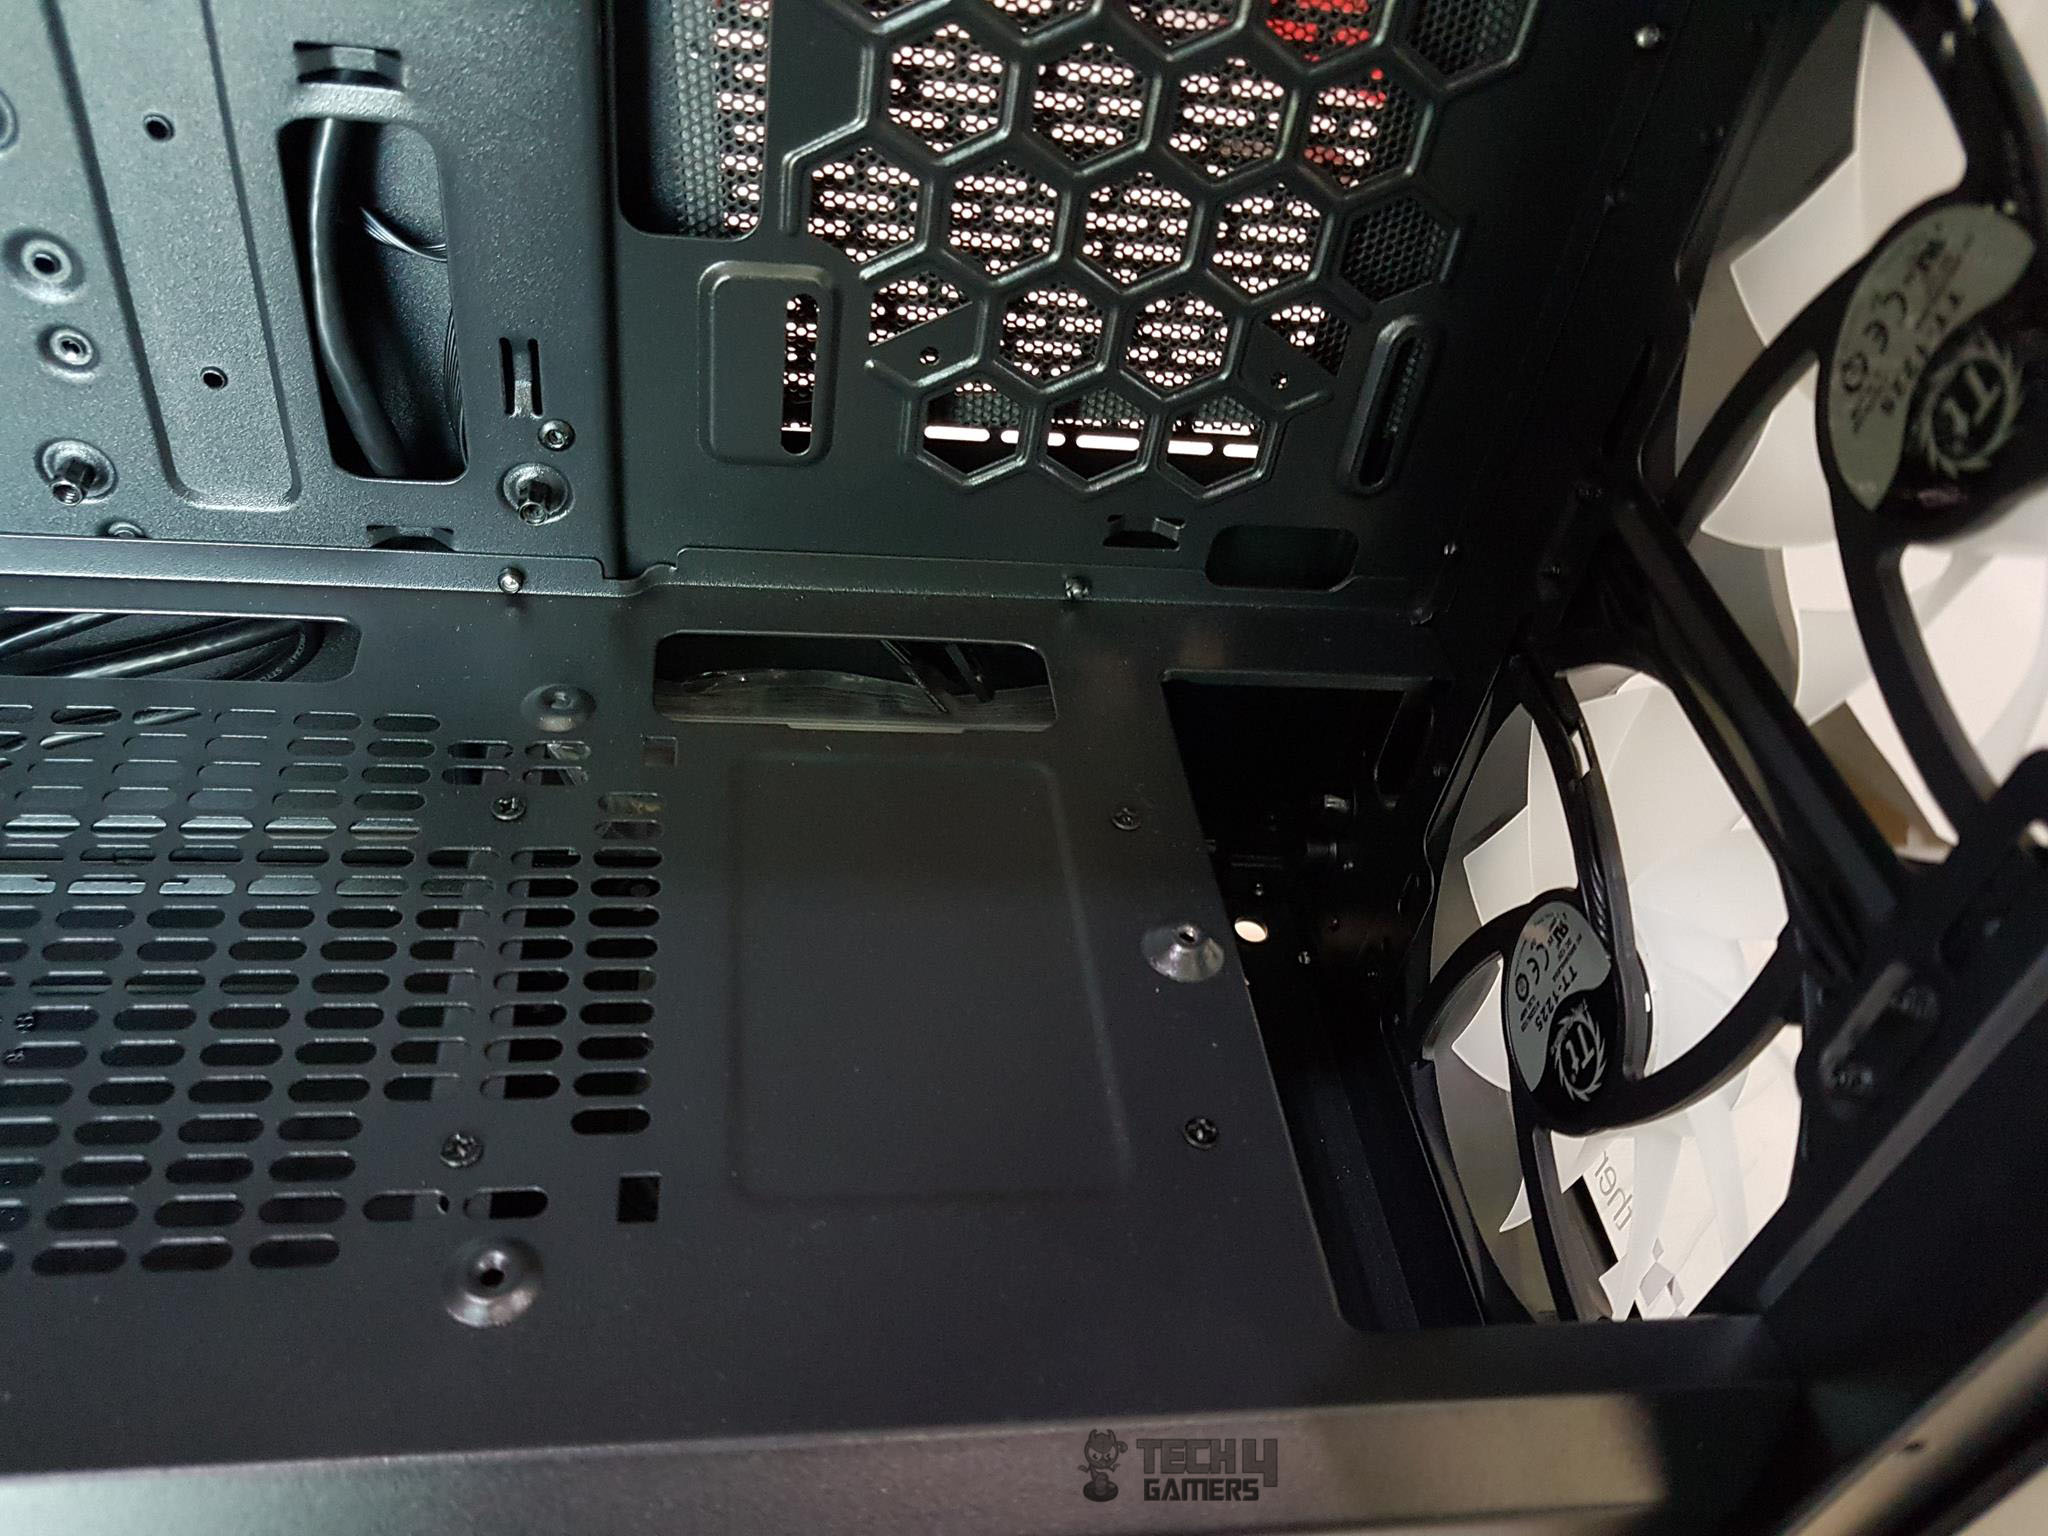
The above picture shows the 4x screws with flat heads on the shroud’s top side. These 4 are to be removed in addition to the bottom mounted 4x screws if the drive cage is to be removed.
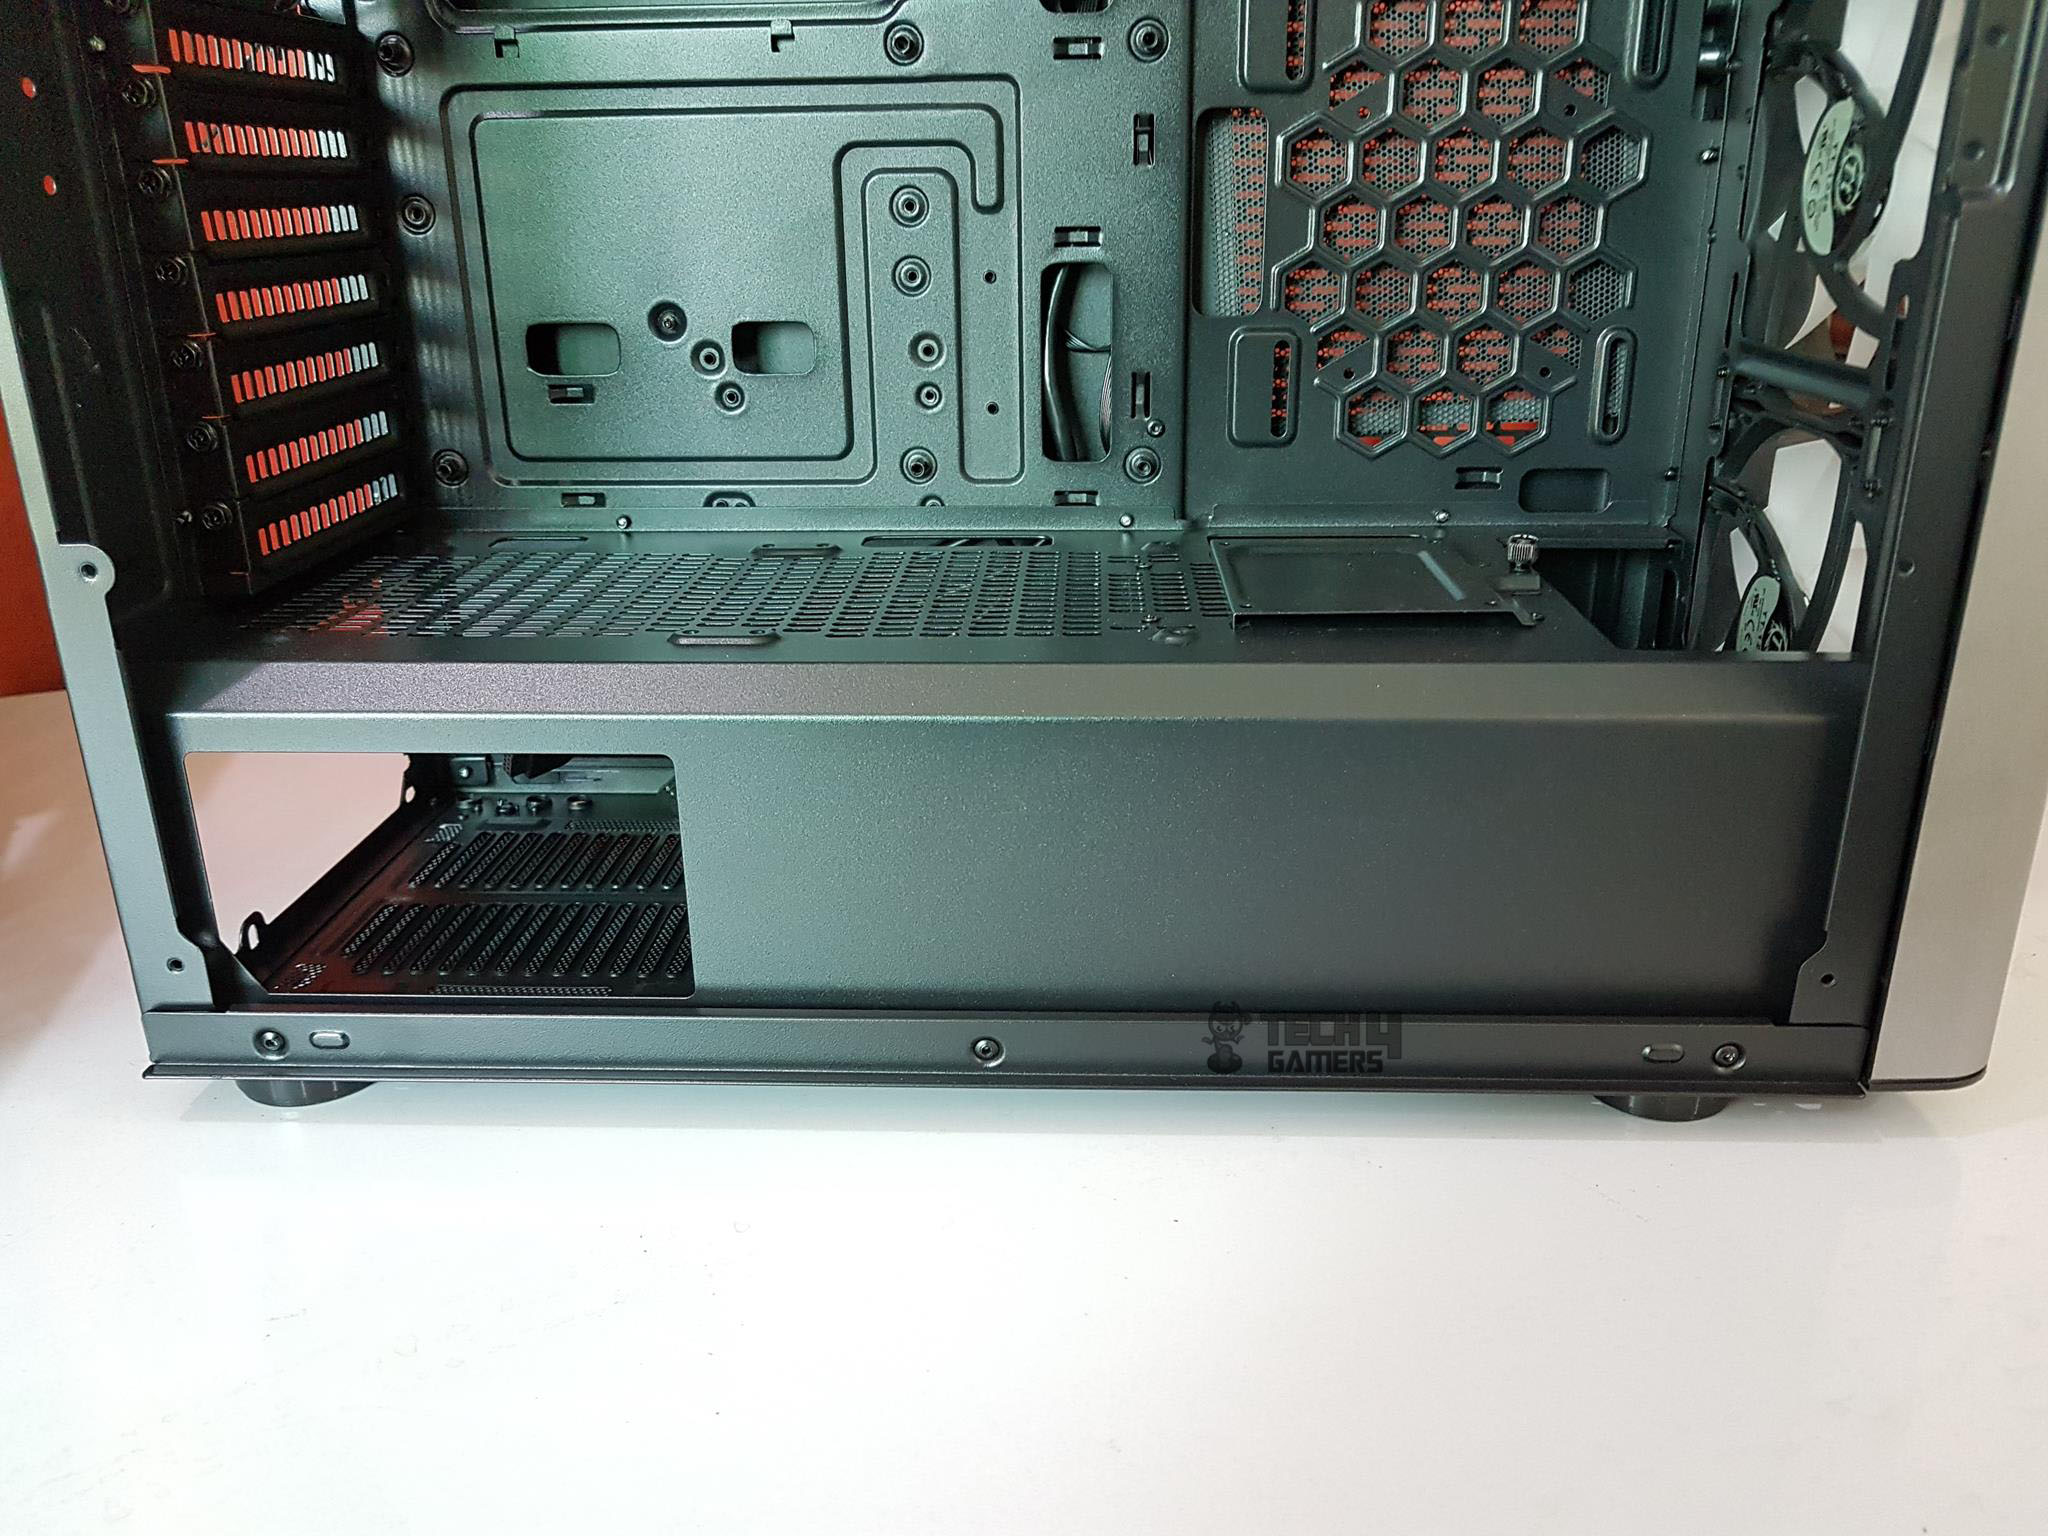
The above picture shows the PSU shroud from its side. We can spot a large size cutout on the left side to showcase the PSU branding. The overall look and feel of the design from this very angle give a resemblance to the Fractal Design R series cases. As can be seen, the shroud runs to the entire length of the chassis.
Let’s take a look at the chassis from the backside with the panel removed.
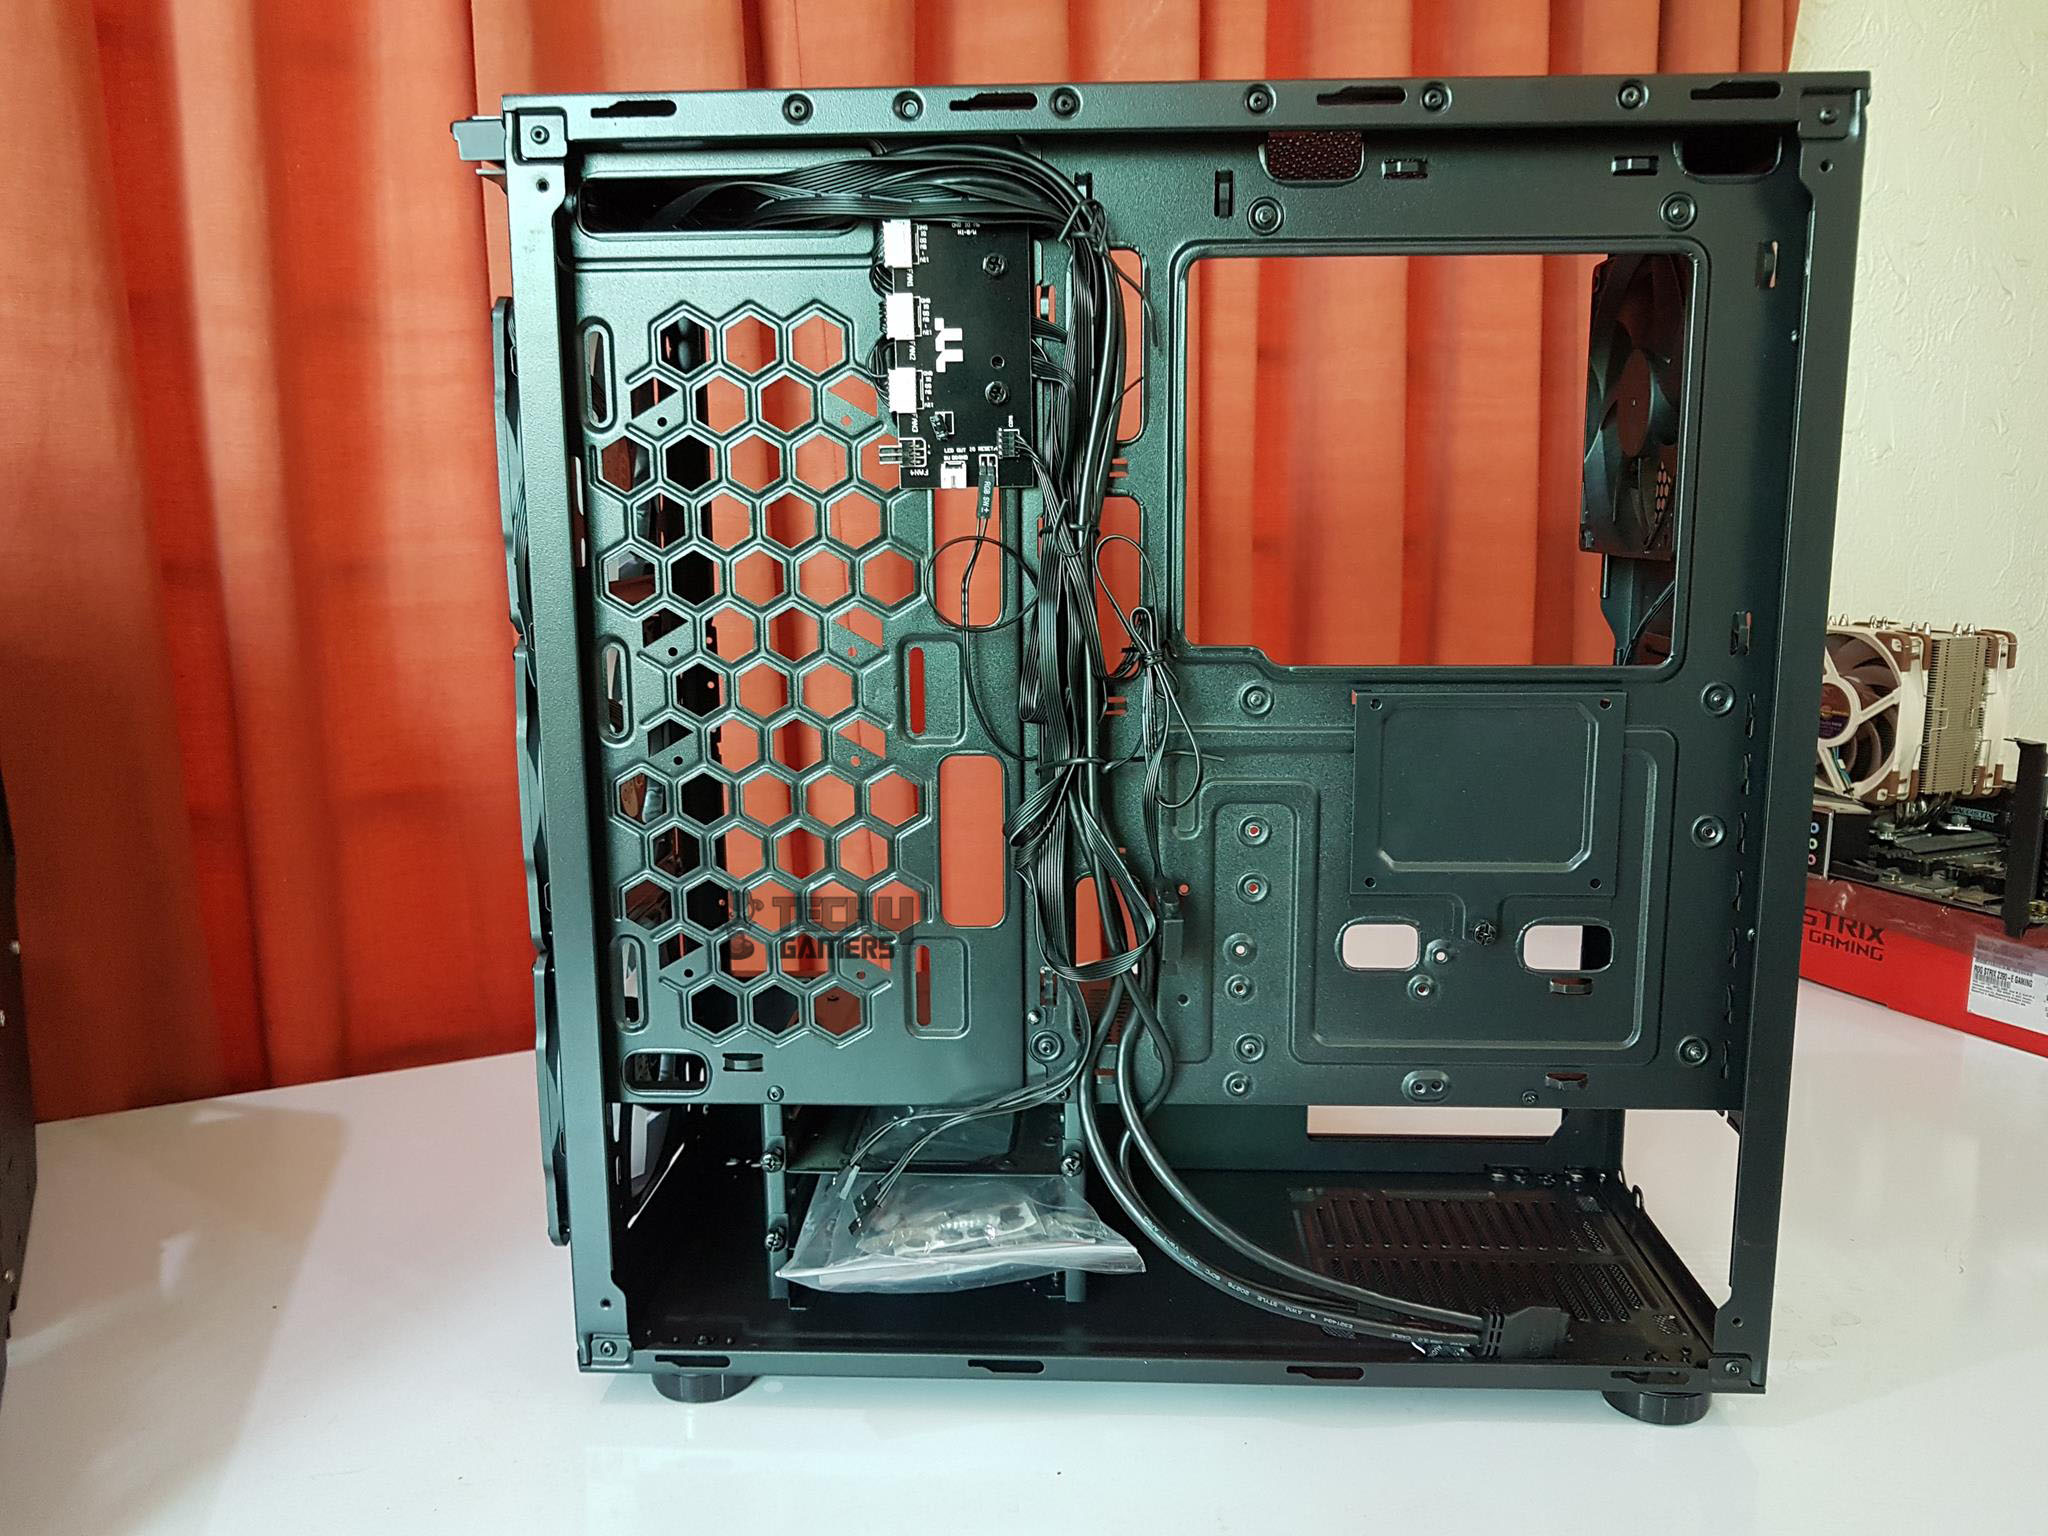
There is a total of 16 cable tie points. There is another 2.5” drive bracket right below the CPU cutout hole behind the motherboard tray. The RGB switchboard is installed on the left side behind the vented side. Looking closely you will see that it is covering a certain portion of the top cutout from which the 24-pin ATX cable is supposed to be routed through. Again, we are seeing a design overlook. One option is to remove the board and pass the cable followed by installing the board again but that sounds cumbersome and inconvenient from the user’s perspective. All the cables are managed on the center lining of the chassis. There is another drawback here as the total workspace for cable management is less than that of approximately 12mm or so depending upon the location. Be careful if you are routing the cables such as they are bundled in a group on the center which actually looks pleasing but in this case, you will find a hard time closing the side panel. There is no inset in the panel hence zero support is coming from the panel itself to hold some cables bulk in it. To showcase this point, I did cable management exactly the way that would obstruct the panel. You can see that later in the section.
Let’s take a look at the bottom chamber.

The bottom chamber has a length of approximately 420mm. the spacing between the drive cage and the right side is approximately 240mm. Installing the 170mm length PSU would leave 70mm or so spacing for the PSU cables which is not enough.
The PSU mount does not have anti-vibration rubber pads on the tabs that are supposed to hold the PSU. I am wondering how much cost would Thermaltake have saved in doing that! The PSU is slided in from the side and secured using 4x screws from the rear side.
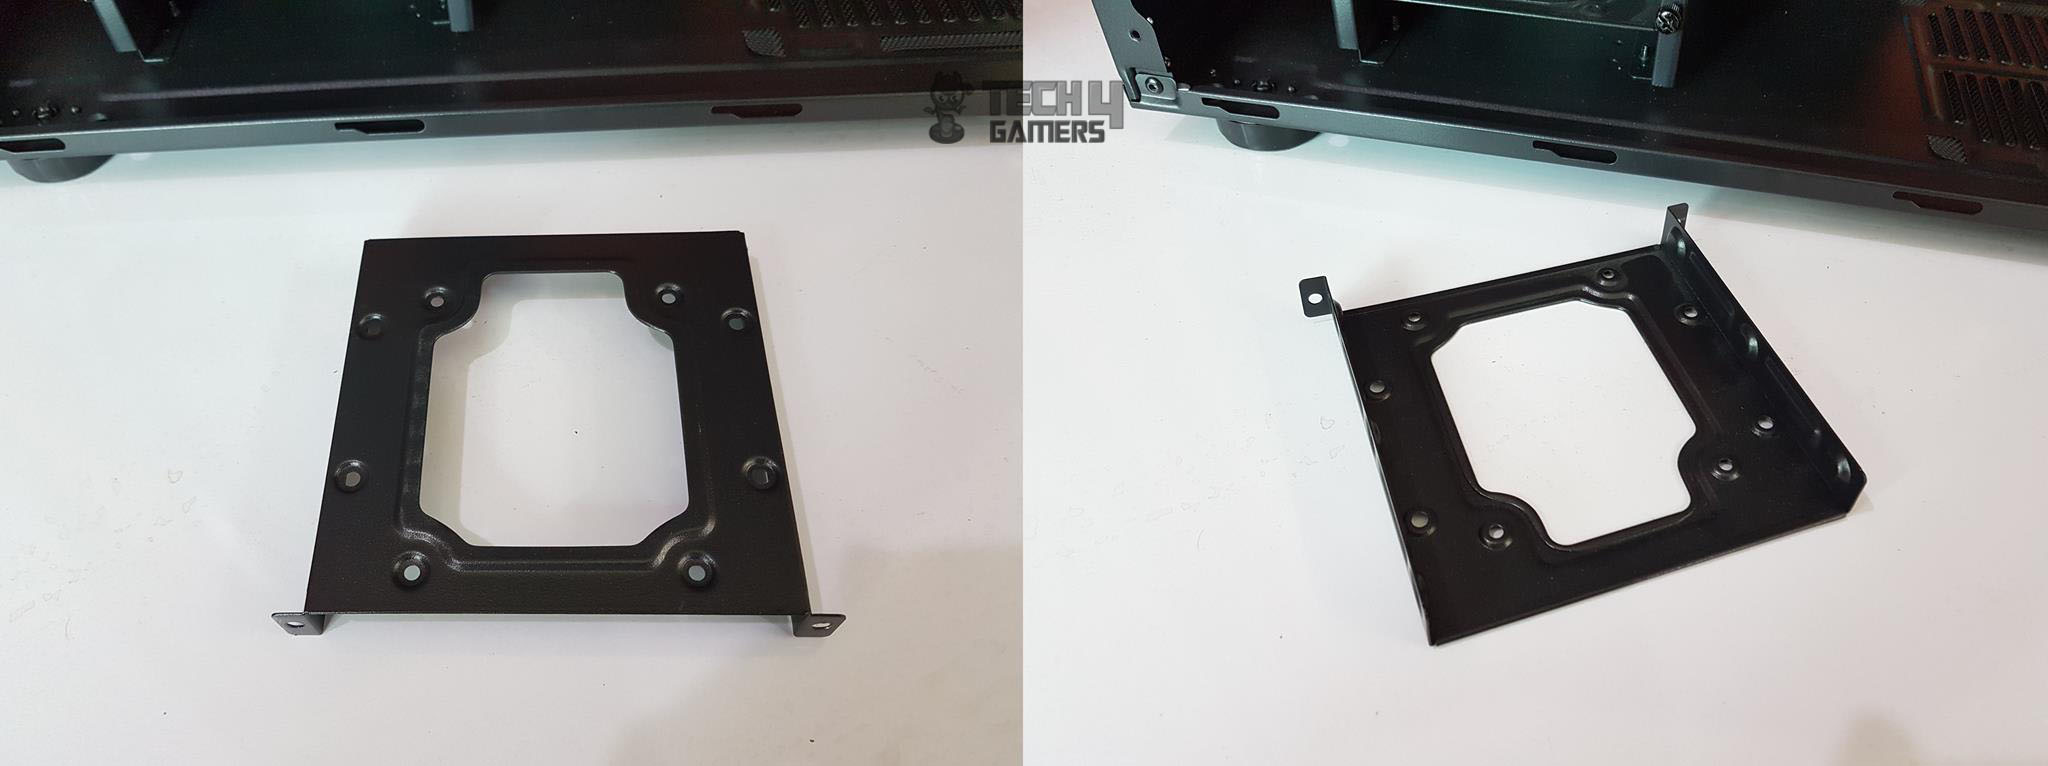
As mentioned above that the drive cage is not tool-less. There are two steel caddies without any anti-vibration padding. Each is secured to the frame of the cage using two thumb screws. Each caddy can hold up to 1x 2.5” or 3.5” drive.
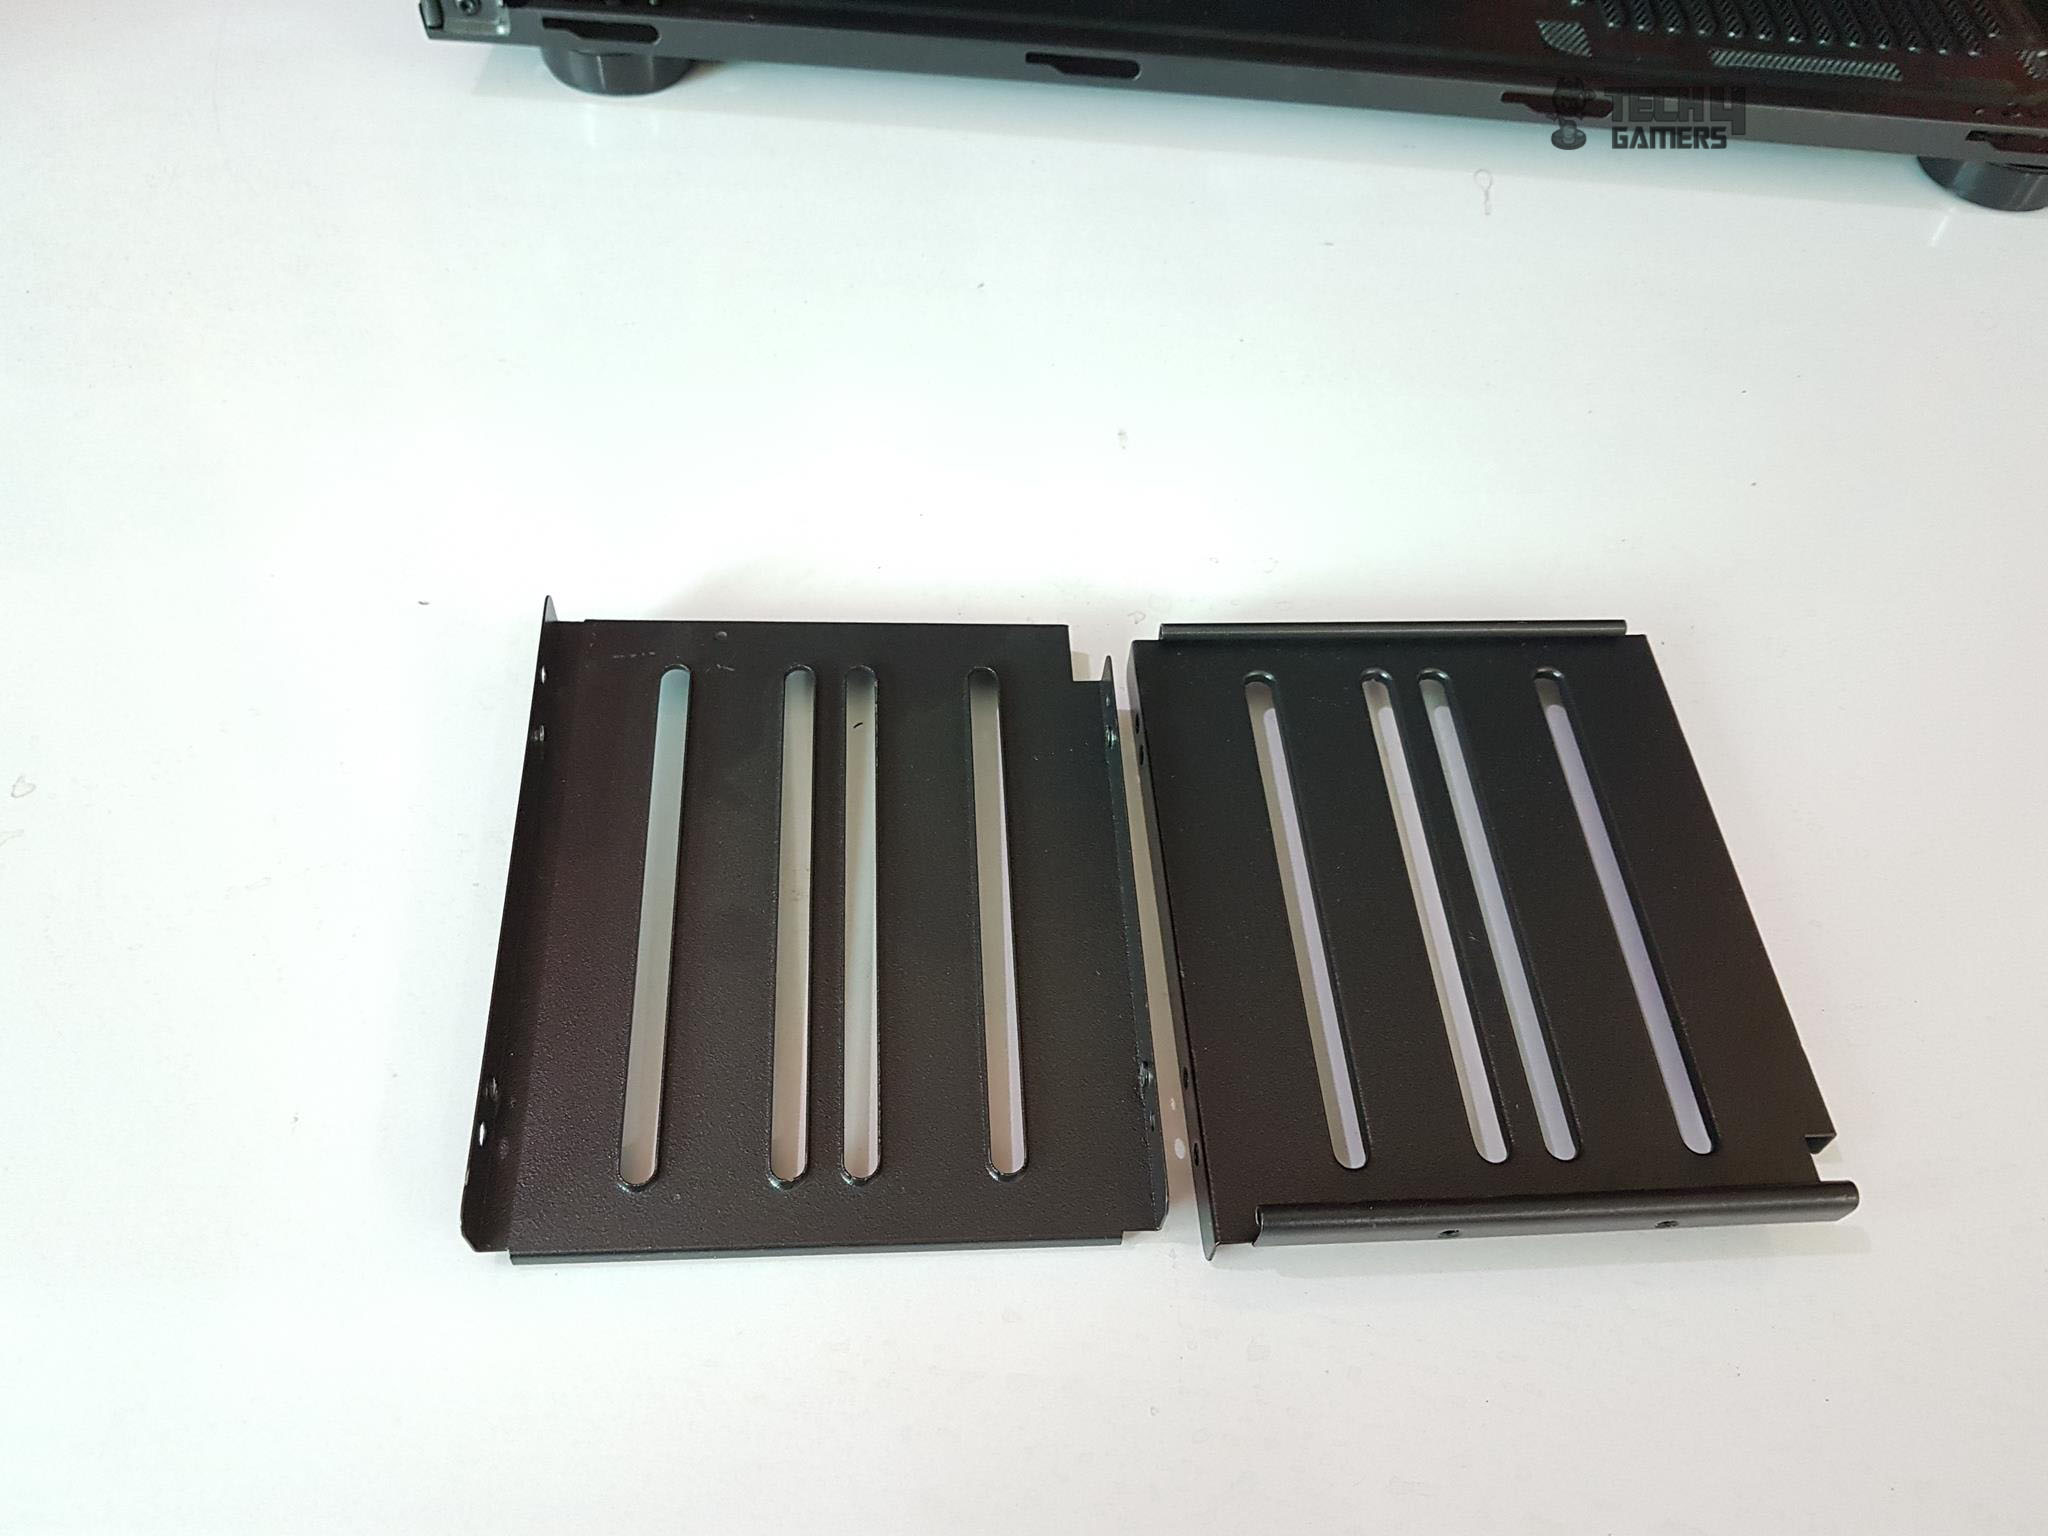
The drive cage consists of two brackets that are installed in parallel to each other vertically using 4x screws per bracket. I have covered those screws locations above. This design element reminds me of the similar system in the Phanteks Evolv ATX though the finish quality of the Evolv is too good plus its caddies are tool-less.
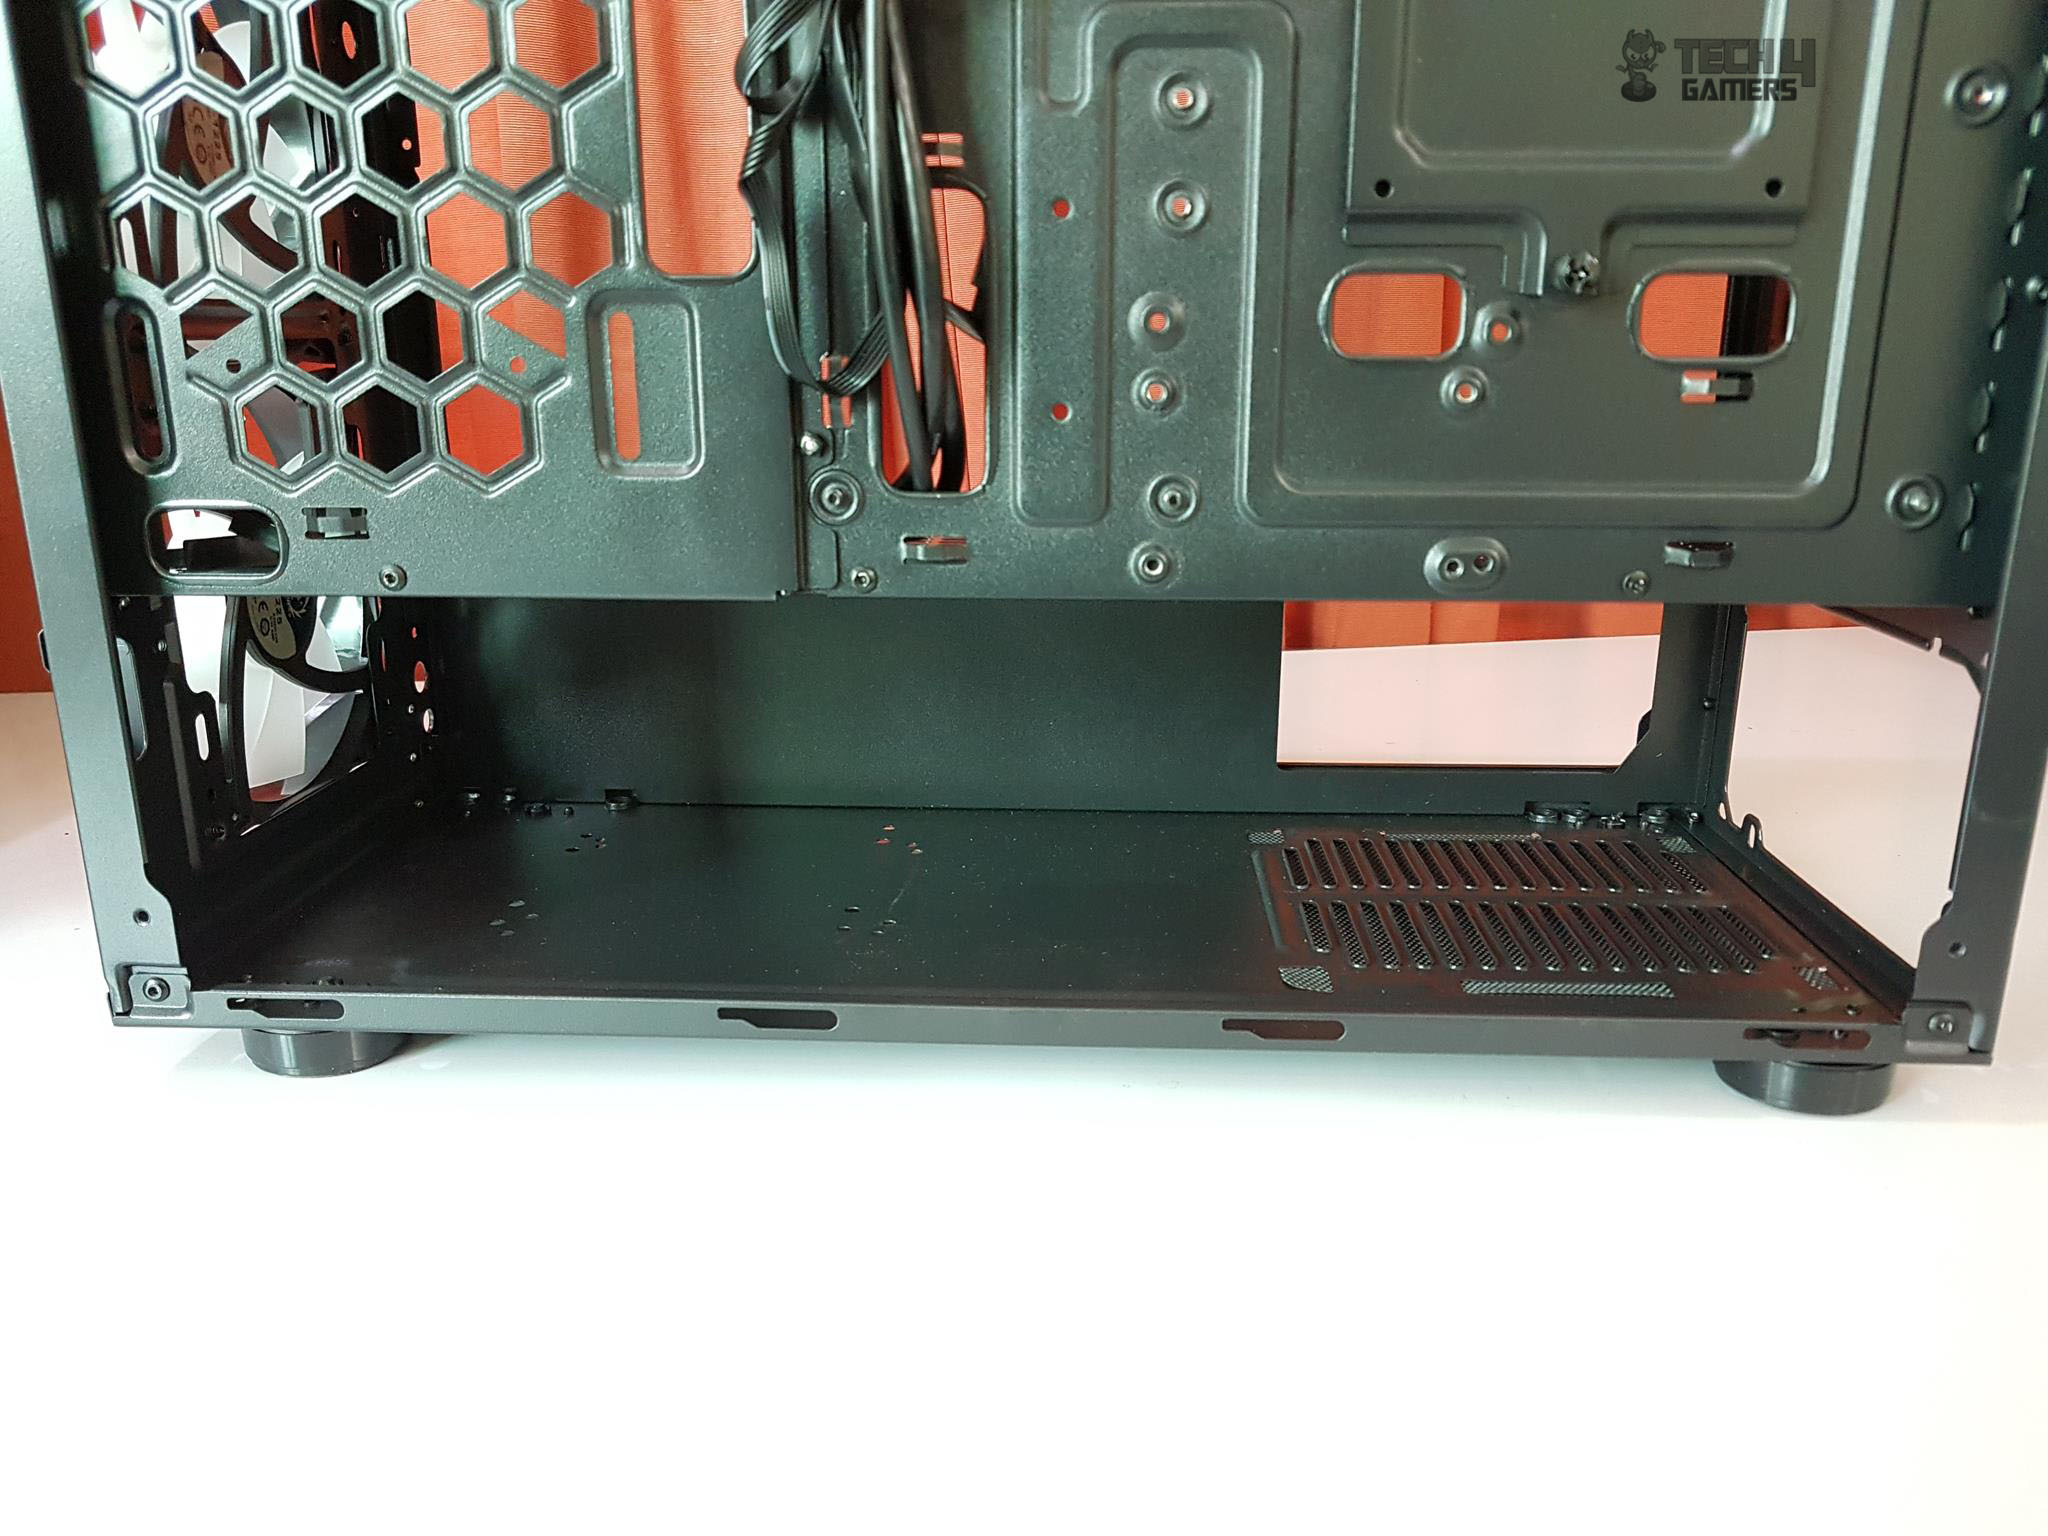
The above picture shows the bottom chamber with drive cage removed.
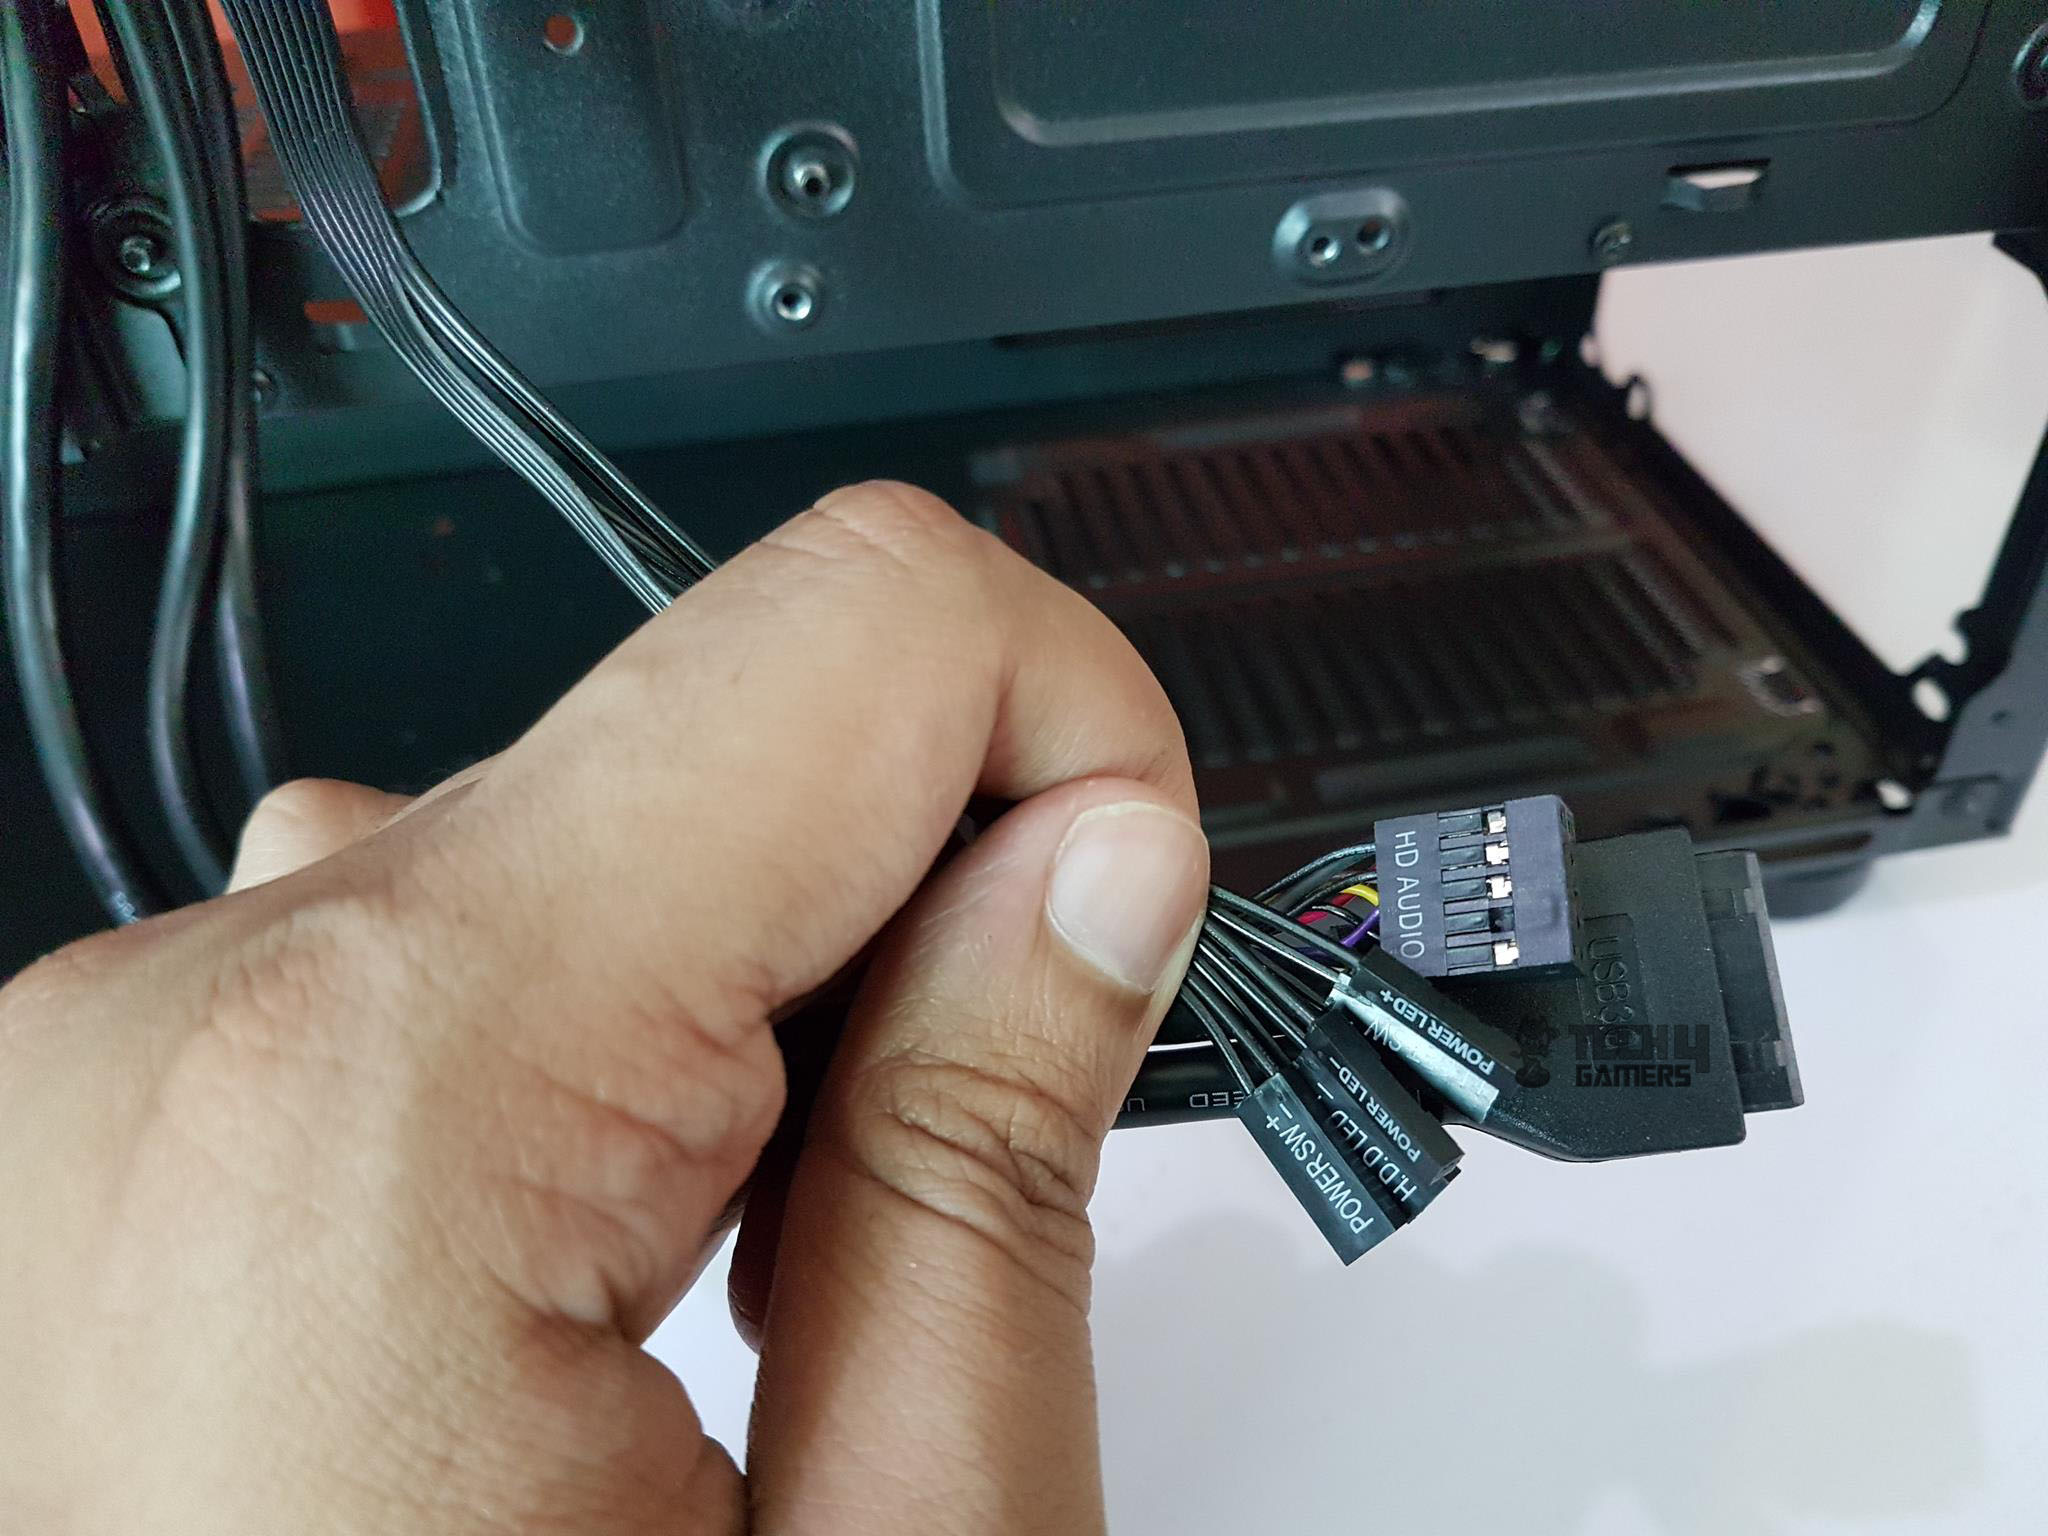
The above picture shows the system panel cables’ connectors.
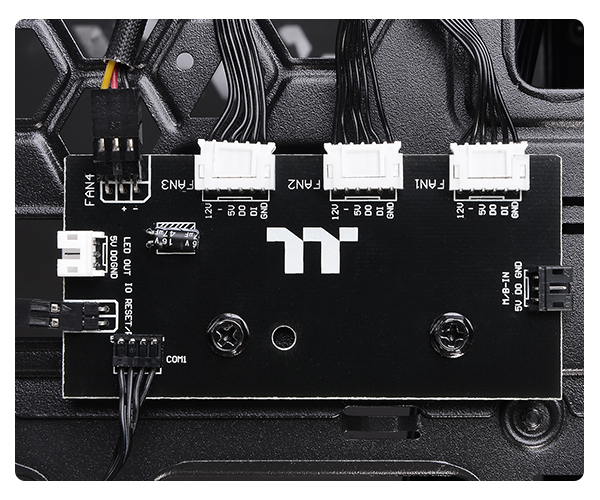
This is yet again another chassis from the Thermaltake with the RGB fans coming with proprietary cables and switchboard rendering the fans unusable without the controller. The 5V switchboard has black color PCB with three 6-pin connectors. Each connector has fan power and LED power cable combined into a single unit. There is also a 3-pin fan header to which the rear fan’s power cable can be connected as our sample does not have the rear fan connected to this header. This board uses SATA connector to take power. There is a white color connector at the bottom labeled as LED out.
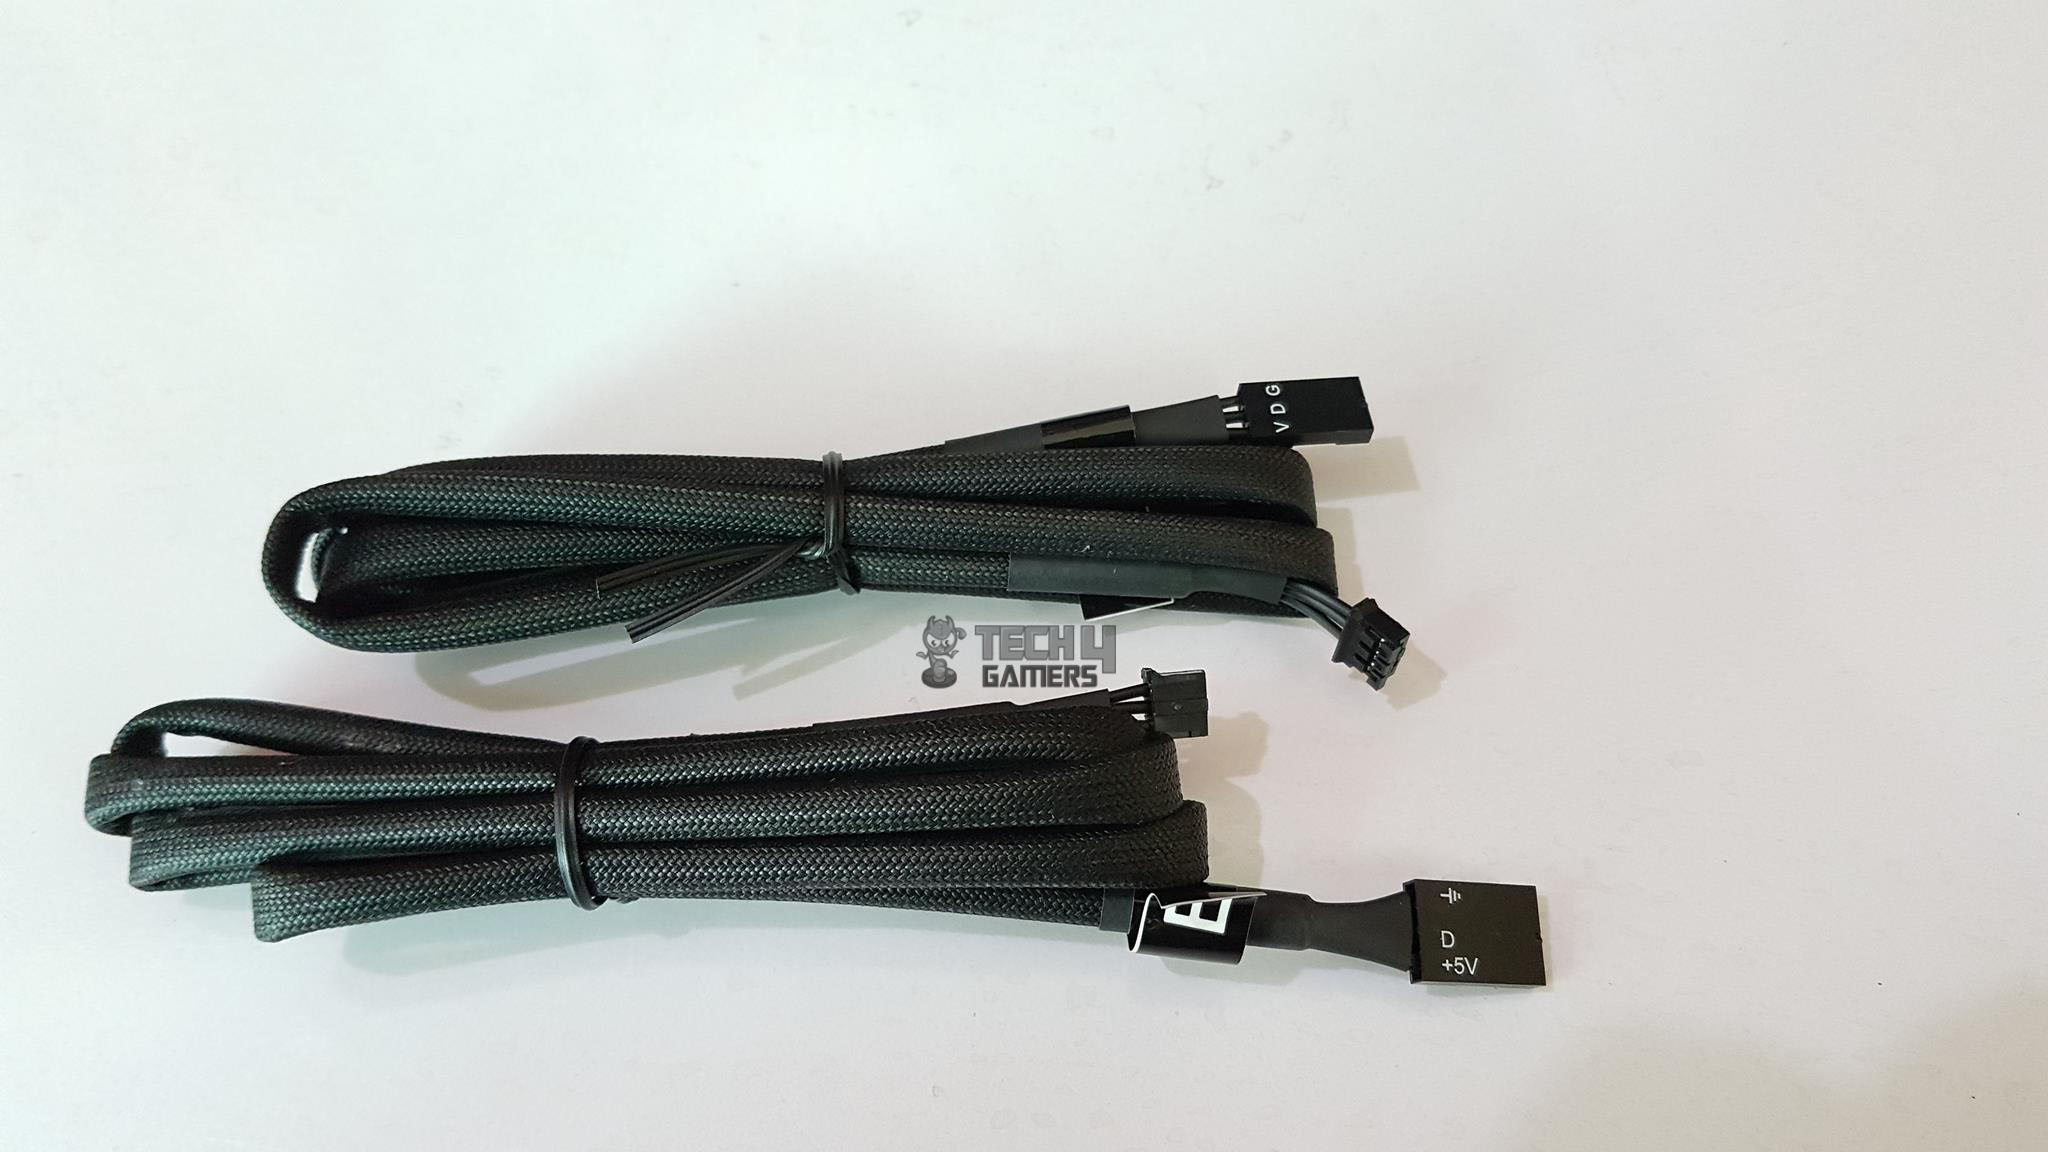
This is where the either of two bundled ARGB sync cables is to be connected while the cable’s other end will be connected to the motherboard’s 5V lighting header like AURA Sync header on the Asus motherboard. Since the Gigabyte motherboards use 4-pin style interface, Thermaltake has bundled 4-pin lighting sync cable as well. The lighting solution is compatible with Asus AURA Sync, ASRock Polychrome, Gigabyte RGB Fusion, and MSI Mystic Light Sync. To convert the control to the motherboard, press and hold the RGB switch on the top I/O panel for a few seconds after connecting the lighting sync cable.
Thermaltake Level 20 MT Motherboard Sync ARGB ATX Mid Tower Gaming Computer Case


Hi,
ReplyDeleteThanks for sharing such a great article.The Best and High Performance PC Gaming Cases , Computer Case for PC Builders and Gamers. PC Desk Cases, Gaming Cases.We offer the best quality Computer Gaming Cases, water-cooling, RGB gaming cases.at best price.
Looking for Advanced Thermaltake H550 Gaming Case in Uae, Thermaltake TG ARGB Gaming Case in Uae, Black Gaming Case in Uae
ReplyDeletehttps://pcdubai.com/product/thermaltake-h550-tg-argb-gaming-case-black-ca-1p4-00m1wn-00/
Thermaltake Riing Trio Fan in UAE, 12 LED RGB Radiator Fan in UAE, TT Premium Edition Fan in UAE
ReplyDeletehttps://pcdubai.com/product/thermaltake-riing-trio-12-led-rgb-radiator-fan-tt-premium-edition-3-fan-pack-cl-f072-pl12sw-a/
Thermaltake Riing Trio Fan in UAE, Safe Shopping Multiple Payment Options Express Delivery PC Dubai Moneyback Guarantee One Year Warranty Authorized Dealer.
1631603369101-7
Hola buenas tardes estimado primero agradecerte por la completa información, una consulta tengo ese mismo CASE Thermaltake LEVEL 20MT y tengo una placa Gigabyte B150-HD3 que no tiene la entrada para la conexión ARGB de 3 pines como podría hacer esta conexión para controlar los cooler desde la placa
ReplyDelete