

Segotep Phoenix ATX Black Mid Tower PC Gaming Computer Case
Segotep Phoenix ATX Black Mid Tower PC Gaming Computer Case
Today I am taking a look at a case turned upside down and around! The Segotep Phoenix a Mid-Tower ATX case with some interesting features. Segotep is a top brand of computer cases and power supplies in China, with a focus on DIY products. With nearly 15 years of experience, Segotep has built up a good R&D team and testing systems, to provide top quality. I do not know much about this company but they do make one interesting case here with the Phoenix.
Closer Look
Right away getting the Phoenix unboxed you can see things are a bit different than with your normal ATX Mid-Tower. Yes, it is designed to sit on the left of your desk and the IO is rotated from the rear to the top of the case.


Full front air filter for the 120/140mm fan compatible mounting area.


The filter can swing aside or just be removed completely for fan installation.


Once your system is set up it will look something like this under the top access panel, with the wires feeding out the back to be connected to your hardware, power or other accessories.

Here on the bottom is the other air filter included with the SegoTep Phoenix, situated under the Power Supply zone to allow clean fresh air through your power supply’s own ecosystem.


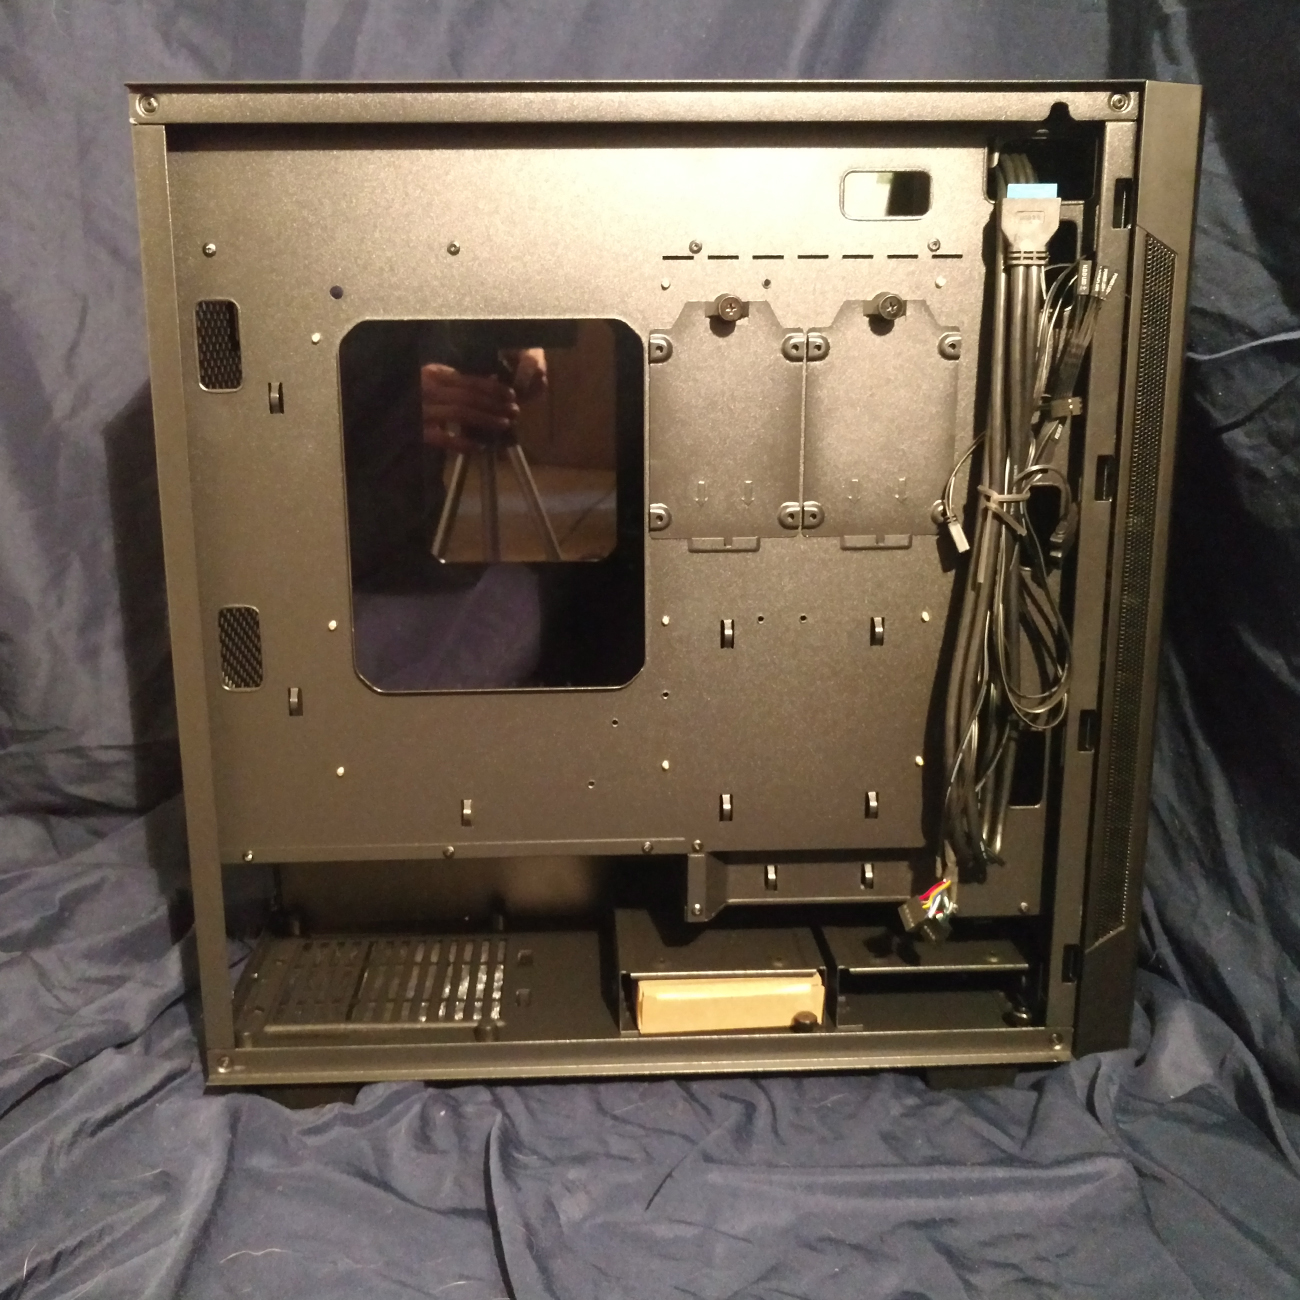
The back panel is held on similarly to that of the front glass panel. By loosening the two captive screws and lifting the door away it then reveals your hard drive storage locations and potential cable management possibilities.


The top 2.5″ hard drive sleds are just thin metal slabs, they function really well allowing an easy single captive screw install or removal.

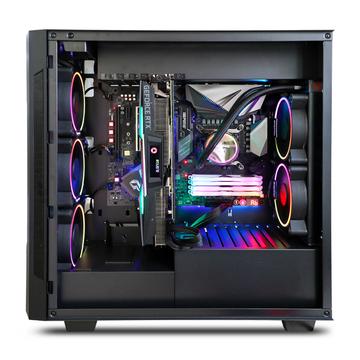
Here is a good view of the GPU clearance, as you can see with the rather large 3-fan GIGABYTE GTX 980 Ti XTREME there is still plenty of room left for more if needed. You can also see some of the SATA and GPU supplemental power cables routing, it is really easy to hide about 90% of the front cables with Segotep’s design here in the Phoenix.

Accessories
Here are all of the included accessories, Segotep has thought about it all with a list of screws for all of your needs and some zip ties to top it off with for clean cable management. All of this can be found in the little brown box pictured, tucked away in one of the rear 3.5″ hard drive caddies.

RGB
Other than the front RGB zone there are no extra included strips or fans. You can power the front RGB zone via a SATA power connector and simply change the effect with the little button to the right of the power button on the top of the case. There is no need for software with this method. If you opt to plug the RGB up to your motherboard that will change depending on the software needed for your specific motherboards RGB implementation.

Final Build
Building in the Segotep Phoenix was a very interesting time indeed. With everything turned upside down and around the Phoenix goes out of its way to make sure you know it is of a special design. As you would expect with an AIO in the rear and the GPU upfront thermals were great. My GTX 980 Ti actually ran cool enough I had to readjust my overclocks because the card was trying to boost beyond what the card could maintain. This was resulting in soft driver crashes where the card would revert to bare bone stock 980 Ti clocks. Lol was actually funny to experience, generally with air-cooled GPU’s you are thermally limited even before you run out of voltage.

Segotep Phoenix ATX Black Mid Tower PC Gaming Computer Case
ModelBrandSegotepSeriesPhoenixDetailsColorBlackMotherboard CompatibilityMicro ATX / ATXSide Panel WindowYesWith front LCD displayYes
ExpansionInternal 3.5" Drive Bays2Internal 2.5" Drive Bays2
Front Panel PortsFront PortsFront : 120mm fan*3 / 140mm fan*2
Cooling SystemFan OptionsRear : 120mm fan*2 / 140mm fan*2Radiator InstalledFront : 360 water-cooling / 240 water-cooling
Dimensions & WeightMax GPU Length Allowance323mmMax CPU Cooler Height Allowance167mmDimensions (H x W x D)20*8.5*19 inchWeight24.5 lbs
GroupSide WindowTempered Glass
Additional InformationDate First AvailableOctober 08, 2019
Performance
The Segotep Phoenix performed really well once I added some fans into the build, I will dive into this more in the Value section below. My GPU maintained sub 60c thermals generally hitting 50-58c in the titles and software I play and test. My R7 1700 clocked at 3.8Ghz with 1.25v stayed nice and cool never crossing the 60c threshold as well unless I was to render a project. Generally, during gaming, the CPU stayed in the mid-40s. The front panel vents could do with a small redesign with maybe larger open vent holes cut out of the plastic or just remove the mesh. This does hinder airflow quite a bit when coupled with the front intake air filter. Not enough to ruin thermals but enough to question whether I have managed positive airflow as I set it up for or if the case intake is managing to be beaten out by the rear exhaust. All in all the Phoenix performed really well and was designed to do so with your Graphics Card thermals in mind first.
Design
This is the most interesting case design I have built-in so far. The upside-down and left of your desk build style will really turn heads and make people look twice. Which is exactly what some look for in their showcase build. With Graphic Card thermals first in the designs cooling your Graphics Card will purr at really low temps and low noise fans speeds. The overall weight of the case is rather light, and the glass panels on both the front and side are not the thickest you can get on the market by no means, but the way they are implemented is very well done. In no way does the thinner glass or lighter nature of the design lead you to feel like you got a cheap product. Everything has been well designed and fitted together here.
Value
Now here I have to hit on some harder points because at even the point of the case market you are generally getting at least two fans included. There were no fans included in this case, granted most of the time when you are designing a showpiece build you will replace the fans but not including them is a bit of a hard pill to swallow after years of being used to getting a few in much cheaper cases. This is not the end-all decider for my self and should not be for anyone else, it is just something to consider if maybe you are wanting to start with stock and build up the show build slowly. Next is the RGB it has a really nice effect from the front until you sit down to the side of the build and then the light shifts from lighting the front panel to the sides of the LEDs showing more clearly the further to the side of the case you get. I do not know if this can be stopped but it can be somewhat distracting at night, you just have to hold down the top RGB button for a few seconds and it will shut off if this is a bother to you.
All in all, this is a very special design, that took some thought and a lot of work to get fleshed out. I have only seen one case like this in person so far and I will say it is a head-turner once completed. Cases like the Segotep Phoenix are gambles, they a bit harder to design with success and either a hit or a miss with builders. The Phoenix is a hit here on my desk I give it a 7 out of 10 for value. If some fans were added and or the price dropped maybe this would be a solid 10/10 for value in my book, you are getting a lot out of a special design that does a great job with thermals. If you are looking for something not only special but very different from the traditional PC case then I think you should give the Segotep Phoenix a look.
Segotep Phoenix ATX Black Mid Tower PC Gaming Computer Case


amazon affiliate link below


Thanks for sharing this great post. I really like the post. pc components uk
ReplyDeleteChristmas Background This is such a great resource that you are providing and you give it away for free. I love seeing blog that understand the value of providing a quality resource for free.
ReplyDelete"Very nice post, Thanks for the detail information i will link back your acticle with my website.
ReplyDeleteI am an online seller of gaming chairs in the UK.
Explore Pc cases Brands in UK at Pcgamingcases.co.uk
ReplyDelete