

Cooler Master MasterLiquid ML240P Mirage Addressable RGB Close-Loop AIO CPU Liquid Cooler
Cooler Master MasterLiquid ML240P Mirage Addressable RGB Close-Loop AIO CPU Liquid Cooler
pros
Elegant lighting effects using a clear pump top
Threadripper support
Cooler Master controller hub included
cons
Premium pricing
Average thermal performance
MasterLiquid ML240P Mirage
Keep your high-performance CPU cool and make your gaming rig perform and shine with this liquid cooler. It includes a large stylish aluminum radiator, a re-engineered transparent pump, and two Mirage fans, all working together to remove heat effectively and max out CPU performance. Built-in addressable RGB LEDs on the pump and fans deliver exhilarating lighting effects. You can customize them to create your own style with CM Lighting software or the wired addressable RGB controller. The transparent pump will add to the drama by showing the movement of the inside impeller.
Permission denied
Addressable RGB LED
A total of 24 independently-controlled LEDs on the pump and fans allow for full customization via CM Lighting software featuring Mirage mode.
Wired Addressable RGB Controller
This allows you to customize RGB lighting or expand your ARGB rig if your motherboard doesn't support RGB header.
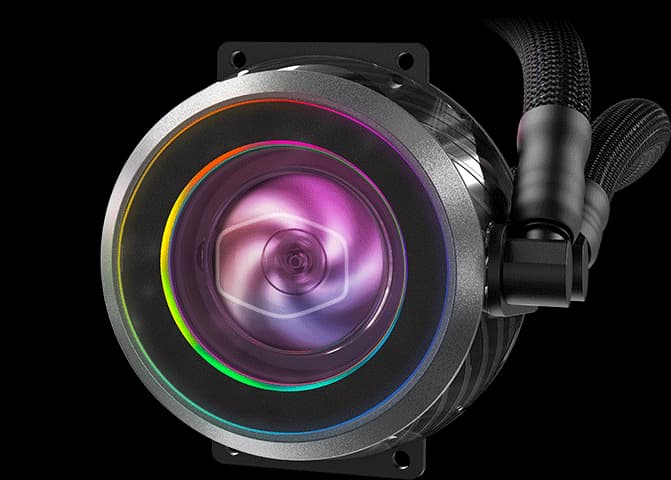
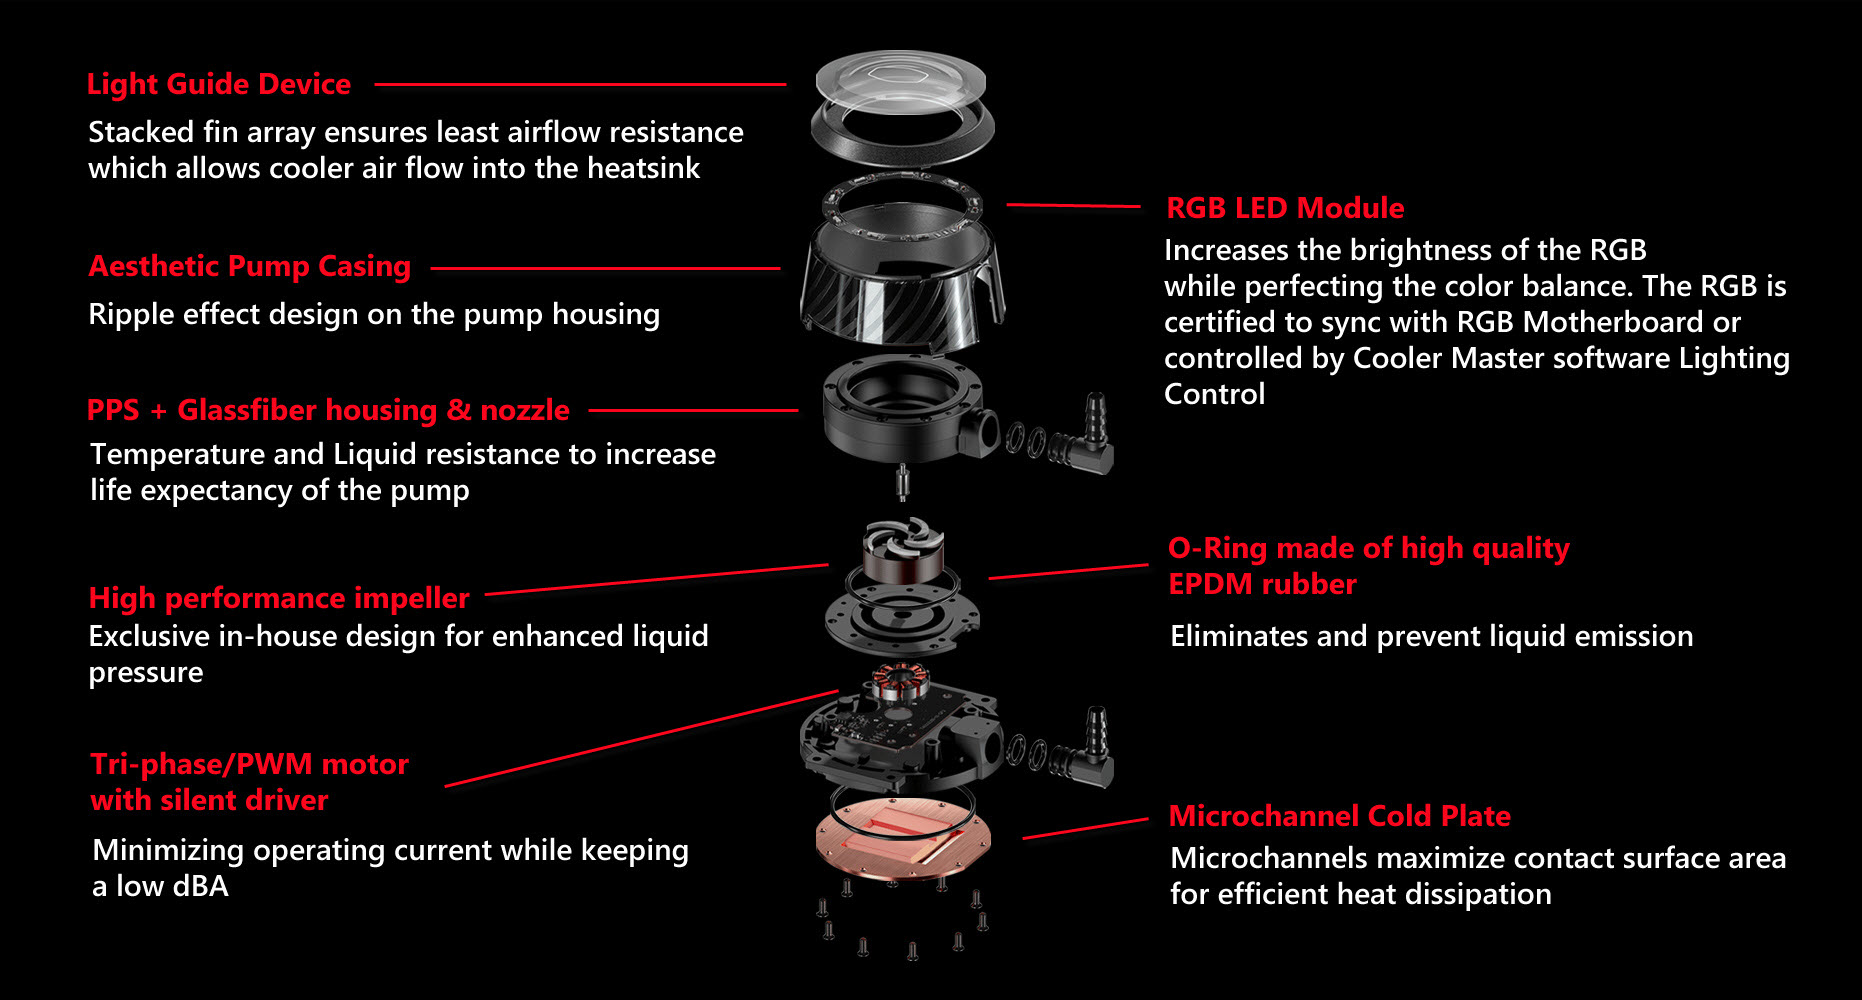
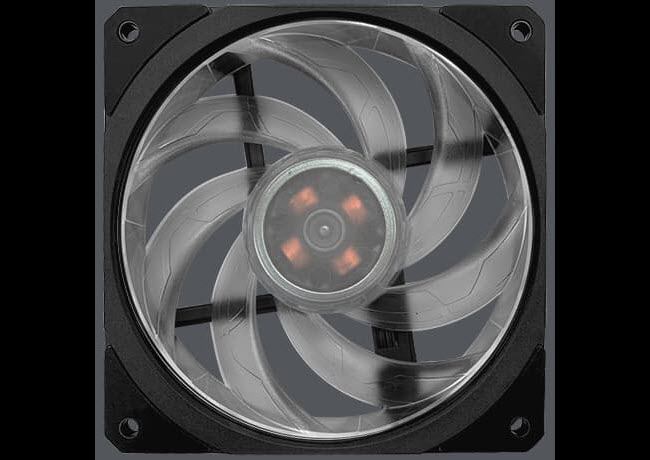
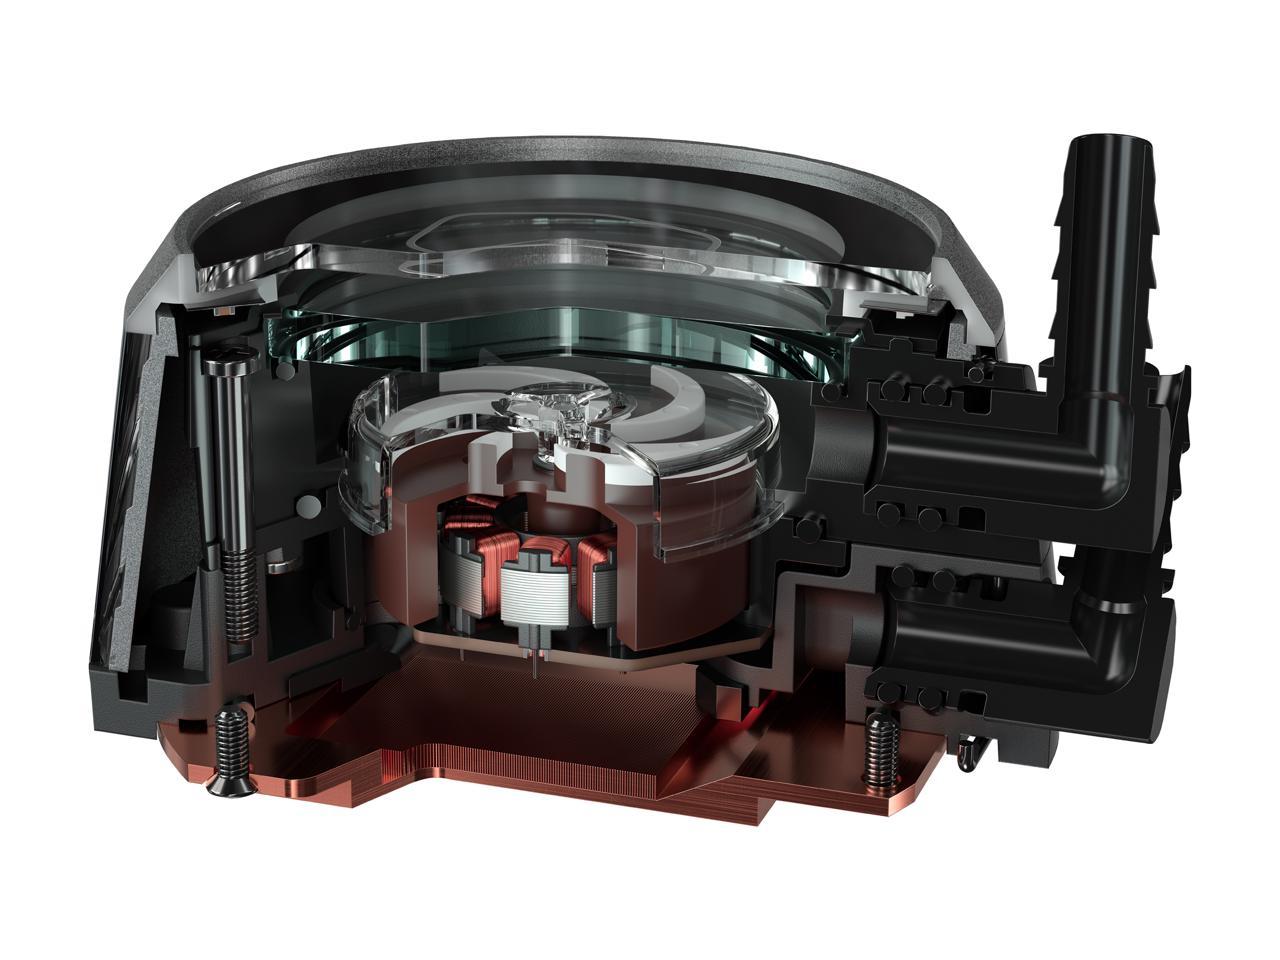
Transparent Pump Design
Transparent pump cover showcases the movement inside the pump while the high-performance impeller is spinning with Mirage lighting effect.
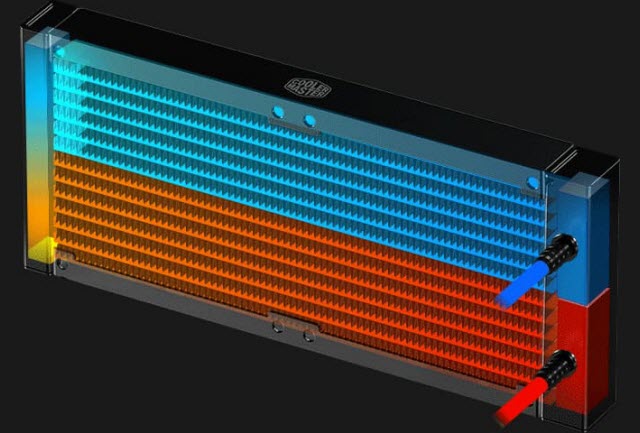
Stylish Radiator
ML240P Mirage uses a custom-designed low-resistance radiator that delivers higher flow rate and heat exchange efficiency for unparalleled cooling performance.

Double Tubing
FEP materials make the tubing durable yet flexible while sleeved design on the exterior gives it a premium look.
Exclusive Square Fans for Ml240P Mirage
The fan blades are connected together by an outer-ring to reduce fan distortion and improve rotation stability.
Installation Video
Permission denied.
Learn more about the Cooler Master MLY-D24M-A20PA-R1
ModelBrandCOOLER MASTERSeriesMasterLiquid ML240P MirageModelMLY-D24M-A20PA-R1TypeLiquid Cooling System
BlockBlock CompatibilityIntel LGA 2066 / 2011-v3 / 2011 / 1366 / 1151 / 1150 / 1155 / 1156 / 775
AMD TR4 / AM4 / AM3+ / AM3 / AM2+ / AM2 / FM2+ / FM2 / FM1Block Dim.85.0 x 80.0 x 41.7 mmBlock MaterialCopper
PumpPump Noise< 20 dBA (1m)
RadiatorRadiator Dim.277.0 x 120.0 x 27.0 mmRadiator MaterialAluminum
FanFan Size2 Fan Slots (120mm)Fan Dim.120.0 x 120.0 x 26.0 mmFan RPM2000 +/- 10% RPM (Max)Fan Air Flow60.95 CFM (Max)Fan Noise27dBA (1m)Fan Connector4-Pin (PWM), ARGB 3-PinColorBlackLED ColorAddressable RGB
TubeTube MaterialSleeved FEP
FeaturesFeaturesTransparent Pump Design - Clear top pump cover showcase the enhance impeller spinning Mirage lighting effect.
Exclusive Mirage Fans - Outer-ring connecting fan blades design reduces distortion and improves rotation stability in the fan.
Pump & Radiator - The large Aluminum radiator maximizes cool efficiency, while the re-engineered pump remove excess heat from the CPU.
Addressable RGB LED - 24 independently-controlled LEDS on the pump and fans combined for full customization via CM Lighting software that features Mirage mode
Wired Addressable RGB Controller - For non RGB Motherboards for full customization or expanding your ARGB rig
Sleeved FEP Tubing's - Sleek Black Outer Sleeves with FEP Tubing's inside for Durable Lasting and Flexibility
Package ContentsPackage ContentsML240P Mirage
2x 120mm Fans
Manual.
Specifications
Thickness
|
1.125" / 28.6mm (2.25" / 57.15mm w/fans)
|
Width
|
4.75" / 120.7mm
|
Depth
|
11.0" / 279.4mm
|
Pump Height
|
1.75" / 44.5mm
|
Speed Controller
|
BIOS
|
Cooling Fans
|
(2) 120 x 25mm
|
Connectors
|
(1) SATA(2) 4-pin PWM(1) 3-pin PWM(3) 4-pin RGB
|
Weight
|
43.7 oz / 1237g
|
Intel Sockets
|
2066, 2011x, 1366, 115x, 775
|
AMD Sockets
|
AM2(+), AM3(+) AM4, FM1, FM2(+), TR4
|
the Coolermaster ml 240p mirage since it was announced and we've used it in quite a few builds already now we've started getting a lot of questions about the cooler itself so we decided it was time to give it the gear seekers treatment in this review I'm gonna show you how to restore the brand new cooler master ml 240p mirage in an a.m. for base sister you asked for it here it is let's do it , before we begin I just want to make this super clear this review is for demonstration purposes only this is not a review every system motherboard case fan placement and setup is different make sure you research what will fit in your case before buying parts for
all of your builds this guide is to give you the fundamental idea of how to install the cooler master ml to 14 P mirage on AIM DS and 4 platform we're not showing you how to install it on Intel sockets in this review that version will probably come probably this time next week so make sure you watch the entire review before asking questions because chances are I'm gonna answer all of the inevitable questions in this review anyway so yeah let's say answer some of those questions right off the bat the motherboard in this video is the gigabyte x5 70 or is pro Wi-Fi the CPU is the horizon 730 700 X and the case is the fantex eclipse P 408 these parts were
chosen purely for demonstration purposes and to reflect a a common combination of parts for an installation like this because they're very popular parts at the moment know the installation is not the same as the old ML 240 our RGB yes the fan placement in this review is correct it also depends on your case and the clearances for your case yes it's RGB but it's addressable RGB only yes it comes with the RGB fans that are shown in this review yes you can put whatever fans you want on it like like literally any fans that you want as long as they fit yes everything you're seeing in this video for installation is included in the box yes it will work with almost every
single AMD aim for CPU and motherboard combo you're about to ask it out in the comments from the launch of Verizon up until the foreseeable future yes it will work with aura sync mystic light RGB fusion and polychrome RGB yes the thermal paste is included and no you don't have to fill the cooler you don't have to top it up you don't have to maintain anything at all now that's out of the way let's jump right in and show you how to install the brand new cooler master ml 240p mirage let's start off by you look at what you need to get this installed in your system you've got some screws you've got some bolts that mount to the back plate you've
got the nuts that mount the cooler to the top of the IHS you've got the standoffs for the back plate and the plastic clips that hold everything together unlike other aim for cooler installs you will actually need to replace the back plate and not use the standard back plate that comes with the motherboard so we're going to be using this back plate and you're going to need these brackets these brackets are specifically for for installations let's start this installation off by setting up the back plate you're going to need these standoffs all four of them but I'm just
gonna grab one in this clip you're going to need these plastic clips and what you're going to want to do is feed them through the holes I'm about to show now these are actually labeled for the type of installation as you can see here it says for AMD this is the side that needs to face away from the motherboard and what you want to do is grab those little standoffs put them in the hole and actually put them towards the outer edge of that long oval hole as I've just shown here and get one of those plastic clips and slide them over the top now they're a little bit tight to get on but just push it it will go on and push it on and it will clip in quite easily and what you
want to do is rinse and repeat that process for every corner just make sure that the standoffs are towards the outer edge when you're using the clip to lock them into place when you're done setting up the back plate it should look something like this okay let's move on to setting up the motherboard itself you will need to remove the standard aim for mounting solution so what you want to do is just take out the four screws just like this I'm gonna speed it up just so you don't have to sit here and watch me do a hit at a normal speed because it would take forever and lift up the board and take the backplate in awake like I just showed we set up a new backplate
don't throw any of this stuff out because chances are you might want to change the cooler later down the line or if you want to sell them on the board I've had a lot of people complaining that they threw this out so just hold on to it grab the back plate that we set up just a few moments ago and the easiest way to install this is to lift the motherboard up put the backplate down on a flat surface and then lower the motherboard onto the backplate lining it up and as you can see here I didn't get this quite right the first time but yeah you'll probably be better than me at
doing this the next step is grabbing all four of these bolts yep these ones pictured right here and what you're going to want to do is actually screw them into the standoffs you can finger tighten these to begin with there isn't a correct way to do this so just finger tighten it for now and I'm gonna show you what you can do you can get this little included wrench and actually then go ahead and tighten them but don't tighten them too much otherwise you'll never be able to get them undone just lock them in I think this steps actually optional if you're trying to build quickly you might not need to use a wrench but it is recommended that you use it we've had
quite a few comments with this color of people talking about the back plate being loose and moving around it's designed to be this way so you don't have to worry once you tighten it it will lock into place okay let's get those brackets onto the block itself it's pretty straightforward to get this done on the side of the block you notice there will be some slots and this slots have little notches in them which line up with the notches on these brackets and just drop them in and what you'll notice is once you drop them in they won't move and all you need to do is grab the included screws and screw the bracket in just like this very very easy and straightforward and
once you're done doing that you want to rinse and repeat that process on the other side I'm going to show you how to do this one more time line up the bracket with that slot in the side of the block slide it in and just tighten up those screws it is very straightforward don't forget to remove the protective plastic peel off sticker otherwise your CPU temperatures will be very very warm locate eight of these long bolts these are used to fasten the fans to the radiator and the way that we're going to install this is by putting the radiator on the backside of the front panel of this case and putting the screws through the fan and through the case just fastening
them up but like I mentioned in the introduction of this review it most likely will be different for your case it's different to mount it on basically every other case it may not fit it might fit this way you'll just have to experiment or just do a little bit of research we can't actually mount this in the top of this case because the motherboard vrm cooling is too high okay once you get that all nice and done and unn tightened up you can use a screw driver to tighten them but they're actually designed to be tighten with your fingers feed the cables from the fence to the backside
of the case to make your life a little bit easier later on in the installation and you'll see why we do this a little bit later like I just mentioned the next thing you want to do is locate the included two board master gel pro thermal paste and you'll need to locate these four nut so you can fasten the block to the mounting solution that we just set up now this is up for debate this is the way that I recommend installing thermal pays for rising 3,000 chips there are lots of different techniques you don't have to do it the exact same way that I did lower the cooler onto the
thermal paste and the IHS of the CPU that you just applied give it a little bit of a little bit of a swish and squish around just to spread that thermal paste nice and good what you want to do is get the nuts and fasten them on the opposing corners now I'm just gonna show you this from a top view so you can see what I mean just finger tighten them for now just to get them on there don't do each corner up all the way because you'll find it very hard to get it fully installed and just rinse and repeat that process to get it to almost as tight as you can now I want to just to point this out as well this corner with aim for installations is quite typical because if the pipes
coming out of the block I've talked to coolermaster about this they're aware of the issue don't worry you won't end your life just tighten them up with the screwdriver if you will you can use your fingers to do it up but this is just for good measure okay let's move on to the fun stuff let's do some of the wiring we're going to attach the 2-way PWM splitter this is pretty straightforward what you want to do is locate the CPU fan header on your motherboard it could be labeled something else depending on your board but in our case it's the CPU fan and
feed it through the back and plug in the CPU fan header this is save us some time a little bit later now we're going to show you what to do with these two cables that come off the block itself the first one we're going to take a look at is the PWM connector what you want to do is locate the CPU opt or W pump or it'll be in relation to in a IO or an optional CPU connected depending on your motherboard in our case it is CPU opt if you're not sure what this is called with your motherboard just refer to your motherboard manual it will most likely tell you where to plug this in and just plug it in and you should be good to go now the other cable that is
coming out of the block is the 3 pin 5 volt addressable RGB connector you don't need to do anything with this now except pass it through to the back of the case it's gonna make your life a lot easier when you're trying to cable manage and hook it up ok let's plug in the fence so the the 2-way PWM splitter that we just plugged in what you want to do is locate the 2 PWM power connectors from the fans and plug them into the splitter just like this it's very very easy and very very straightforward it only plugs in one way now that your fans are powered let's get into the fun stuff let's hook up the RGB I'm going to show you a few ways to hook up the RGB but
this step needs to be done regardless of which way you connect your RGB so this is the 3-way RGB splitter what you're wanting to do is get that 3-way RGB splitter that is included with the cooler locate the three RGB cables that come out of two fans and the pump itself and plug them into that splitter and just rinse and repeat that process until all three cables are connected and then we're going to move on to the first way to connect up RGB with this setup because like I mentioned there is a couple ways to do it the first way is we're going to plug the other end straight into the motherboard so you can use ads Rock polychrome RGB or RGB fusion or
whatever you like you'll want to locate a 3 pin addressable RGB header on your motherboard and you can go ahead and plug this straight into your motherboard and if that's the way that you want to do it your installation is now complete for this cooler but if you're wanting to use the cooler master RGB controller there are a couple ways to connect they can krola as well so let's start off with getting the USB connected you want to locate this USB cable this only plugs in one way to your motherboard so we're gonna show you how to do this right now locate a
USB 2.0 header on your motherboard and you want to grab that cable and feed that header end through from the back of your system and plug it straight into the motherboard just like that locate this included USB cable this does come in the box don't worry you don't need to use your own and what you want to do is plug the USB end into the USB port on the other side of that header cable on the bottom of your controller plug it into the USB and that's the controller connected as far as USB you will also need to connect up some SATA or SATA power depending on where you are living in the world and there should be one free on your power supply and it
will look like this once you've got both of those things plugged in the next thing we're going to do is locate one of these little header connectors for the three pin 5 volt addressable RGB you can plug it into any of these connectors just make sure you take a note for later when you want to configure it in the software of which one to plug it in I plug it into the first one to make it easy for memory later down the line and plug in that other end of that addressable RGB cable that we connected in the first step into the controller so this is basically just replacing it plugging it straight into the motherboard but rather into the controller now we're going to
show you how to connect the pass-through in case you can't decide whether or not you want to use the controller or not the cool that comes with this pass-through cable it's very easy to connect what you want to do is plug this end the ones with the pins pre-installed in it into this bottom connector on the controller and what you want to do is get the other end and just like plugging it directly into the motherboard locate that addressable RGB connector and plug the cable straight into your motherboard but if you don't want to do that and use software control only you're all done you're all good to go your ml 240p maraj should be installed and you
should be ready to go and if you had any luck it should look a little something yes , I think I covered pretty much everything in this review if you've got any questions feel free to head on over to our discord or drop a comment down below but make sure you read the comment section first because myself or someone probably would have already answered your question already.
Cooler Master MasterLiquid ML240P Mirage Addressable RGB Close-Loop AIO CPU Liquid Cooler
I've got the ml 240p mirage on my left so this gets stuck running , okay so what I'm going to do today is basically test our existing system which has the monster liquid Pro inside of it it's running an Asus X 370 Pro motherboard and an 1800 X so it is a bit of an older rosin processor blitz it's still on a core 16/3 220 watt chip so you can pull some decent current you might see some very insane voltages because I've left it on the Asus performance mode so it is going as much as 1.5 volts so there's no lack of power being pushed through the chip and as you can see
based on this graph at the moment our bottom attempts are between on degrees so it's at about room temperature I'd say it's probably about 24 25 degrees inside at moment so what we're gonna do is we're going to run a single run of Cinebench r15 I'm using a 15 or 20 because it allows the CPU in a bit of a different way this is a bit bitter of a test still that'd be our 20 so we're just gonna give this a single run and then check what our temps are you guys can ignore the scores because I haven't called all the extra software this is obviously running monitoring
and I asked tweet and all other rubbish in the background but what we are looking for here is temperature performance so at the start of this we are seeing it go as high as 120 watts so it is pulling the maximum wattage from the chip and it is looking like it's gonna sit on 57 so yeah 57 degrees at the end of a single Cinebench run which is pretty good but that obviously isn't enough data to base a whole cooling review offer so we are going to be using our trial version here of aida64 and we are going to load it for ten minutes and then come back and see what the
scores were back and if we go see in ten minutes two hours later alrighty so we lifted a little bit long because we went to have a cup of coffee but I did call it at 21 minutes it's stabilized at 64 degrees right on 100% load so we are going to stop it there so we got 57 from our single segment run and 64 so you could just you could surmise in gaming and we'll probably sit at sub 50 but from these two tests now we are going to haul out this old Massa liquid prior and the shrub ourselves in a brand new most liquid ml or the ml 240p Mirage I'm quite excited about this kit
because it's got a brand new fan is a shouted fans similar to what Asus had actually done with matrix graphics cards this will be the first time I'm using these kind of fans on the water cooling kit and they've updated their pumps loudly so without further ado let's rip this up and get stuck in all righty so we've got the ml 240p mirage snapped into our food cooler master build on the side I must say the new friends are quite spectacular they have changed a little bit of the mounting this is a much bigger bracket that actually sits in for the m4s you can have it
orientated either way it is much nicer having both cables coming out of the same side of the pump I must say and there are quite a bit longer so it'll be a lot easier to install this into a bigger chassis I have hooked this up with the controller that it comes with and just kind of left it on this default profile so there will be more movement if you do have address water GPS the controller itself is quite limited I couldn't find a scrolling kind of setup for it but it does have the functionality I'm sure there's just so many settings we just obviously focusing here on performance because if you have all addressable RGB then you'll be able to do whatever you
want with the gray this board being in a slightly older board doesn't have that functionality but it's we once again we're here to taste cream so we start off with the Cinebench we're gonna see what the run produces temperature was on our hardware monitor here so ever look it's already up to 60 70 degrees 72 degrees 73 degrees it is a bit warmer inside the studio at this time but it's definitely not giving us the performance that we are hopeful at least on initial looks I did do a test with the case completely open in Seoul 57 degrees so I thought let me close it up and we'll
see what we get is it's already sparked all later 73 I said it's quite a bit woman here now than it was earlier today but let us do the good old either 64 test is leaving us for 10 minutes and see what our results look like three days later karate so basically after our 10 minutes of our the 64 stress test it increased by one degree a single degree which is actually quite amazing for a couple of reasons one this is a smaller pump so it has less thermal efficiency because it can move the water around and use the water out of the slower slower right at least and then this here pump all these fans didn't increase their fan curve at all they stayed completely at 900 rpm
right throughout a practical render test so this kit being a more entry-level ha GB or at least addressable RGB kit is actually doing exactly as advertised so I don't say another winner from Coolermaster ml 240p Mirage definitely gets a thumbs up will give it an OnPoint 5 out of 10 the only reason I'm dropping off a mark was they change the back plates I very very much like the back leg I know it's gonna be a lot cheaper to produce which helps to bring that cost down and make it more available to a lot more people so all-around good job from coolermaster I love your new fans I'll take some for free thank you so much thank you all .
Cooler Master MasterLiquid ML240P Mirage Addressable RGB Close-Loop AIO CPU Liquid Cooler


To find out more from Amazon link below


I was having trouble purchasing Cooler master casing price in pakistan for my home but this article helped me. Thank you for sharing.
ReplyDelete