

DEEP COOL MATREXX 70 3F Case
DEEP COOL MATREXX 70 3F Case
Description
MATREXX 70 ADD-RGB 3F is a new-concept chassis specially designed for the enjoyment of DIY. By adopting numerous novel structural designs, its architecture yields convenience and flexibility in PC building. Meanwhile 3 * CF 120 RGB fans and 1* RGB LED strip are included to provide top-notch lighting effects. MATREXX 70 ADD-RGB 3F is ready to give you a boost of the gaming ambience.


For DEEPCOOL/GAMERSTORM devices

For other brand devices
Friendly ADD-RGB Ecosystem Included
The ADD-RGB lighting system includes 5 pre-programmed lighting effects (dynamic color, static, breathing, comet and fashioncollision) and can be easily controlled by the RGB button on the I/O panel or motherboard. Meanwhile the special accessory pack enables the syncing between the products from Deepcool and other brands, thereby creating a friendly ADD-RGB ecosystem.
Easy-to-install Side Panel
The side panel is fixed with 1 groove + 2 screws design. The groove can hold the panel and prevent it from falling even with no screws mounted,which makes installation much easier. After installation, this unique fixation method will grant the glass panel even stress distribution, hence reduces the risk of cracking;
Removable radiator/fan Holder
The radiator/fan holder simplifies the installation and replacement of the radiator and fan, it’s especially effort-saving when you need to install the radiator and the fan on the different sides of the holder.
The holder supports up to 360mm radiator or 3*140mm fans.
Removable Glass PSU Shroud
In MATREXX 70 ADD-RGB 3F, DEEPCOOL creatively used tinted glass as the top cover of PSU shroud, which is pioneering in the industry.
The tinted glass can hide the power cables while reflecting the RGB lighting of your other parts, especially GPU, hence creating an infinite space visual effect. Effect Diagram of Light Bars Installed on the Power Shield (RGB Light Bars are included)
Flexible Ventilation Solutions with Excellent Performance
With air intake options at front and bottom, exhaust options at the top and rear, MATREXX 70 ADD-RGB 3F provides highly flexible ventilation solutions. Meanwhile the 15mm-wide front intake hole guarantees sufficient air supply, together with the low friction material applied on all meshes, the cooling efficiency is maximized.
Radiator Support
Motherboard support
E-ATX( Up to 330mm )
ATX
Micro-ATX
Mini-ITX
Graphic cards support up to 380mm
Equipped with large spacing - 170mm( Tower Room ) and 30mm ( cable sorting at the rear )
Four 2.5inch independent hard disk lots and two 3.5/2.5inch hard disk spaces.
As the dust screens are installed at the top, bottom and front, it provides remarkable anti-dust capabilities while being easy to clean.
Learn more about the DEEPCOOL MATREXX 70 ADD-RGB 3F
ModelBrandDeepcoolModelMATREXX 70 ADD-RGB 3F
DetailsTypeATX Mid TowerColorBlackCase MaterialABS / SPCC / Tempered GlassWith Power SupplyNoPower Supply MountedBottomMotherboard CompatibilityMicro ATX / ATX / Mini-ITXSide Panel WindowYesLEDRGB
ExpansionInternal 3.5" Drive Bays2Internal 2.5" Drive Bays4Expansion Slots7+2
Front Panel PortsFront Ports2 x USB 3.0 / 1 x USB 2.0 / 1 x Audio (HD) / 1 x Mic
Cooling SystemFan OptionsFront: 3 x 120mm (3 x 120mm ADD-RGB Fan Pre-installed) or 3 x 140mm fan
Rear: 1 x 120mm fan (Pre-installed)
Top: 3 x 120mm or 3 x 140mm fanRadiator OptionsFront - Up to 360mm / Rear - Up to 120mm / Top - Up to 360mm
Dimensions & WeightMax GPU Length Allowance380mm (Horizontal) / 360mm (Vertical)Max CPU Cooler Height Allowance170 mmMax PSU Length200 mmDimensions (H x W x D)19.38" x 8.98" x 18.70"Weight20.68 lbs.
Additional InfoFeatures3 x CF 120 RGB fans and 1 x RGB LED strip pre-installed and synced
Included ADD-RGB system controllable by either case button or motherboard, and compatible to other brands’ ADD-RGB products.
Large mid tower case supporting up to E-ATX(330mm) motherboard.
228mm wide tower compartment with 30mm clearance for cable management
Easy-to-install front and side panels
Quick-mounting radiator/fan holders pre-installed at the front
Supports installation of 120/140/240/280/360/420mm radiator liquid cooling system at front,
120/140/240/280/360mm radiator liquid cooling system at top, 120mm radiator liquid cooling system at rear
Removable tempered glass PSU-HDD top cover, offering top-notch lighting ambient.
Magnetic dust filters at the top, insert-in dust filters at bottom and front
Additional InformationDate First AvailableApril 05, 2019
Specs & Features
Mid tower case: supports ATX, E-ATX, MicroATX, Mini-ITX
Lighting: Three RGB fans + RGB light strip pre-installed
Top I/O: 3.5mm (2), USB 2.0, USB 3.0 (2)
Drive bays: 2.5-inch (4), 3.5-inch (2)
Expansion slots: Standard (7), Vertical (2)
Fan bays: 120/140mm (6, 3 included), 120mm (1, included)
Dust filters: top, bottom, front
Radiator: front and top (120/140/240/280/360), rear (120)
Clearances: 170mm CPU fan, 380mm GPU (360mm vertical), 200mm PSU
Materials: SPCC steel + ABS plastic + tempered glass
Dimensions / weight: 475 × 228 × 492mm / 9.39 kilograms
Design

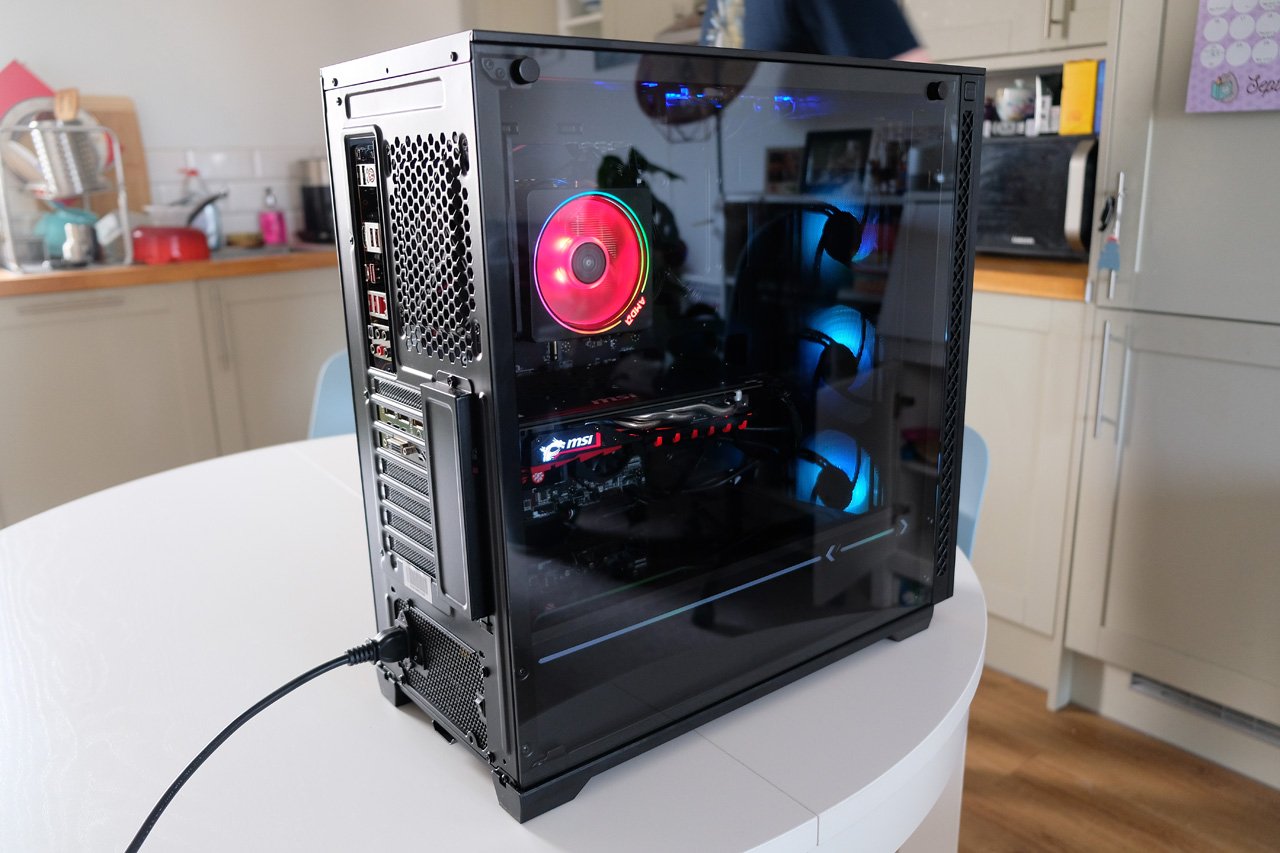
The Matrexx 70 is a handsome, boxy case with glass on the front and side. The side glass is held in place with two thumbscrews, while the front glass gets a quick release button.

The case has relatively large dimensions for a mid-tower, with 30mm clearance on the back tray which should result in easy cable management.

The case supports liquid cooling well, with the option to mount radiators up to 280 or 360mm both up front and along the top. A single 120mm radiator can also be installed on the back if required. Radiators mounted up front can be installed onto a removable “radiator holder”, which simplifies what can be an annoying process of screwing in and cable routing.

A removable PSU shroud is installed in the bottom of the case, with RGB lighting for a line and Deepcool logo along its top edge – however, we found the lighting was far dimmer than the image above suggests.
The top of the shroud is made from tinted glass, which hides any cable mess lurking below and reflects light from your other RGB components to make the inside of the case look bigger than it actually is.

Top I/O is substantial, with no USB-C (boo) but three USB ports (yay). Headset inputs, power switch and RGB button are also included; you can also control the RGB lighting with most motherboards such as those by Gigabyte, Asus, Asrock and MSI. Each port and button here is ringed by an LED, which looks quite spectacular once the PC is turned on.

Dust filters are included for the top, bottom and front of the case, which should reduce the amount of dust that accumulates on your fans and other components.
Build impressions

Here are the components we used for our Matrexx 70 test build:
AMD Ryzen 3600X CPU (w/ AMD Wraith Prism cooler)
16GB DDR4 RAM
MSI X570 Gaming Plus motherboard
MSI GeForce GTX 1060 3GB
XPG SX8200 Pro NVMe SSD
EVGA 650W Gold power supply
These components are truthfully what was available, rather than a superbly optimised build – I’d recommend spending less on the CPU and more on the GPU, for example – but it represents a low to mid-end gaming PC. You’ll note that as an AiO wasn’t available, we didn’t test fitting a radiator to this PC, but we did try fitting a SATA SSD before eventually switching to an NVMe alternative (more on that later).

The build started well, with the Matrexx 70’s standoffs providing much less issues than the NZXT ones we used most recently. The incredibly short manual provided with the case (and its online counterpart) don’t tell you which screws are used for which components and they aren’t separated in the bag, so pay attention here.

With the motherboard slotted it in easily, we installed the power supply. Despite being a modular PSU, the number of cables we needed – motherboard 24-pin, CPU 8-pin, GPU 8-pin, SATA – still just barely fit in the PSU bay, thanks to the default placement of the 3.5-inch drive caddy. You can see the lay of the land in the image below – the left side is where the PSU sits, while the right is for the HDD cage. Thankfully, this HDD mount can be moved into a second set of pre-drilled holes further away from the PSU, allowing more space to stuff your cables, while still propping up the reflective glass panel that hides most of your cable handiwork.

This is done by carefully unscrewing the glass panel thumb screw, removing the panel, then tipping the case over, removing the bottom dust filter, unscrewing the four Phillips head screws, moving the drive over to the alternate position, replacing the glass panel and screwing everything back in. Phew.

Installing the case fans was relatively simple, with power for each of the three fans connected to a single fan header on the motherboard using a cable provided in the box – although I wouldn’t have complained if this was pre-installed. The RGB side of the equation is handled by a SATA cable, with the option to instead use a four-pin RGB header on your motherboard if applicable. The rear fan is not RGB and its cable comes with both a Molex and four-pin PWM plug; using the latter meant that the bulky Molex cable had to hang out awkwardly on top of the motherboard.

There are two 2.5-inch mounts on the rear of the case for SATA SSDs to be installed, but we ran into trouble using them. The tool-less installation method is convenient, but only allows for the SSDs to be screwed in one way – which doesn’t leave enough room for anything but a flat SATA power cable to be installed. The right angles of our SATA power cables meant we needed to either mount the SSD elsewhere or really flatten the cable to make it fit; we chose the latter and the SSD stopped working after the first successful boot. It’s not clear whether the drive has been irreparably damaged through this mounting or it was an incidental failure, but either way it’s a real shame. The troubleshooting cost us a good hour before we ended up opting for an NVMe drive instead – a real shame.
Interestingly, the top and front filters for the case are held in place with sticky tape, which occasionally left a bit of detritus when removed. The front filter is made from a thin mesh, which must be tucked into ten slots whenever you put it back in – this takes a while, especially as some of these slots are in the dark recesses of the case. It would be great to see a simplified magnetic fixture for this, as it’s quite annoying to replace. Thankfully, the top mesh clings magnetically and the bottom mesh slides into place easily.

The rear side of the case provides 30mm for your cables, which we found enough for our needs. There are no pre-installed velcro straps, but there are enough tie-down points that you shouldn’t face too much difficulty making everything neat and tidy even with the extra wires required by RGB fans.

Noise & Thermals
We’ll briefly cover noise and thermals based on the limited testing we performed. At idle, we saw CPU and GPU temperatures in the neighbourhood of 50 degrees (this is a Ryzen 3600X using the Wraith Prism cooler with PBO on and an MSI GTX 1060 3GB, for reference). Under load, the highest temperatures recorded in MSI Afterburner were 84 for the GPU and 71 for the CPU, although looking back through the recording 77 for the GPU was a more normal figure.

This is broadly in line with expectations, and indicates that the default setup – three front fan intakes, one rear exhaust – is quite sensible. Note that these figures are with all dust filters in place; removing these would allow for greater air intake and therefore potentially lower temperatures.
Noise was also more than acceptable, with the PC being nearly inaudible at idle and still reasonably quiet under load with this particular hardware.
Wrapping up
While the Matrexx 70 has a few small annoyances such as the annoying mesh and poorly designed SSD mounts, it’s still a fun case to build in and provides good value for money. Deepcool may not be a household name in the West, but it’s clear that their case designs are just a few iterations away from greatness.
Packaging
OK, we'll dive straight into the photo-shoot as we'll have a lot to cover today. As always we start off with the packaging. Here is the box, clearly denoting the Matrexx 70.
The chassis is protected in Styrofoam and a plastic bag.
There were no noticeable scratches, dents, fingerprints, dust, mud or graffiti spray on it whatsoever. The top, front and side panel glass elements have a protected plastic layer on it.
And once unpacked you can see the chassis a little better. The glass immediately jumps out, and hey the side and front panel are fitted with it. It looks terrific as you will later find out. A feast for the eyes alright. Simple, stylish and kind of mystifying.
At the front side, we see a vented panel slash mesh. The chassis has quite a bit of mesh for proper airflow with at the front topside the standard IO and power/reset buttons.
The bottom shows four feet with rubber padding. The removable dust filter to the left sits under the PSU and can be pulled out to clean.
The Matrexx 70 has plenty of grommet holes, however there not rubberized which is a bit of a miss really. Your PSU is separated in that lower left compartment protected by a glass panel, let me show you that.
So a glass panel sits on top of the PSU compartment, unfortunately not a really good choice as it'll be a dust collecting magnet as well as you can see all cables you're trying to hide.
The front bezel with glass panel you can take out by simply pushing a button. Here again remark, please look at the next photo:
The front side has a dust filter, it's however not magnetically attached. Very easy to remove, but very _very_ hard and flimsy to install again. So that is just not a good option. Especially when you have installed gear there.
At the inside top, you can see plenty of clearance/space for cooling. BTW you receive just one fan in the rear, the rest you'll need to purchase, or use your liquid cooling for a bit more airflow.
On the rear left, we spot the single fan, obviously the rear exhaust fan which is a 120 mm fan, it uses black cabling for the fans and wiring overall. And all the way down, the power supply compartment. The chassis has 7 PCI slots and thus fits up-to-EATX motherboards.
As shown on the previous page, you can mount four SSDs at the backside. Look at the space for the power supply btw, I wish the HDD cage would have been positioned a bit more to the left. You can house four SSDs and two HDDs.
Once we look at the right side (or rear) of the motherboard tray (behind the motherboard) we see cable routing nirvana. There is enough space for cable routing (3cm), the chassis has many routing points.
Also, there are plenty of grommet holes and space to tuck away the cable spaghetti. The PSU area could have been a notch bigger, still, it is enough to fir common ATX power supplies and tuck away cables.
There is one HDD bay with two trays available. You simply slide it in and secure it with screws. There is no rubber resonating protection though, so the HDD mounting system is not the best, also you can mount only two HDDs.
The SSDs are secured with screws in the trays you can see in the photo above, located at the rear side of the motherboard tray. There are two trays, and a total of four positions (see below for the additional two).
It's no fun to photograph in a white environment. Below a few photos to get an idea of capability and looks when powered on. Also some photos of cable routing space etc. We added a LED strip for a bit of an effect though, this is not included as standard.
DEEP COOL MATREXX 70 3F Case
Acoustic performance - Fans, Noise Levels
Processors and graphics cards can produce a lot of heat, usually, that heat needs to be transported away from the hot core as fast as possible. Often you'll see massive active fan solutions that can indeed get rid of the heat, yet all the fans these days make the PC a noisy son of a gun. Do remember that the test we do is extremely subjective. We bought a certified dBA meter and will measure how many dBA originate from the PC. Why is this subjective you ask? Well, there is always noise in the background, from the streets, from the HDD, PSU fan, etc., so this is by a mile or two, an imprecise measurement. You could only achieve objective measurement in a sound test chamber. The human hearing system has different sensitivities at different frequencies.
This means that the perception of noise is not at all equal at every frequency. Noise with significant measured levels (in dB) at high or low frequencies will not be as annoying as it would be when its energy is concentrated in the middle frequencies. In other words, the measured noise levels in dB will not reflect the actual human perception of the loudness of the noise. That's why we measure the dBA level. A specific circuit is added to the sound level meter to correct its reading in regard to this concept. This reading is the noise level in dBA. The letter A is added to indicate the correction that was made in the measurement. Frequencies below 1 kHz and above 6 kHz are attenuated, whereas frequencies between 1 kHz and 6 kHz are amplified by the A weighting.

There are a lot of differences in measurements among websites. We measure noise levels in a completely enclosed and closed room. The lowest dBA level we can measure without any equipment activated is roughly 28 dBA in this room. We measure at 35 cm distance, we hotwire only the passive PSU, this way other components cannot influence noise.
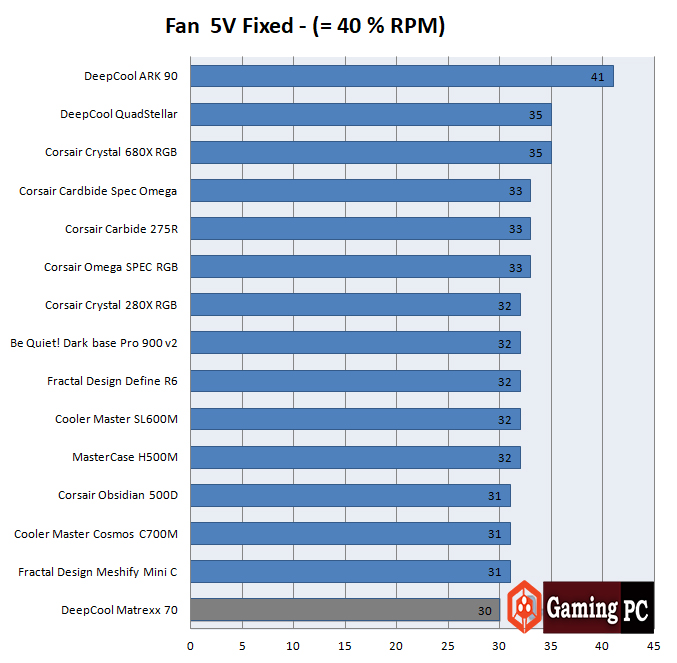
Please note: With the help of a dedicated fan controller, we assign either 5 Volts or 12 Volts to the fans installed in the chassis. That goes for any chassis tested so that we can control the test environment. So we bypass the any integrated fan controller.

Now then, 12V (100% RPM) measurements (max fan noise): not that you'd ever use such a mode, but we know you guys like data and test results. At full power 12V, we measure 35 dBA.
Airflow performance
On the previous page, you have been able to see the acoustics for 5V and 12V settings. We'll now place a focus on airflow and, while a totally precise measurement, I'll classify this page as somewhat subjective. But we can get a good indication of airflow per fan at each setting.
example photo of Anemometer measuring airflow
With the help of a simple to use anemometer, we can see how airflow behaves. An anemometer is a device used for measuring the speed of the wind, and actually also is a common weather station instrument. The term is derived from the Greek word anemos, which means wind, and is used to describe any wind speed instrument used in meteorology. It's a relatively cheap device to get and does seem to provide pretty steady results. Each fan is measured with the anemometer positioned precisely as shown above. Now we can measure how much air the fan is sucking inwards, the value is measured in meters per second; higher is, in this metric, better of course.

So at a 4V~5V, you're looking at average for the included fan(s). In this chart, higher is better of course. Once we fully load up the fan with 12V we can measure 2.1 meters of air being moved (wind speed) each second for the front intake fans. The fan(s) rate average for airflow.
Final Words & Conclusion
It's been interesting with the Matrexx 70, I swear I've seen an announcement a long time ago with a completely different front. So inbetween a year and now, DeepCool revamped the design significantly. Pretty much they stripped away anything RGB, bringing a more dressed down product to market. the chassis is okay really as it offers plenty of room and is spacious and easy to tuck away cables. It looks good as well, though the glass plate above the PSU is not really a plus as it will collect 'easy to spot' dust and if you can see through it, you will be looking at PSU cable spaghetti. One fundamental miss really is the front side-mounted dust filter, it isn't magnetic and if you mound a fan of LCS there, it's a bitch to put back, really annoying and you'll get annoyed every time you will, clean that filter. As to why DeepCool did not opt a simple magnetic clip for that filter much like the top side, is a little baffling. The PSU compartment could have benefited from a bit more clearance for cables coming from the PSU, but with a standard power supply, it ain't an issue either. The 3cm clearance at the backside for cable routing is good. One thing I do miss though are rubberized inserts for the grommet holes. Other than that I have little negative comments to make really as we're not exactly talking about a 200 USD product here.
Aesthetics
Taste differs and the chassis itself might be something to a preferred style of many, but not for all. It's a bit surprising to see a chassis from DeepCool with no active RGB whatsoever. The usage of glass really works out well as well as hiding stuff that does do not want to show. I can say though that each and every little aspect of the chassis has been thought through really well. The design of the chassis has been made to make your life a little easier while combining the best features an enthusiast crowd seeks in a chassis. But yeah, this is a well thought through product with nice cooling, dust filters, USB 3.1 integration and relatively tool free design. The glass side and front panels obviously give it the great looks, especially when you combine it with a nice RGB LCS kit or fans. BTW there is a 3F version of this chassis with 3x RGB fans.
DEEP COOL MATREXX 70 3F Case
Features
Internals, here we really cannot complain. I mean I could moan about the HDD trays being secured with a screw and accessed from the front side, but come on, who really cares? DeepCool also extended towards EATX form factor support for motherboards, the more lengthy graphics cards will fit easily as well. There is no graphics card riser included with this kit, but that is optional. it would look great we think. There's plenty of extra space for many forms of liquid cooling on the top, front and rear sides. Storage wise the optical 5.25" unit seems to be a thing of the past, easily solved with a USB based DVD/Bluray drive of course. There is sufficient space for two HDDs and another 2x2 SSDs (two of them have trays, the other two can be mounted directly on the chassis plating. The chassis has nice motherboard cutout and there's enough but not plentiful space left for cable routing through the grommet holes, all in that all-black interior. The one downside is the visibility of the power supply, I wish the PSU would have been covered 100% opposed to see through glass. The overall build quality of the chassis is okay.


"https://gccgamers.com/computer-parts-components/power-supplies/deepcool%20dq750m%20750w%2080%20plus%20gold%20certified%20fully%20modular%20-%20black%20%7C%20dp-gd-dq750-m-v2l.html
ReplyDeletebuy DeepCool DQ750M 750W in uae"
Sharkoon Case in UAE, Sharkoon TG4 Case in UAE, Sharkoon RGB ATX Case in UAE
ReplyDeletehttps://gccgamers.com/sharkoon-tg4.html
Sharkoon TG4 Case in UAE, Safe Shopping Multiple Payment Options Express Delivery GCC Gamers Moneyback Guarantee.
1632202721285-7