

Cooler Master MasterBox NR600 w/Front Mesh Ventilation
Cooler Master MasterBox NR600 w/Front Mesh Ventilation
Cooler Master MasterBox NR600 without ODD
Form and Function Streamlined
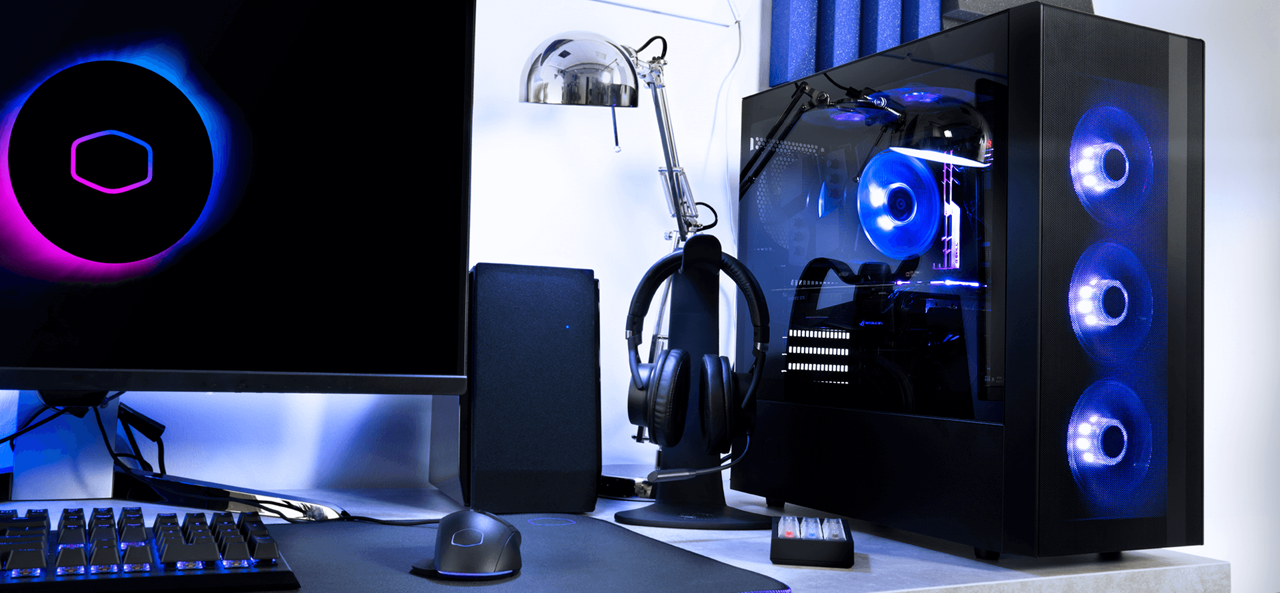
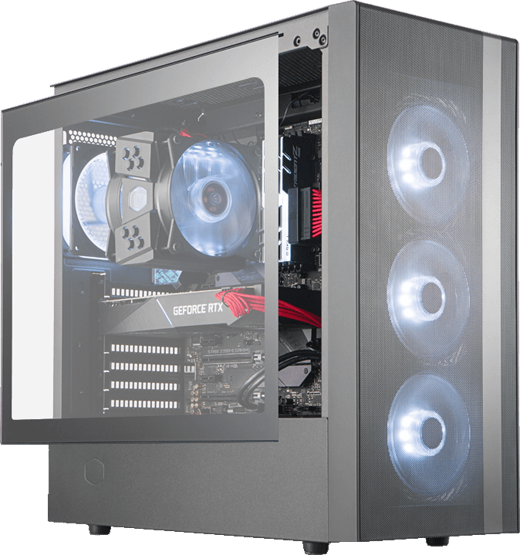
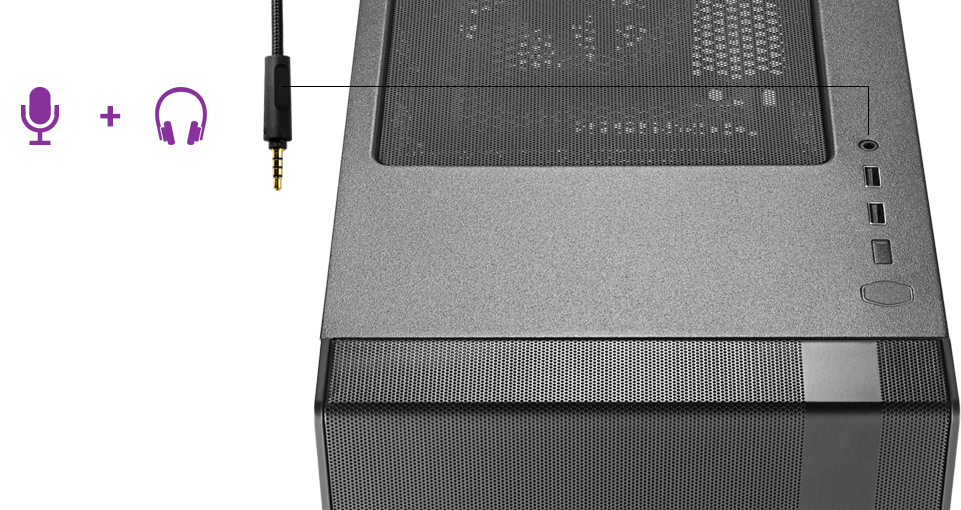
A minimalistically-designed mid-tower case that looks great in various settings. The meshed front panel pairs with a pre-installed front intake fan and rear outtake fan to create efficient airflow. A tempered glass side panel lets you admire and showcase your neat, clean build, which is achieved by cable routing space behind motherboard tray and a power supply shroud hiding cables and drives. Inside the enclosure you'll find ample space to accommodate your high-performance components, while also having flexibility to configure air or water cooling as needed. For easy access, two USB ports, a reset button, a Cooler Master logo-shaped power button, and a 4-pole headset jack are located on the top of the case.
Minimalistic Design
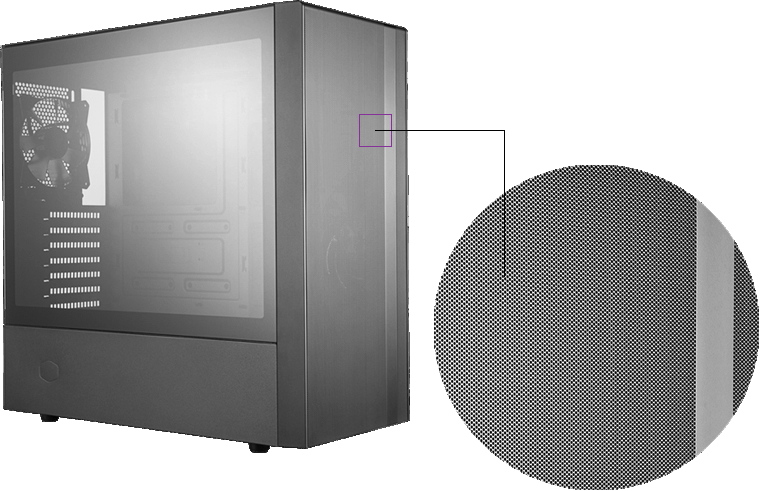
The MasterBox NR600 is a pure and simple design that is focused on airflow performance. A single-layer, fine mesh makes up the entire front panel, achieving efficient airflow while also acting as a dust filter.
Seamless Tempered Glass
The tempered glass side panel sits completely flush against the chassis, mounted securely and discreetly by a system of tabs and thumbscrews.
Ample Storage Support
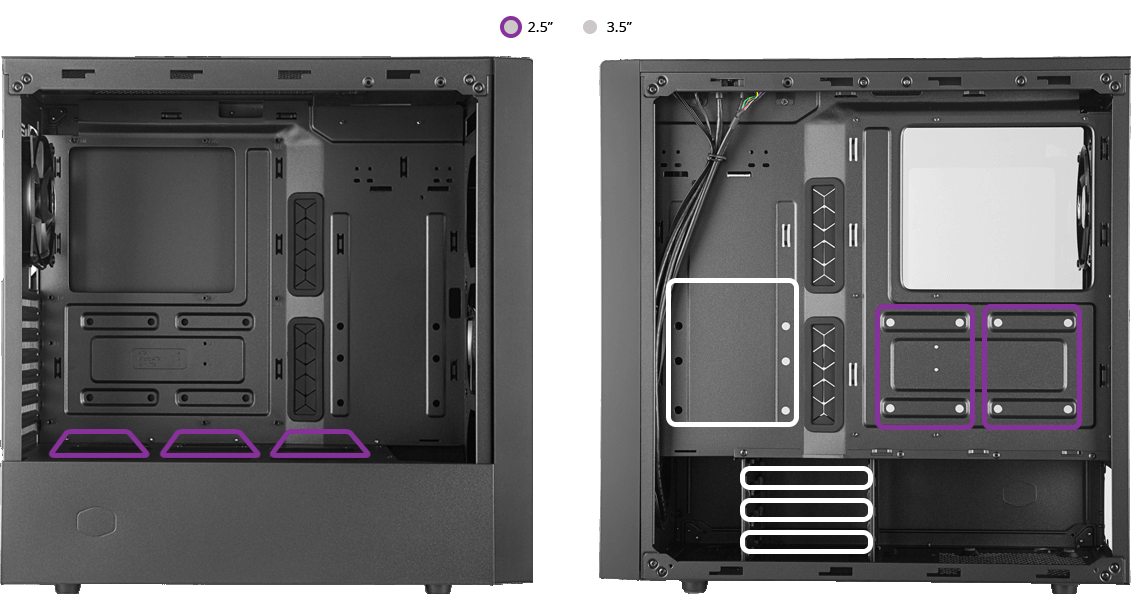
A total of 5x 2.5" and 4x 3.5" drives can be mounted tool-less. Storage can be mounted on the PSU shroud, behind the motherboard tray, and in the HDD cage.
Headset Jack
The single 4-pole headset jack features both Audio and Microphone capabilities simultaneously so that separate jacks are not needed.
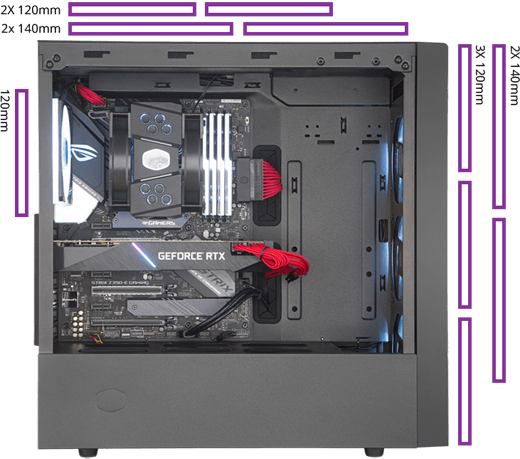
Fan Support
Front: 140mm x2 / 120mm x3
Top: 140mm x2 / 120mm x2
Rear: 120mm x1
* non ODD version
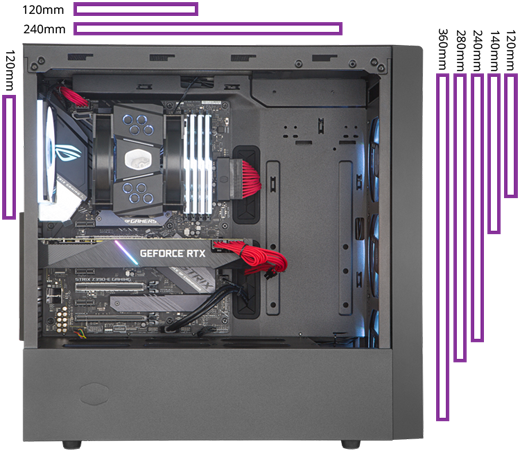
Radiator Support
Front: 360/280/240/140/120mm
Top: 120/240mm
Rear: 120mm
* non ODD version
Learn more about the Cooler Master MCB-NR600-KGNN-S00
ModelBrandCooler MasterSeriesMasterBox NR600 without ODDModelMCB-NR600-KGNN-S00
DetailsTypeATX Mid TowerColorBlackCase MaterialSteel / PlasticWith Power SupplyNoPower Supply MountedBottomMotherboard CompatibilityMicro ATX / ATX / Mini-ITXSide Panel WindowYesRemovable FilterTop, Bottom
ExpansionInternal 3.5" Drive Bays4Internal 2.5" Drive Bays5Expansion Slots7
Front Panel PortsFront Ports2 x USB 3.0 / Audio
Cooling SystemFan OptionsFront: 3 x 120mm (1 x 120mm fan Pre-installed) / 2 x 140mm fan
Top: 2 x 120mm / 140mm fan
Rear: 1 x 120mm fan (Pre-installed)Radiator OptionsFront - Up to 360mm / Rear - Up to 120mm / Top - Up to 240mm
Dimensions & WeightMax GPU Length Allowance410 mmMax CPU Cooler Height Allowance166 mmDimensions (H x W x D)18.60" x 8.20" x 18.80"Weight14.50 lbs.
Additional InfoFeaturesMinimalistic Mesh Design - Elegant design elements are applied to mesh for optimal thermal performance.
Optimal Thermal Performance - The full mesh front panel and ventilated top panel provide a high potential for thermal performance.
Flush Tempered Glass Side Panel Design - The tempered glass side panel, fastened by thumbscrews on the rear panel, keeps the surface flush and unobstructed.
Headset Jack - The single 4 pole headset jack features both audio and microphone capabilities simultaneously so that separate jacks are not needed.
Graphics Card Support Up To 410mm - Generous clearance space is provided to support the latest graphics cards.
Cable Management - High quality, longer length rubber grommets and generous clearance behind the motherboard offers ample room for cable management.
Additional InformationDate First AvailableMay 11, 2019
Opening up the case for the first time revealed two minor fit-and-finish issues: first, there was the tip of a broken-off rivet (nothing structural) loose in the bottom of the case, and second, the glass panel doesn’t slide all the way forward to fit flush against the front panel. The glass is supposed to be slotted in, slid forward,and screwed into place, but since it can’t slide forward that last millimeter or so, the metal tabs at the rear of our case were bent slightly when the thumbscrews were tightened down at the factory. This also doesn’t affect function, but it is visible from the outside of the system.
The other side of the case uses an old-school steel panel with tabs that hook into the case, but it’s thick enough and the cable management space is wide enough that there isn’t much danger of the panel bowing out when it’s being put back on, which is usually the biggest annoyance with that style of panel. The cable cutouts on the motherboard edge, the clearance for cables, and the tie points that are well-placed for velcro straps make cable management pretty good. The riveted HDD cage is the only roadblock, since it makes it more difficult for users to repurpose that space for storing power cables.
The top of the case has a vent roughly 30cm long, or large enough to fit two 140mm fans. Its magnetic filter is shipped stowed inside the side panel, which is a great strategy to keep us from using it our stock test and hurting thermals. The filter for the PSU vent on the bottom of the case is just a square of mesh that fits into cutouts on the case. It pops out easily and it’s annoying to put back in, but it’s also fairly standard for this price range.
Front I/O is limited to two USB ports and one four-pole (combined in/out) audio jack. Cooler Master advertises the combined jack as a feature, but plenty of headsets split mic/headphone cables out to two separate 3.5mm jacks, so it’s just as likely to be a limitation. Whether it’s a benefit or a drawback comes down to what the user already owns, though. On the other hand, Cooler Master may have made up for this in the compatibility department by selling a version of the case with a 5.25” bay. We rarely bother to comment on support for optical drives at this point, but it’s something that other mesh-fronted cases like the Meshify C, RL06, or the various Cooler Master H500 variants shy away from. The ODD model of the case is a separate SKU and doesn’t seem to be on sale yet at the time of this writing.
GN Case Testing Bench (Sponsored by CableMod)
Component
|
Courtesy
Of
|
|
Video
Card
|
MSI GTX 1080 Gaming
X (OC Mode)
|
MSI
|
CPU
|
Intel i7-6700K @
4.4GHz
|
GamersNexus
|
CPU
Cooler
|
MSI Core Frozr L
|
MSI
|
Motherboard
|
MSI Z170A Gaming M7
|
MSI
|
Memory
|
Corsair Vengeance
LED 32GB 3200MHz
|
Corsair
|
SSD
|
Samsung 850 EVO
120GB
|
Samsung
|
PSU
|
Corsair RM650x
|
Corsair
|
Cables
|
CableMod Pro Mesh Cables
|
CableMod
|
Case
|
This
is what we're testing!
|
-
|
The video card is configured to run at 55% fan speed at all times.
Prior to load testing, we collect idle temperature results for ten minutes to determine the unloaded cooling performance of a case's fans and air channels. Thermal benchmarking is conducted for 1400 seconds (23 minutes), a period we've determined sufficient for achieving equilibrium. The over-time data is aggregated and will occasionally be compiled into charts, if interesting or relevant. The equilibrium performance is averaged to create the below charts.
Load testing is conducted using Prime95 LFFTs and Kombustor “FurMark” stress testing simultaneously. Testing is completely automated using in-house scripting, and executes with perfect accuracy on every run.
We recently validated our test methodology using a thermal chamber, finding our approach to be nearly perfectly accurate.
CM NR600 Thermals & Noise
For standardized fan testing, we’ve picked two 140mm 1500RPM Noctua fans to use as intake (one designated upper, one lower) and one 120mm 1500RPM Noctua fan as exhaust. Almost every ATX case we’ve reviewed over the past couple years supports two 140mm intake and one 120mm exhaust fan. Other than that, we tested without the front panel as usual, and did one final test with an extra 120mm 1500RPM intake fan to see what performance would be like if a user chose to just buy one additional fan.
NR600 Torture Test - CPU

We’ll start the CPU torture thermals with just the NR600, then we’ll add it to the comparative chart versus other cases. With the Cooler Master NR600 under full stock conditions, we measured CPU thermals at 55.6 degrees delta T over ambient when running the torture workload, with idle at about 4.8 degrees Celsius. Simply adding a Noctua 1500RPM 120mm fan to the front dropped CPU thermals to 47 degrees over ambient, a reduction of about 8.5 degrees. If you’re buying this case, one of the best things you can do is purchase one 120mm fan. The improvement is because we’ve now created a straight front-to-back airflow path for the CPU tower cooler, benefiting our configuration greatly. That doesn’t mean the case is bad in its stock configuration – it’s actually not bad overall – but does suggest that there’s a lot to be gained from adding one fan. This is great news, actually, because it means that Cooler Master’s front mesh design is sufficiently constructed such that fan configuration changes have meaningful, significant impact to thermals. Removing the front panel entirely has functionally the same effect on thermals as adding a fan, which is because we’ve now opened up air to the CPU tower fan to directly intake without obstructions and pressure inhibitors. Adding a fan and removing the panel are nearly synonymous, which indicates minimal obstruction to airflow with the panel design. Replacing the fans with 2x 140mm fans in the front yielded worse performance for the CPU than just adding one 120mm, and that’s because of the awkward, poor fitment of 140mm fans in this case. We wouldn’t recommend them.

Here’s the comparative chart. 55.5 degrees Celsius CPU dT is average on this chart, just a little warmer than the Meshify C stock. It’s in the same boat as Fractal’s Meshify: great cooling potential, but short on fans when stock. Adding a single fan to achieve the 47.1 degree result makes the NR600 much more competitive, and puts it on the level of the long-praised SilverStone RL06, another mesh-fronted case that ships with a full complement of four 120mm fans. There’s always a pick-two balance to be struck between case price, number of fans, and quality of fans, but both Cooler Master and Fractal prioritized price. The user is left, and encouraged, to purchase at least one extra fan or shove a CLC in the case somewhere.
NR600 Torture Test - GPU

GPU torture thermals are next, starting again with a limited chart. The baseline torture GPU temperature with the stock case configuration was 54.3 degrees Celsius, which dropped to 50.6 degrees with the front panel removed. This lack of reduction versus the CPU results is because the single intake fan is aimed more towards the bottom of the case, benefiting the GPU in the stock configuration. This is probably best, as the GPU is more thermally sensitive and will boost pursuant to core temperatures. Adding a single front intake fan did little for the GPU, unsurprisingly, as we pointed it straight at the CPU cooler. We measured a 1-degree reduction, which is within our error margins. We do not have the test resolution to state if this is a meaningful change or just statistical variance. Swapping to the lopsided dual-140 configuration further reduced thermals, bringing us down to 49.9 degrees. In this setup, because the top doesn’t accommodate a 140 properly in favor of an optical drive support, the GPU receives most of the air.

Here’s the comparative chart. A baseline of 54.3 degrees is on the warm side, judged against our other cases, but still well under control. To be fair, the stock Meshify C averaged 57.8 degrees dT over ambient in this test. With a full set of four 120mm fans (three intake, one exhaust) in this case, we’d probably see scores comparable to the RL06 across the board. One of the advantages of mesh-fronted cases like this is that adding more fans will continue to improve performance.
3DMark Thermals

Running the Firestrike Extreme stress test on a loop averaged 56 degrees over ambient for GPU thermals, a couple degrees higher than the torture test. That places it in the middle of the chart again, but two degrees below the stock Meshify S2 and four below the stock Meshify C – we’re emphasizing “stock” because these cases would perform better with additional fans if they were purchased, but that’s also true for the NR600, which we ran stock in this test. Stock intake fans that have to supply air to both the CPU and GPU are never a great compromise, but with airflow biased towards the GPU, the NR600 manages to pull through reasonably well in this test.
Cooler Master NR600 Blender Benchmarks

The blender CPU render averaged 38C CPU dT, a full two degrees below the Meshify C. It’s within margin of error of the NZXT H500, which is practically the same thing but with a sealed-off front panel. Mesh is great, but without an extra fan or two to take advantage of it, no more air will come in than it would in a more restricted case.

With the blender GPU render, GPU dT averaged 26.8C. That’s again significantly better than the Meshify C, but just about tied with the NZXT H500, as well as the Lian Li O11 air. Those are both fine cases, but again the NR600 could do better with some additional fans, as seen in the torture tests. The stock fan does a decent job of moving cool air in along the surface of the PSU shroud, but it doesn’t force a wall of air through like the RL06.
CM NR600 Noise Tests

Noise testing is up next. 38.7 dBA is almost precisely the same as we measured the stock Meshify C, which makes sense. The open mesh front doesn’t do much to muffle noise, but the two stock fans also don’t generate much. This case is reasonable overall, just know that adding more fans will affect the noise given the front panel design. That said, we’ve previously demonstrated that mesh cases can be better tuned acoustically by simply dropping fan RPM, which is a benefit not afforded by most silence-focused cases as they need higher pressure to pass all the obstructions.
Conclusion: Cooler Master NR600 vs. Meshify C & NZXT H500

Cooler Master’s NR600 is the exact opposite of its Q500L. The NR600 has highly competitive airflow, even with the stock two fans, and still manages to convert the mesh front into a self-serving dust filter. Job well done overall on this one.
Cooler Master MasterBox NR600 w/Front Mesh Ventilation
Cooler Master MasterBox NR600 review - Product Showcase - PackagingNothing extraordinary at the beginning of this chapter – just a photo of the packaging. The package is rather small and light. The NR600 comes pack in between 2 pieces of protective foam, with the case itself wrapped in a plastic bag. The design is plain, with simple black print on a brown background.
The back of the box presents both versions (with and without an optical drive), as well as a few more details about the case in several languages. You can take a look at the main features of this case below:
Front with mounts for 3 x 120mm fans or 2 x 140mm fans, the front can support a 360 (without ODD), 280, 240. 140 or 120mm radiator.
The top can house 2 x 120mm or 2 x 140mm fan, with room for a 280mm/240mm radiator
The rear can house 1 x 120mm or 120 mm radiator.
Up to 410 mm clearance for GPUs, 166mm for CPU coolers, and 180 mm for the PSU
Five 2.5” SSD mounts
Four 3.5” drive mounts
Full length PSU shroud
The chassis is protected well, with Styrofoam. Our case has not sustained any damage in transport.
The Masterbox NR600 has a classic look, nothing flashy to be found here. No RGB LEDs either (except for the power LED on the top). It’s a mid-sized chassis, measuring 478 (L) x 209 (W) x 473 (H) mm, with a total capacity of 47.25 l.
Do remember to remove the protective film from the tempered glass panel (which doesn’t cover the whole left side, but just the area over the PSU shroud instead). Cooler Master includes a magnetic dust filter for the top (it’s “hidden” at the back of the motherboard tray).
In the accessory bag (which is hidden inside the chassis), you will find a manual and also:
Mounts for your SSDs/HDDs,
Molex to 3-pin fan adapter,
Cable ties
And all the screws you may need for your build.
No additional accessories are included, like a logo badge, etc. but that’s not a must in this budget (and it’s not really an issue). Let’s proceed to the evaluation of the exterior.
Cooler Master MasterBox NR600 review - Product showcase – exterior
One of the side panels is made of tempered glass, and the other one (on the motherboard tray side) is solid. We’d like to remind you the basic specs here. The body is black, which is the most universal colour.
At 478 (L) x 209 (W) x 473 (H) mm /18.81 in x 8.22 in x 18.62 in, the size is about average for today’s standards. The weight is quite low, as it’s only 6.57 kg. The following motherboard form factors are supported:
ATX,
M-ATX,
Mini-ITX
The left side panel has tempered glass spanning about ¾ of the case’s height.
The chassis is stable (despite the fact that it’s relatively light), and the side panels are secured by thumbscrews.
The front of the case is made almost entirely of mesh, which should help the front fans (up to three of them) to pull in air relatively easily. The mesh also doubles as a dust filter. There is a solid black stripe on the right side of the front part, but there’s no logo there that would indicate the brand. You can see also the place for 5.25” drive.
At the back, you can see 7 expansion slots. The rear (120 mm) fan mount allows some height adjustment. As the screws holding the individual covers are placed outside the case, Cooler Master has implemented an extra cover that you will need to remove during assembly. The PSU bay is located at the bottom, so no surprises here.
The manufacturer includes two 120mm, voltage-controlled fans (200031171-GP) with a rifle bearing. Cooler Master states that they have maximum of 1200 ± 200 rpm.
When you look at the bottom section, you’ll find feet that have been rubberized to prevent unwanted movement of the chassis on the floor. The provided (very basic) dust filter (not a magnetic one) covers the PSU area. It’s easily removable for maintenance, but also quite difficult to put back in correct way on your first try. It also allows the PSU to catch a breath.
You'll find a (relatively) standard I/O panel on the top (like in most cases nowadays). It consists of a set of two USB 3.0 ports, reset and power buttons, and an audio jack (only one, combining the mic and headphone function). The top part has a vent with mesh a filter. Let’s continue to the next page.
Cooler Master MasterBox NR600 review - Product Showcase - Exterior/Interior
The Cooler Master Masterbox NR600 looks very modest (but that’s not an issue).
To open the panels, you need to unscrew two thumbscrews on each side, and then pull them towards the back. There are no sound dampening materials on them.
Out of the box, the Masterbox NR600 offers three SSD mounts located in the main chamber.
There are also two places for mounting SSDs (red) right under the backplate cut-out, and then one 3.5” (white) mount on the left side of the back section of the chassis, plus three additional 3.5” mounts in the PSU shroud area. In total you get:
Five 2.5” SSD mounts
Four 3.5” drive mounts
Cooler Master MasterBox NR600 review - Product showcase – interior
Both side panels are relatively easy to open: you just have to remove two thumbscrews on each side. Let’s see what’s waiting for us inside.
The first thing in the main chamber that will catch your attention would be the ODD bay, and a full-length PSU shroud (on top of which you can install three SSDs). The 5.25” cage can be removed by unscrewing a couple of screws.
You can also install your SSDs in the rear part of the chassis.
There are two SSD mounts under the backplate cut-out. The 3.5" drive mounts are placed on the left side (1x), and in the PSU area, where you can install up to three drives.
Although it’s a medium-sized case, it’s really easy to access all of the motherboard ports, and you can fit huge components here. The case supports graphics cards up to 410mm in length, and we have yet to see anything even close to these limits in real life (even the MSI GeForce RTX 2080 Ti LIGHTNING Z edition is “only” 340mm long). Max CPU cooler height is 166mm (which should be enough to fit most products on the market). The maximum PSU length is 180mm.
On the top, there is a magnetic dust filter that you can find at the back of the motherboard tray after you’ve unpacked the chassis. Unfortunately, there is no removable fan/radiator tray, which would have made your installation experience a bit easier (but that’s not a must in this budget).
There is quite a lot of space to route cables, but it’s better to pre-route the EPS one before securing the motherboard inside. There is also a huge cut-out for your cooling solution’s backplate, which should make installing the CPU cooler much more user-friendly. There are rubber grommets for the cable pass-through and this part is also slightly angled (so it should provide a bit more space for cables at the back).
Under the rear 120mm fan, there are 7 PCI card slots secured with screws. You can access them from the back of the chassis.
There is a 180mm length limit for the PSU, because the HDD cage is installed permanently. It’s best to stay below 170mm if you want to use it. The PSU bay has foam tips to prevent vibrations from transferring to the frame. Ok, next page, please.
The Cooler Master Masterbox NR600 is equipped with one 120mm fan in the front. You can install up to three 120mm fans, or two 140mm ones instead. This amount of space is enough to fit even 360mm radiators. The front mesh also doubles as a dust filter.
As you can see, there is about 70mm of space in the PSU shroud cut-out, so you can mount standard AIO radiators (with fans that are typically 25mm thick) in the front, but if you want to use some beefier ones (or a push-pull setup), you can still do it, as the front fans are mounted on the front of chassis frame.
The back side of the Cooler Master chassis is clean, and it should be relatively easy to route all the cables properly in there, especially that the cable openings with rubber grommets are slightly angled, so you’ll have a bit more space on the left side of this area.
Clearance varies depending on where you measure it. It’s in a range between 20 and 28 mm, and the latter value is quite nice.
On the lower-left side, there is space for up to three 3.5” drives. The standard cables include USB 3.0, and front panel connections (with HD audio), as well as one SATA connector (for the fan hub). The cabling is black, which improves the aesthetics of the whole package. There is no fan hub included (but that’s not a problem considering the budget).
Cooler Master MasterBox NR600 review - Product showcase – The Build
As the top provides space only for radiators up to 240mm, we had to install the NZXT Kraken X62 (or Asus Ryujin 360) on the front. It was best to remove the 5.25” bay in the process. To do that, you need to undo four screws.
Mounting an SSD on the back of the motherboard tray, right below the backplate cut-out, is done in a brilliant way (the best solution that I’ve encountered so far), and no tools are required. You just need to pop the rubber grommets into place, screw the pin-style screws into the drive (even with your fingers), and push the drive into place.
Installing 3.5" drives is simple (but not as much as the 2.5” ones). You don’t need any tools here either, as you simply attach the plastic rails and slide the drive into place until it snaps in.
It’s relatively easy to route cables at the back of the motherboard tray. Rubber grommets and zip tie mounts surely help in that matter. There is quite a lot of space on the left side of the back of the motherboard tray, due to the recessions in the plate.
On this page, you’ll find a selection of photos of the finished build inside the Cooler Master Masterbox NR600. The GPU that we used here has an AIO LCS, and the CPU is cooled (for measurements) either with air (Thermalright True Spirit 120 Direct) or with a liquid cooler placed at the front. For the purpose of this section, the Asus Ryujin 360 was used (radiator placed at the front). The motherboard is an ATX form factor one (and looks relatively small in this Cooler Master chassis), based on the Z390 chipset, with a de-lidded i7 8700K @ 4.8 GHz inside. The GPU comes from Aorus, and it’s the Waterforce version (GeForce GTX 1080 Ti). The final result looks better than ok. There were no major issues with installing the components inside. To make as much room as possible, the 5.25” bay has been removed.
The PSU is not mounted using a removable bracket, unlike in quite many other cases today, so it has to be fixed to the back wall of the chassis. That’s not a big issue though, considering the price. If you’re installing a modular PSU, attach your cables first, as once the PSU is installed, access to your modular cable ports is limited. Overall, fitting all the cables of the test setup in the case wasn’t difficult, but it’s better to route the EPS power cable before attaching the motherboard to the tray. The white power button lighting on the panel is the only element that stands out during operation.
You won’t see a ton of cables here. The PSU shroud really does its job well (did you notice that there is no logo on it, just an outline?). Now, two shots with the LEDs on.
The only lighting element on the Masterbox NR600 is the white LED in the shape of the CM logo around the power button.
Cooler Master MasterBox NR600 review - Acoustic and thermal performance
Acoustic performance - Fans Noise Levels
Processors and graphics cards can produce a lot of heat, that heat needs to be transported away from the hot core as fast as possible. Often you'll see massive active fan solutions that can indeed get rid of the heat, yet all the fans these days make the PC a noisy son of a gun. Do remember that the test we do is extremely subjective. We bought a certified dBA meter and will measure how many dBA originate from the PC. Why is this subjective you ask? Well, there is always noise in the background, from the streets, from the HDD, PSU fan, etc., so this is, by a mile or two, an imprecise measurement. You could only achieve objective measurement in a sound test chamber.
The human hearing system has different sensitivities at different frequencies. This means that the perception of noise is not at all equal at every frequency. Noise with significant measured levels (in dB) at high or low frequencies will not be as annoying as it would be when its energy is concentrated in the middle frequencies. In other words, the measured noise levels in dB will not reflect the actual human perception of the loudness of the noise. That's why we measure the dBA level. A specific circuit is added to the sound level meter to correct its reading in regard to this concept. This reading is the noise level in dBA. The letter A is added to indicate the correction that was made in the measurement. Frequencies below 1 kHz and above 6 kHz are attenuated, whereas frequencies between 1 kHz and 6 kHz are amplified by the A weighting.
There are a lot of differences in measurements among websites. We measure noise levels in a completely enclosed and closed room. The lowest dBA level we can measure without any equipment activated is roughly 30 dBA in this room. We measure the noise 30 to 40cm from the side panel.
The components:
Intel Core i7 8700K de-lidded @ 4.8 GHz @1.30 V
Asus ROG Strix Z390-E Gaming
AORUS Waterforce GeForce® GTX 1080 Ti Xtreme Edition 11G
Samsung Evo 970 1 TB
OCZ RD400 512 GB
Seasonic Prime Titanium Ultra 850 W
Thermalright True Spirit 120 Direct for AC
NZXT Kraken X62 for LC (placed at the front)
The temperatures were recorded during OCCT testing and in DiRT Rally, with the highest settings, and at 2560 x 1440. Each of the 3 measurements lasted 30 minutes. The noise was measured using a Voltcraft SL-100, at 30 cm from the side panel, in idle and during stress tests. The measurements were taken with the chassis closed. This is similar to a real-life scenario, making it a bit noisier than an open environment. This is the nature of airflow bumping into and hitting the innards of the chassis.
Acoustic performance - Fans Noise Levels + measurements for LCS + measurements for air cooling:
Cooler Master MasterBox NR600 review - Thermal performance
Thermal performance – GPU/CPU temperatures
The fans were connected to the motherboard and ran with one pre-defined fan curve. Room temperature was at 21 +/- degrees Celsius. The charts present the highest temperatures recorded using CPUID HWMonitor 1.39 or HWiNFO 6.00-3620. Since we are testing it all pretty thoroughly, here are the temperature measurements. First up is OCCT - [°C] lower = better.
First up are the liquid cooling temperatures, then the Dirt Rally test for the CPU, followed by the GPU. Air cooler results are also included.
Measurements for LCS followed by Air cooling:
Cooler Master MasterBox NR600 review - Final Words & Conclusion
Final Words & Conclusion
It’s time for the conclusion. The Cooler Master Masterbox NR600 is a nice, budget-friendly chassis. The case has a very unique look that is quite different from a lot of other offers on the market. The interior of the Masterbox NR600 is functional without compromise, offering you plenty of air and liquid-cooling potential, hard-drive storage space, and GPU expandability. The front mesh design doubles as a dust filter, and does its job well. One feature that is not so common anymore is the 5.25” bay. The main drawbacks are the fact that you need to put the EPS power cable in before you install the motherboard, and the lack of a PSU tray, which would have come in handy, especially for power supplies with modular cables. Additionally, it would be nice to be able to remove the HDD cage entirely, as not everyone uses 3.5” drives these days.
Featureset
The Cooler Master Masterbox NR600 is well equipped, and you can’t complain about the storage capacity (for this size of chassis). In the standard layout, you can install four 3.5” and five 2.5” drives. You can still fit up to a 360 mm radiator in the front (after removing the 5.25” bay). The cable management system on the underside of the motherboard tray is above average (especially in this budget). The tray itself has several openings with rubber grommets (and some recessions) that help with cable management and improve the overall look of the case. You can mount up to 166mm air coolers, 180mm PSUs, and 410mm graphics cards, so that should be enough for most users. Dust filters are included as well – placed on the top (magnetic) and on the bottom (for the PSU).
Cooler Master MasterBox NR600 w/Front Mesh Ventilation


amazon affiliate link below

Post a Comment