

Thermaltake Core V1 SPCC Mini ITX Cube Gaming Computer Case Chassis
Thermaltake Core V1 SPCC Mini ITX Cube Gaming Computer Case Chassis
DESIGN
Thermaltake Mini Chassis - Core V1
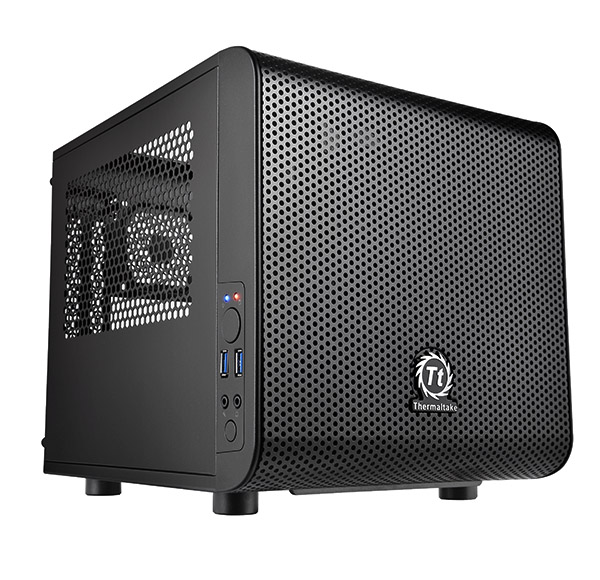
The new Core V1 represented by Thermaltake is a small and cute ITX based chassis with a 200mm fan in the front panel. Smart interchangeable side panels allow users to flip it accordingly to showcase either for superior liquid cooling or superb airflow, which allows you to make your own personal setup. You not only grant to have a really powerful mini system, it also has the ability to house various overclocking components to keep it really cool!

Chambers Concept
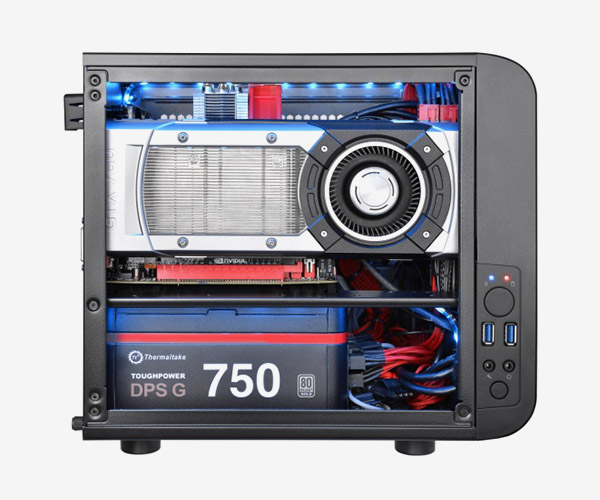
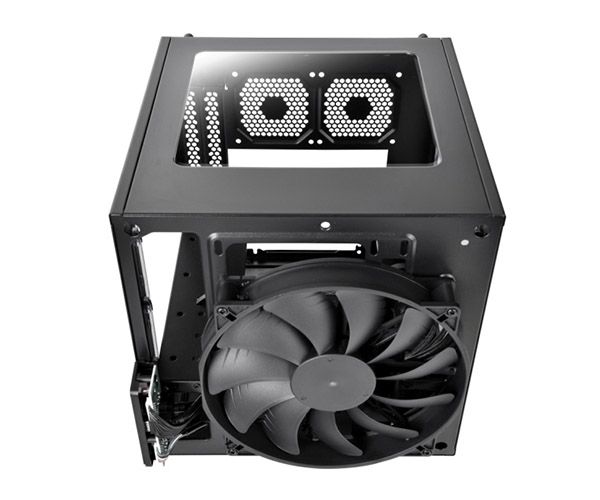
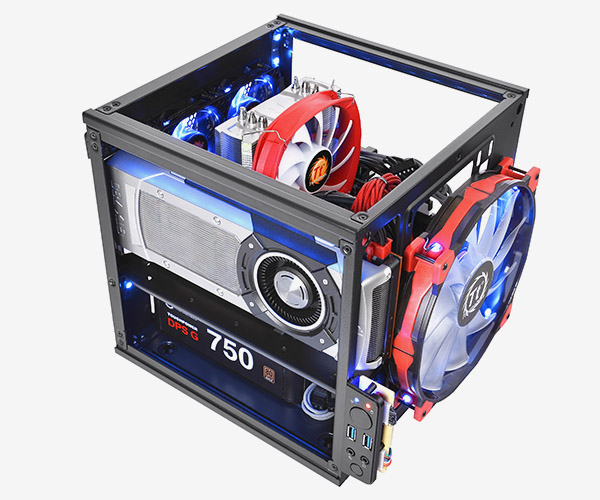
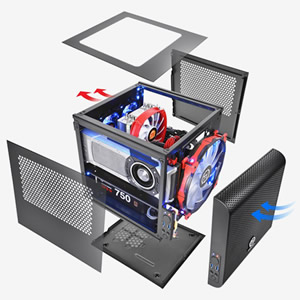
Core V1 has divided into two main chambers: the upper chamber is made for cooling performance and efficiency, and the lower chamber is made for PSU and cable management. With the aid of the removable 2.5”/3.5” drive device racks, users can enjoy to the freedom of gain the maximum interior space for advance cooling performance or liquid system build.
Advanced Ventilation
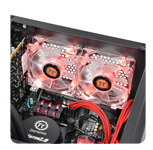
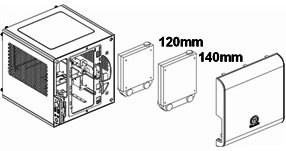
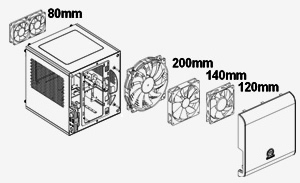
With a promising cooling ability, Core V1 has various mounting points to supports all types of cooling systems that includes DIY/AIO liquid cooling systems and air cooling units. A large 200mm fan is preinstalled in the front, along with two optional 80mm turbo fans at the rear, guarantee to hold up any type of gaming system.
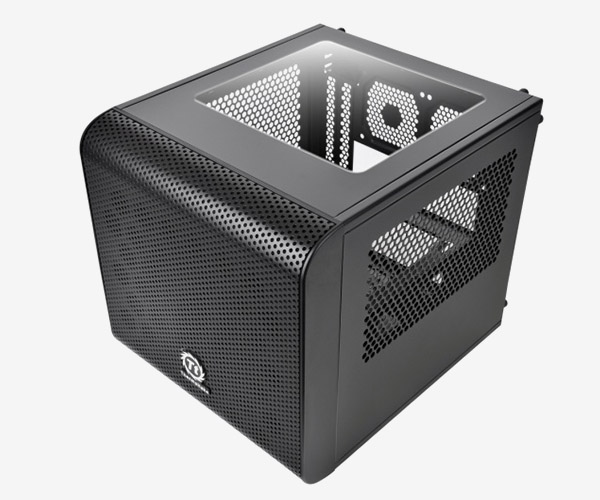
Interchangeable Side Panel
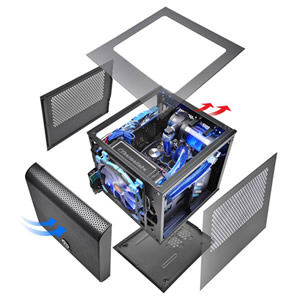
Symmetrical panels allow users to build the system with personality. Play around the panels accordingly for either the best viewing presentation or cooling performance. A removable PSU dust filter and adjustable shockproof rubbers is built with the bottom panel of the chassis to prolong the PSU usage.
Handy I/O Ports
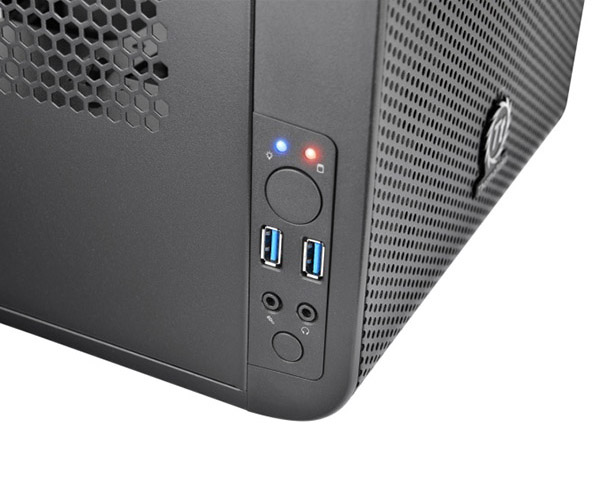
Design with convenience and cleanness in mind, Core V1 has built in dual USB 3.0 and HD audio connectors together with the Power and Reset Button on the side of front panel, which not only keep the panel clean and simple, it also grants a direct and easy access for external devices.
Great Expansion in Compact Size
Core V1 is designed with high-end gaming system compatibility, gamers can easily install up to 4 data storage devices with the modular drive racks, a dual expansion slot VGA with the length up to 260mm, a tower CPU cooler with height up to 140mm, together with a high wattage PSU of length up to 180mm, and still offers a 80mm cable management space.

Tt LCS Certified
Tt LCS Certified is a Thermaltake exclusive certification applied to only products that pass the design and hardcore enthusiasts standards that a true LCS chassis should be held to. The Tt LCS certification was created so that we at Thermaltake can designate to all power users which chassis have been tested to be best compatible with extreme liquid cooling configurations to ensure you get the best performance from the best features and fitment.
Product Information
|
|
Model
|
Core V1
|
P/N
|
CA-1B8-00S
1WN-00
|
Side Panels
|
Window /
Perforated
|
Color
|
Black
|
Compatibility
|
|
Motherboard
Supported
|
Mini-ITX
|
Form Factor
|
Mini Case
|
Dimensions
|
|
Height
|
276mm/10.9"
|
Width
|
260mm/10.2"
|
Depth
|
316mm/12.4"
|
Expansion
|
|
Expansion
Slots
|
2
|
Internal
Drive Bay
|
2 x
3.5"/ 2 x 2.5"
|
External
Drive Bay
|
-
|
I/O Ports
|
|
USB 3.0
|
2
|
USB 2.0
|
-
|
HD Audio
|
Yes
|
Fan
Controller
|
-
|
Cooling
|
|
Air
|
|
Top
|
-
|
Front
|
1 x 120mm or
1 x 140mm or 1 x 200mm |
Rear
|
2 x 80mm
|
Bottom
|
-
|
Side
|
-
|
Liquid
|
|
Top
|
-
|
Front
|
1 x 120mm or
1 x 140mm |
Rear
|
-
|
Bottom
|
-
|
Clearence
|
|
CPU Cooler
Height
|
140mm
|
VGA Max
Length
|
255mm/10"
Enclosed 285mm/11.2" Extended |
ATX PSU
Length
|
220mm
|
Thermaltake Core V1 SPCC Mini ITX Cube Gaming Computer Case Chassis
Learn more about the Thermaltake CA-1B8-00S1WN-00ModelBrandThermaltakeSeriesCore V1ModelCA-1B8-00S1WN-00
DetailsTypeMini-ITX TowerColorBlackCase MaterialSPCCWith Power SupplyNoPower SupplyStandard PS2 PSUMotherboard CompatibilityMini-ITX (6.7" x 6.7")Side Panel WindowTransparent Window (Interchangeable)Removable FilterNo
ExpansionInternal 3.5" Drive Bays2Internal 2.5" Drive Bays2Expansion Slots2
Front Panel PortsFront Ports2 x USB 3.0 / 1 x HD Audio
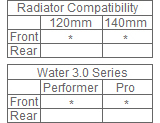
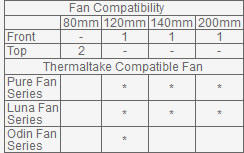
Cooling SystemFan OptionsFront: 1 x 120mm or 1 x 140mm or 1 x 200mm fan (1 x 200mm fan included)
Rear: 2 x 80mm fanRadiator OptionsFront - Up to 120mm / Front - Up to 140mm
Dimensions & WeightMax GPU Length Allowance255mm (Inner chassis), 285mm (Outer chassis)Max CPU Cooler Height Allowance140 mmMax PSU Length200 mmDimensions (H x W x D)10.90" x 10.20" x 12.40"Weight8.80 lbs.
Additional InfoFeaturesThermaltake Mini Chassis - Core V1
The new Core V1 represented by Thermaltake is a small and cute ITX based chassis with a 200mm fan in the front panel. Smart interchangeable side panels allow users to flip it accordingly to showcase either for superior liquid cooling or superb airflow, which allows you to make your own personal setup. You not only grant to have a really powerful mini system, it also has the ability to house various overclocking components to keep it really cool!
Chambers Concept
Core V1 has divided into two main chambers: the upper chamber is made for cooling performance and efficiency, and the lower chamber is made for PSU and cable management. With the aid of the removable 2.5"/3.5" drive device racks, users can enjoy to the freedom of gain the maximum interior space for advance cooling performance or liquid system build.
Advanced Ventilation
With a promising cooling ability, Core V1 has various mounting points to supports all types of cooling systems that includes DIY/AIO liquid cooling systems and air cooling units. A large 200mm fan is preinstalled in the front, along with two optional 80mm turbo fans at the rear, guarantee to hold up any type of gaming system.
Interchangeable Side Panel
Symmetrical panels allow users to build the system with personality. Play around the panels accordingly for either the best viewing presentation or cooling performance. A removable PSU dust filter and adjustable shockproof rubbers is built with the bottom panel of the chassis to prolong the PSU usage.
Handy I/O Ports
Design with convenience and cleanness in mind, Core V1 has built in dual USB 3.0 and HD audio connectors together with the Power and Reset Button on the side of front panel, which not only keep the panel clean and simple, it also grants a direct and easy access for external devices.
Additional InformationDate First AvailableDecember 19, 2018
The Thermaltake Core V1 is supplied in a fairly compact cardboard box which is decorated in a simple black livery. The front of the box features an exploded image of the case which gives us an idea at the internal features.
Turning around the box reveals another picture of the case and a list detailing the features and specification of the case.
Inside the box, there is a limited bundle included which only comprises of the screws required for installation and a few cable ties.
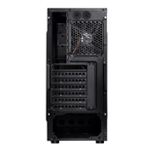
The left and right side panels of the case also feature large perforated air vents which allow extra airflow into the case. The entire case is finished in black and is constructed from a combination of steel and plastic. The construction of the case feels fairly solid, despite the materials feeling a little cheap and flimsy.
We find the front panel connections of the case on the left hand side at the front. Here we find power and reset buttons, two USB 3.0 connectors, headphone and microphone jacks and a pair of LED indicator lights for power and hard drive access.
Thermaltake have integrated a large acrylic window into the roof of the case which gives us a top-down view of the motherboard within when installed. The left, right, top and bottom panels are all removable which gives excellent access to the internals during installation.
Moving around to the rear of the case we can see that the Core V1 has a similar internal design to most competing cases, with a horizontally orientated motherboard sitting atop a full-size ATX power supply. There is space for two 80mm exhaust fans in the rear of the case, although these aren’t populated from the factory.
The case itself is loosely divided into two discrete sections, separated by the motherboard tray which is mounted horizontally. The stand-offs are pre-installed into the case to facilitate the installation of the motherboard.
This case only supports mini-ITX motherboards, meaning that your choice of motherboard is restricted somewhat. The case offers enough space for two expansion bays, though, so dual-slot graphics cards can be installed.
Moving down to the bottom section of the case, there is room for a full-size ATX power supply. We managed to fit our larger than average Seasonic Platinum 1000W in without any trouble, although we were forced to remove the bottom panel of the case to manoeuvre into position.
There is 140mm of clearance for CPU coolers in the case, although we chose to install a Corsair H75 into the unit. There is room for either a 120mm or 140mm radiator in the front of the case.
Rather than use a standard hard drive cage in the Core V1, Thermaltake have chosen to mount two hard drive trays behind the right hand side panel. These can each support a 2.5″ drive and a 3.5″ drive – we installed our Intel 330 Series solid state drive in one of these. Unfortunately we were not able to remove one of the trays from the case due to the poor quality screw thread.
Unfortunately our usual AMD Radeon R9 290X graphics card would not fit in the case as it is too long – the Core V1 only supports graphics cards up to 255mm in length. Instead we chose to install our AMD Radeon 6670 in the case which is more compact in nature.
Test System:
Processor: AMD Vision A10-6790K
Motherboard: Gigabyte GA-F2A85XN-WIFI
Cooler: Corsair H75
Thermal Paste: Arctic Cooling MX-2.
Memory: 16GB (4x 4GB) Mushkin Blackline 1600 MHz
Graphics Card: AMD Radeon HD 6670
Power Supply: Seasonic Platinum 1000W
System Drive: Intel SSD 330 Series 120 GB
Monitor: Viewsonic VX2260WM.
Software:
Microsoft Windows 7 Home Premium (64-bit).
CPUID Hardware Monitor.
Prime95 64-bit.
Furmark V1.10.6
To test the thermal performance of the Aerocool Xpredator Cube we loaded our test system for 15 minutes using Prime95 and Furmark and recorded the maximum temperatures reached using CPUID Hardware Monitor. We then restarted the system and left it for 15 minutes before recording idle temperatures.
Room temperature was maintained at 20 degrees C for the duration of our tests.


These temperatures are good and represent exactly what we would expect from the case.
To conduct our noise level tests, we replaced the graphics card in our system with a AMD Radeon HD 5550 Silence which was passively cooled. We also momentarily disconnected the fans on the CPU cooler so we were only taking into account the noise generated by the fans in the case. We tested the system with the fans at the maximum and minimum setting.

The Core V1 is very quiet indeed, making it ideal for use as a home theatre PC.
Overall we think the Thermaltake Core V1 is a fairly decent chassis which is attractively designed. We imagine that the majority of people will admire the understated design of the case, which makes it ideal for use as home theatre PC or gaming system.
When it comes to build quality, we are a little disappointed with the Core V1 but there are not any serious issues to speak of. Some of the materials used in construction feel a little flimsy but the price of the case must also be factored in. The Core V1 is cheaper than a lot of the competition, so we can consequently forgive the slight build quality issues.
In our thermal and acoustic tests, the Core V1 delivers decent results. While it is clear that this case isn’t specifically designed for maximum cooling capability or silent acoustics, it strikes a reasonable balance between the two.
the Thermaltake Core V1 offers decent value for money. This means it is similarly priced to the Cooler Master Elite 120 Advanced that we looked at a couple of years back, but offers a superior interior layout and more attractive aesthetics.
ProsUnderstated design.
Compact form factor
Good value for money.
Quiet operation.
ConsAverage build quality.
Limited cable routing options.
Thermals & Noise
Results from these tests are not comparable to our other case tests. Our ITX test bench uses 100% different components.
3DMark - CPU & GPU

We’re starting with our 3DMark Firestrike test, which is a gaming stand-in benchmark that generates a realistic load on both the CPU and GPU. Remember, we’re just starting on ITX reviews, so the charts are sparse right now.
CPU temperatures across the board are acceptable for this configuration. The SilverStone SG13 is the lead performer right now, keeping the GPU at 50.1 degrees over ambient. This is well below any throttle territory, and is actually good even when compared to some ATX cases. The front intake fan on the SG13 helps tremendously here.
The Thermaltake Core V1 operates about 4 degrees warmer, at 54.1 over ambient, which is also acceptable. The Cryorig Taku is pushing it, running a 61-degree delta T over ambient. After accounting for ambient temperature, that puts us right against a major thermal limitation with GPU Boost 3.0. Our actual diode temperature is closer to 83, with throttle territory at 84C. We’re dropping some clocks here.

In fact, in this frequency over time chart, you’ll see that the SG13 maintains an average clock of about 1780 to 1800MHz, whereas the Taku sits closer to 1740-1760MHz, with some dips down to 1670MHz. That’s not a lot -- you’re talking single-digit FPS differences -- but it’s certainly a demonstration of how thermals impact performance.
Blender - CPU

Next up is Blender performance with CPU rendering, for which we’ll also cover VRM thermals.
For CPU thermals, both the SG13 and Core V1 operated at equivalence -- within margins. Both cases are at about 48 degrees over ambient for the CPU. The GPU, which is unused here, is also within error margins for differences.
The Cryorig Taku isn’t throttling or performing in a way that drastically affects performance, but it certainly could be better. The GPU, which is idle during this test, is still operating at 16 degrees over ambient -- that’s impressively lacking cooling. It’s not hurting anything, but it speaks to the design of the chassis. The CPU operates about 5 degrees warmer than the Thermaltake and SilverStone cases. Performance isn’t great, but it’s fine. Considering this test is relatively lightweight on total system thermal strain, we’re doing fine; the only component under serious load is the CPU.
Blender - VRM Thermals
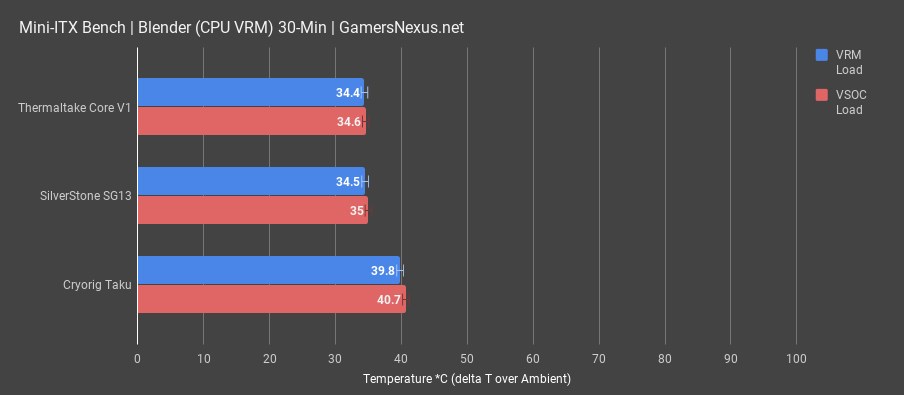
VRM thermals during Blender mostly give us another metric to consider, but don’t reveal any serious design flaws. The SG13 and V1 are both operating at about 34 degrees over ambient for the hotspot MOSFET, or about 35 degrees for the SOC VRM. The Taku is about 40 degrees over ambient. For perspective, in order for even the Taku’s measurement to really matter, you’d have to have a room temperature of something like 60 to 70 degrees. The water in your body would start boiling before you had a catastrophic failure. Although interesting, this load isn’t intensive enough on the power components to hurt anything. All cases perform well within VRM spec.
Blender - GPU

GPU rendering with Blender produces a lineup with the SG13 again in the lead, at 32 degrees over ambient, with the Core V1 positioned about 2 degrees warmer, and the Taku nearing 40 degrees.
Torture - CPU

Torture testing is a little abusive on these small boxes. We run power viruses on both the CPU and GPU simultaneously, which results in a lot of potential for throttling.
In an absolute worst-case scenario, the Taku with the drawer completely opened -- basically an open-air bench -- performs best, naturally. This gives us an idea for the kind of impedance that these cases are causing, resulting in obstructed airflow in a few instances. The Taku establishes a baseline of 54.7 degrees over ambient for unobstructed airflow, an improvement of 13 degrees over the stock Taku’s 67.5 degree result. The SilverStone SG13 tested stock at 65.6 degrees, with removal of its filter improving performance by about 3 degrees. The fact that SilverStone’s filter only impacts performance to this minimal level is noteworthy, and it’s well worth keeping the filter in place. The Thermaltake Core V1, tested with the acrylic window in the top position, operated at 69 degrees. This was the worst performer, but is also the only configuration where the top panel is completely blocked off. Given that we’re using a downdraft cooler, that result makes sense. Shifting the acrylic window to the side and putting a ventilated panel on top, we dropped down to 66.7 degrees -- comfortably between the SG13 and Taku.
Torture - VRM Thermals

VRM thermals under this torture test are a bit higher than previous tortures, but still uneventful overall. That’s a good thing, to be fair, it’s just not very exciting. Open air in the Taku, drawer open, vCore VRM thermals loaded to about 39 degrees over ambient, with SOC thermals at 40 degrees. The stock Taku ran significantly warmer -- about 12 degrees warmer -- at 50C over ambient vCore, or 56C for VSOC. The Thermaltake Core V1 ran warmest of all with thanks to the top-mounted acrylic, but was still fine. The mesh top V1 dropped thermals by 2-3 degrees under the acrylic-topped V1. SilverStone’s SG13 was most impressive, with a baseline vCore load temperature of 46 degrees, just 8 degrees above the open-air test.
Torture - GPU Thermals

GPU torture thermals are a bit more varied, and establish the SG13 in a minor lead over the Core V1, and a dominating lead over the Cryorig Taku. The Taku holds a lead when left open, which isn’t really much of a Taku test -- it’s more of an open-air test.
Noise-Normalized

Noise-normalized testing establishes the SG13 and Core V1 as near each other in performance, with the CPU cooler configured to 80%. We actually had to run the Taku with the CPU cooler at 90%, as it was so thermally choked on both CPU and GPU components that it restricted test conditions.
Editors LikedPrice
Side panels
Ease of use
Simple large tray cut out
Room inside for 140 mm CPU Coolers
200 mm fan included, plus room for expansion
Editors Didn't LikeLimited AIO locations and size support
Installation
Getting your system installed in the Core V1 is extremely simple. First I would suggest that you remove all of the panels so you have as much room to work inside as possible. I will be installing hard drives first. To remove the hard drive cages all you have to do is remove a single screw on each and pull them out. I will be installing a 3.5-inch drive and a 2.5-inch drive in the Core V1.

The 3.5-inch drive installs on the large side of the hard drive cage with four screws that you use the included rubber washers with. I opted to install the 2.5-inch drive in the smaller side of the cage. Line up the mounting holes with the two small tabs and clip them in, then finish the installation by securing the drive with two screws on the opposite side. When finished your drive cages should look something like this.

Now go ahead and reinstall the drive cages in your system.

The motherboard is next, it easily installs without any issues at all. You notice that we are using a low profile CPU cooler, but you really don’t need to worry about most coolers as the Core V1 supports CPU coolers up to 140 mm in height.

The power supply is next and all you need to do is flip the entire case over and slide your power supply in. Again this case supports normal-sized ATX power supplies which is great.

Now it is time to start wiring everything up, since you can remove all of the panels on the case you really don’t feel that cramped at all.

Finally it is time for our graphics card and because it is so long I had to install it through the front of the case. The extra room that Thermaltake gives you for graphics cards is great, especially in such a small case.

With everything installed all you need to do now is put your panels back on and power on your system. Here are a few shots with everything installed.


Thermaltake Core V1 SPCC Mini ITX Cube Gaming Computer Case Chassis


amazon affiliate link below


Post a Comment