Cooler Master MasterCase H100 Mini-ITX PC case
Cooler Master MasterCase H100 Mini-ITX PC case
Introduction
With the trend of PC builders flocking to smaller and smaller cases, we have seen an increase of small form factor cases hitting the market. A new contender in the ring is Cooler Master’s latest addition to its H line of cases: the H100. The H100 features steel frame construction, a single 200mm RGB fan, and an extremely small footprint of 12.28 x 8.50 x 11.85 inches. Even with the H100’s small frame, it still manages to support a full ATX PSU and room for a front radiator up to 200mm in size. The H100’s size isn’t the only thing mini about this case, as it lists an affordable MSRP of only
About Cooler Master

Back in 1992, when the internet was in its early stages and CPU’s were measured in MHz rather than GHz, a company called ORYX was born. ORYX later became Cooler Master, which we know the company as today. Started by a rogue product manager who had no funding and no support except a single administrative secretary, he set out to create, innovate and improve products for the PC industry. Starting with its first product, a Socket 7 CPU heat sink in 1993, their product line has since grown to Cases, Peripherals, Fans, and much more. Over the past 25+ years they brought many advancements and firsts to the PC industry (such as the first all copper heat sink) and today, they continue to innovate by bringing new and exciting products to market.
Features & Specifications
Notable Features:
Extra small form factor
Single 200mm RGB front fan
Carrying handle
Technical Specifications:
Dimensions (L x W X H)
|
213 x 216 x 301mm
|
12.28 x 8.50 x 11.85 inch
|
|
Motherboard Type
|
Mini-ITX
|
Expansion Slots
|
2
|
Fan Support - Front
|
120mm x 1 / 140mm x 1 / 200mm x 1
|
Radiator Support - Front
|
120mm / 140mm / 200mm
|
PSU Length
|
210mm (without radiator installed)
|
160mm (with radiator installed)
|
|
Graphics Card Length
|
210mm (without radiator installed)
|
180mm (with radiator installed)
|
|
CPU Cooler Height
|
83mm
|
Power Supply
|
ATX PS2
|
Packaging & Unboxing
Cooler Master’s H100 is packaged in a plain cardboard box that has a wire-frame outline of the case on the front of the box. Toward the bottom, it has the tagline: “A Little Game-Changer” due to its extremely small form factor.

There is a wire-frame shot of the front of the H100 on the side of the box.

On the back is our final wire-frame of the H100 on the right-side with the left-side describing the features of the case. At the bottom half is a bulleted list of all the H100 features written in 8 different languages. These features include:
Compact Mini-ITX design
Fine mesh ventilation
200mm RGB fan
Fits full ATX PSU
Built-in handle
RGB lighting control

The final side of the package is a table of the case specifications and a link to Cooler Master’s website to get more information on the H100.

Taking the H100 out of the box, it is nestled between 2 pieces of Styrofoam and wrapped in a plastic bag protecting the case during shipping.
Now that the packaging has been removed from the H100, we get our first look of its unique single 200mm front fan.

Included with the H100 are the following: an installation guide, RGB controller, zip ties, and mounting screws/hardware.
A Closer Look: Exterior

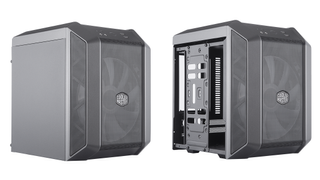
The H100 features an all-black finish with a steel frame construction and measures at an extremely small 12.28 x 8.50 x 11.85 inches. The front of the H100 sports fine mesh ventilation for its large 200mm RGB fan, which is the only fan that provides airflow for the case. The left side of the case is covered by a steel removable side panel that is attached via 2 thumbscrews at the back of the case.

The H100 other side is also covered by a steel panel that is attached via 4 screws located on inside of the case.

The top of the H100 includes some more mesh ventilation as well as a handle at the back. Thanks to the H100’s small size it’s a perfect case to bring to LAN parties and thanks to the handle, it would be super easy to carry around.

Pulling up the front panel and removing the pre-installed 200mm RGB fan reveal mounting point for a single 120/140/200mm fan and/or radiator.
A Closer Look: Interior

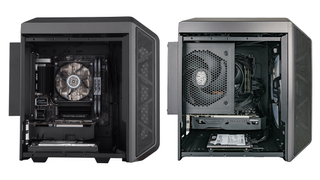
Upon opening up the H100 by taking off its left side panel, you’re greeted with a removable plate that is used to mount up to two 2.5” HDD/SSD drives. To be able to install your motherboard, this plate can easily be removed via the two screws at the top and bottom, securing it in place.

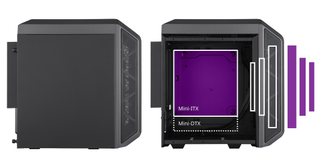
Now that the HDD/SSD plate has been removed, you have room to install your Mini-ITX motherboard on the 4 pre-installed standoffs.

Looking at the pre-installed 200mm RGB fan, we see that it’s an MF200R, which operates at 800RPM and is rated for 12V / 0.3A.

System Build & Installation
Below is a list of the hardware included in this build:
MSI H310I Pro
Intel i5-8600K
Cooler Master i71C
2 x 8GB Team Group T1 Gaming DDR4
Corsair HX750i
Corsair Force 120GB SSD
The Cooler Master H100 now takes the crown for the smallest case I have built in with it being 8.5” wide, 12” inches long and 12” inches high. Even though it is a really small case to build in, it actually was quite painless since I accounted for all the possible clearances with the CPU cooler and GPU.

With the PSU covering the CPU entirely, I only had 83mm of clearance to work at the back of the PSU and CPU socket. Knowing this, I couldn’t use my normal air cooler: the Hyper 212 Evo, and opted for the much smaller i71C, measuring in at a height of only 60mm.

Since this build will be a dedicated media PC, the GPU clearance wasn’t an issue as it will use the onboard graphics of the 8600K. If we were building a portable gaming rig, you would have to grab a mini card as the H100 only has 210mm of clearance for a GPU. This clearance is even reduced more to 180mm if you choose to go with a front radiator.

The hardest part of the whole build was installing the last component which was the PSU. Attaching the PSU to the case was easy but managing the extra slack of the cables was a different story. Due to the H100 size, it leaves very little room to work in when trying to place cables. Finding places where the cables didn’t interfere with the front 200mm fan and the fan from the PSU cooler was quite the task. One saving grace with not installing a PSU, was that it did give us some extra space at the bottom and that was one less cable for us to manage.
Personally, I think the H100 has a well thought out design and with knowing the clearance limitations going into the build, it was a breeze to put together.

I’m a huge fan of Cooler Master’s 200mm RGB fan and it really makes the H100 pop.

Final Thoughts & Conclusion
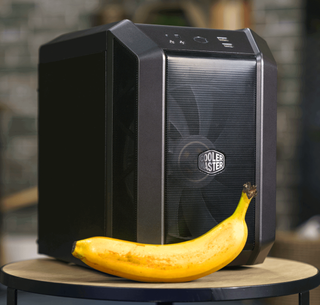
When it comes to small form factor cases, the H100 surely took the “small” part to heart (fruit added for scale). You would think for being so small that it would be a nightmare to work in, but that definitely wasn’t the case with the H100. Thanks to its well thought out design and knowing its limitations beforehand, my build in the H100 pretty much went without a hitch. The toughest part of the whole build was finding a place for all the slack of the PSU cables.
In the looks department, the H100 also does not disappoint with its classic black finish and 200mm front fan. If I had to choose my favorite feature of the H100, it would be hands down the included MF200R RGB fan. I absolutely loved the 200mm fans from the other H series cases and I’m glad they continued this in the H100.
Overall, the H100 is a great sleek, yet portable case that would be at the top of my list to bring to any LAN party.
Amazing job, Cooler Master!
Cooler Master MasterCase H100 Mini-ITX PC case

With the H100, Cooler Master has shrunk the famous H-series down to the Mini-ITX form factor while still retaining all the design elements, like the 200 mm front fan. With its compact size, the case features a handle for easy transportation as well. Classic H-series cases tend to be ATX or even EATX enclosures with two of the large fans in front, so it will be interesting to see how the Mastercase H100 Mini-ITX stacks up in this review.
Test System
System Parts for Case
Reviews
|
|
Processor:
|
Intel Core i7-8600K
|
Motherboards:
|
ATX: MSI Z370 GAMING PRO
CARBON AC
MATX: Z370M GAMING PRO CARBON Mini-ITX: MSI Z370i GAMING PRO CARBON Provided by: MSI |
Graphics Card:
|
Long: ASUS Radeon RX580
Short: HIS Radeon 5350 HD |
Memory:
|
16 GB XPG Dazzle DDR4
2800 MHz CL17-17-17 1.25 V
32 GB GB XPG SPECTRIX D40 3000 MHz. CL16-18-18 1.35 V 16 GB XPG GAMMIX D10 DDR4 2400 MHz CL16-16-16 1.20 V Provided by: ADATA |
HDD:
|
Western Digital 320 GB
7200 RPM
|
SSD:
|
ADATA XPG SX850 256 GB
ADATA Ultimate SU800 3D 256 GB ADATA Ultimate SU700 240 GB Provided by: ADATA |
Power Supply:
|
Antec High Current Gamer
650 W
Antec High Current Gamer 750 W Provided by: Antec |
Cooling:
|
be quiet! Dark Rock 4
be quiet! Pure Slim be quiet! Shadow Rock 2 be quiet! Shadow Rock LP Provided by: be quiet! |
Assembly


Installing the motherboard is done by traditional means, with the use of the pre-installed spacers and included screws. As the board will be blocked by the PSU, you need to make sure to pre-attach any wires, like the SATA data cables and fan/RGB connectors. Due to the compact size, the Mastercase H100 can only accommodate GPUs of up to 210 mm in length in an air-cooling setup, or 180 mm with liquid cooling in place. While rather short, you luckily have a few good choices out there with current-generation AMD or NVIDIA offerings.

Next, you may install the PSU. To allow for longer units, Cooler Master employs an extension bracket. Just make sure you connect up all the various power cables before securing the unit to make your life as easy as possible. According to the case's specifications, you may install a PSU of up to 210 or 180 mm in length depending, once again, on the cooling setup. You want to make sure any loose cables are securely tied together, especially as the H100 doesn't offer a lot of cable-routing possibilities.


Luckily, you may install a single 3.5" drive to the floor of the case. If you also want to add an SSD, you should do so after installing the motherboard, but before adding anything else, and wire it up right away as well.


Adding up to two SSDs to the plate is quite easy, however, as it can be done outside the confines of the chassis. Simply screw the whole plate into place once the drives have been attached.

With everything installed and connected, you can see that access to the board is essentially non-existent. While this is inconvenient, it is fine as the assembly process itself is pretty painless.
Finished Looks


Thanks to the included RGB controller, you are able to manually switch between five color options alongside some animations. As the fan uses a standard 4-pin connector for the lighting effects, it should be universally compatible with motherboards that offer software control. I feel like Cooler Master has missed an opportunity to use aRGB, but considering none of the other H-Series enclosures offer that type of lightning, I was not really expecting it.


In the front, you can clearly see the 200 mm fan behind the metal mesh, as well as the Cooler Master power button with its white LED framing.


You can also take a peek at the interior through the top of the chassis, but won't see too much from this side anyways. In the rear, everything is where you would expect it to be.

Lifting the Cooler Master Mastercase H100 up essentially tilts it forward 45°, which is perfectly fine for transportation. It actually feels quite comfortable overall, and thanks to the angle, you should never have to worry about the system slipping.
The Cooler Master Mastercase H100 has an MSRP of excluding taxes.
prosPerfect-looking Mastercase H-Series as a Mini-ITX form factor
Extra-fine metal mesh a good dust filter
200 mm intake fan
RGB controller included
Built-in handle works well
Straightforward assembly process
Can hold a full-size ATX PSU
Can hold up to four storage drives
Plenty of zip ties included
Air-cooling with low-profile CPU coolers possible
Most mid-range GPUs and compact high-end variants will fit
consRestrictive choices for air cooling and GPUs - other Mini-ITX cases do better.
Clearly made with liquid cooling in mind
Upgrading essentially requires a complete disassembly
Not a lot of cable routing/hiding possibilities
Internal in-line RGB controller hard to access
With the build quality equaling that of its larger brethren, the RGB fan with the included controller was expected as well. That said, it would have been nice to have the ability to control the lighting externally, or even the opportunity to go aRGB right out of the box. However, both of those elements would mean that the H100 would offer something the other H-series cases do not.
The interior is quite simple, which translates into an easy and straightforward assembly process if you ensure you do so in the right order. Cooler Master has done well to enable users to install up to four storage drives without compromising any other components within the case, which is something many Mini-ITX cases of this size don't offer. Once the system is assembled, it becomes apparent how important a strategic assembly process is as all the vital areas of the motherboard and its components are inaccessible. That is also why Cooler Master opted not to put a window on the Mastercase H100—there is simply no need for one.
In terms of price, with an MSRP , it is quite OK, but we are clearly starting to pay for the tarifs the US has put into place. That said, considering the build quality, 200 mm fan, and RGB component, especially as the fan can be considered an element not usually found in most enclosures that are as compact, the price is alright—the H100 is a pretty cool, compact enclosure.
Cooler Master today launched its MasterCase H100 Mini-ITX/Mini-DTX enclosure in a form factor that resides somewhere between mini cube and micro tower. That slightly increased height gives the new design space for several full-sized components, such as its 200mm RGB fan and PS/2 form factor (ie, full-sized ATX and earlier AT) power supply. Product photographers are going bananas over the sleek design.

The firm was even kind enough to provide external dimensions that include the feet and a protruding power supply extension, the later necessitated by the desire to support a 160mm power supply depth with a front-panel radiator installed. Those extra pieces expand the 27.8 x 21.6 x 29.4cm (11 x 8.5 x 11.6 inches) shell to 31.2 x 21.6 x 30.1cm (12.3 x 8.5 x 11.9 inches) .

A squat 83mm maximum height for the CPU cooler means that many builders will need to install a compact liquid cooler, and the big fan space in front opens those options to include 120mm, 140mm, and 200mm square units. Unfortunately, the popular H100i will not fit the H100.

Building with a radiator drops graphics card clearance from 210 to 160mm, which means that the 50mm difference cited by Cooler Master includes both the cooler and its fan. Since the stock fan is mounted on the opposite side of the sheet metal structural panel, those who use it as the sole source for cooling their radiator will sacrifice less interior space.

Storage support includes a 3.5”/2.5” dual-pattern single drive mount on the bottom panel and a 4x 2.5” vertical bracket between the side panel and power supply. Good luck with those cables!
Currently shipping to multiple destinations, Cooler Master lists MasterCase H100 pricing at both Newegg and Amazon whenever the shipments get there.
MasterCase H100
A Little Game Changer
The MasterCase H100 remains fiercely loyal to the H Series, unwilling to part from the 200mm RGB fan despite its mini-ITX form factor. From its industrial design elements to its generous use of mesh, the H100 fits neatly in the series as a travel-sized variant.
Cooler Master MasterCase H100 Mini-ITX PC case


Post a Comment