

Thermaltake Core P5 Black Edition ATX Open Frame Panoramic Viewing
Thermaltake Core P5 Black Edition ATX Open Frame Panoramic Viewing
DESIGN

Thermaltake Core P5 ATX Wall-Mount Chassis
Take presentation to the next level with the Core P5 Open Frame chassis by Thermaltake. The fully modular design of the Core P5 allows flexibility for 3-way placement layouts (Wall mount, Horizontal and Vertical), dual GPU layout locations: Horizontal and Vertical and placement locations for liquid cooling components. Uncover greatness with the Core P5’s panoramic viewing angle with its large acrylic window to protect and present. Seeing is believing, the Core P5 brings the ultimate in PC hardware viewing wherever you mount or display.
*A standard riser cable is included.
Tt LCS Certified
Tt LCS Certified is a Thermaltake exclusive certification applied to only products that pass the design and hardcore enthusiasts standards that a true LCS chassis should be held to. The Tt LCS certification was created so that we at Thermaltake can designate to all power users which chassis have been tested to be best compatible with extreme liquid cooling configurations to ensure you get the best performance from the best features and fitment.


Built for Makers
By practicing and incorporating the ideas of the “maker movement”, Thermaltake has designed the Core P5. The Core P5 is an an open frame chassis that anyone can access to do his or her own mods. This open frame chassis lets users map out and design their own build featuring whatever components they would like to use.
Users can download design files for the Core P5 on our microsite allowing them to customize their own mods.

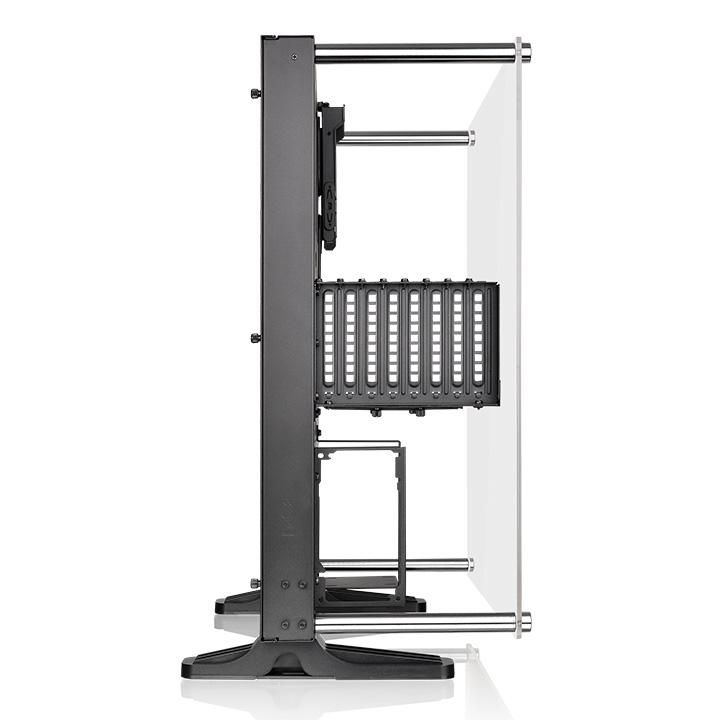
3-Way Placement Layout
The Core P5 wall-mount chassis is designed for use in three different ways: Wall-mount, vertical, and horizontal placement. Built for customization that reflects the makers’ personality, it allows for adjustments to the look of the chassis while ensuring outstanding cooling performance.
Users can hang it on the wall as decoration, take it to wherever they want and display their builds vertically or horizontally.

Panoramic Viewing
Other cases on the market still have “ends” on their open frame designs, while the Core P5 is a true wall-mount case capable of showing the front and back full sides. The Core P5 is unlike anything on the market that is not a modded design or scratch build.

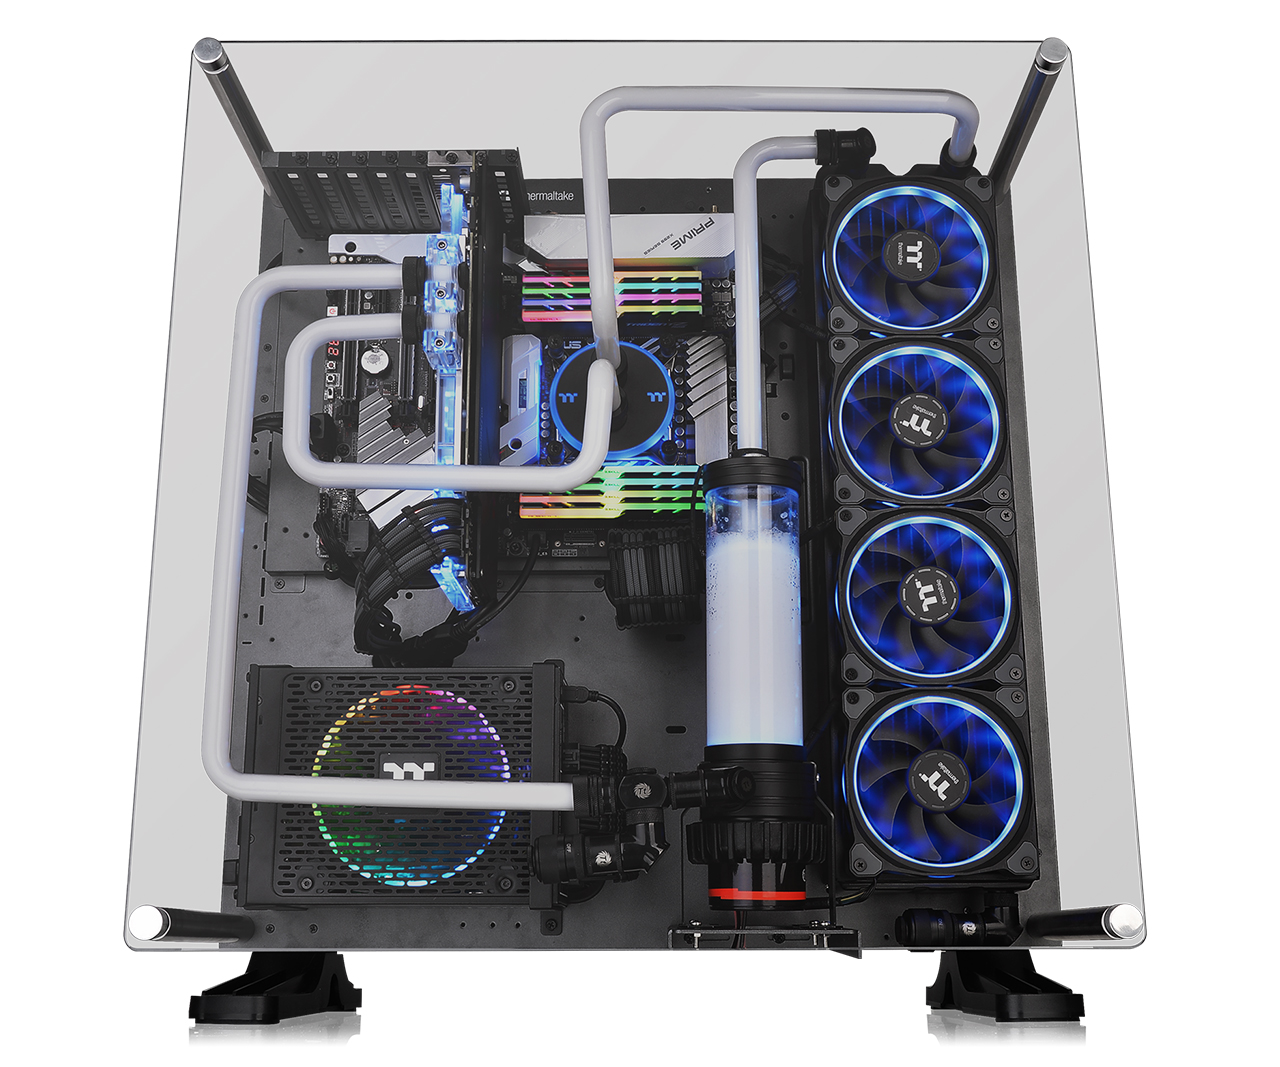
Supreme Liquid-Cooling Support
Core P5 wall-mount chassis enables users to build a complete high-end system, whilst supporting up to either 480mm radiator liquid cooling, or 140mm case fans, with a long graphic card at the same time, and simultaneously providing the best visual effects as well as increasing the CPU’s case modding potential. Most importantly, it has the capability to deliver an outstanding cooling efficiency throughout the entire case.

Versatile GPU & PSU Orientation
Show off your graphic card and power supply with our special design bracket. The Core P5 has included a standard riser cable for you to choose the way you want to build the system. Further, the Core P5 also has the support for vertical PSU layout when ITX motherboard is applied.
Thermaltake TT Premium PCI-E 3.0 Extender (Optional) – Supports a wide range of GPU solutions with ultra-excellent quality. Features like, extreme high-speed cable with highly-routable design, EMI shielding with conducting polymer are crafted for meeting the most demanding system. Available in 300mm, 600mm and 1000mm length.


AIO Bracket (Optional)
Make your Core P5 stand out in the crowd. Build it up with the new Thermaltake AIO bracket, designed to support the AIO liquid cooling system and HDD expansion. The Core P5 can hold up to three brackets, and a single AIO bracket can support one 120mm or 140mm fan.

5mm Thick Tempered Glass Window with Stunning Viewing
The Core P5 TG V2 Black Edition is a true open frame case with viewing capability of showing front and back full sides. The tempered glass panels feature 5mm thickness that meets the highest standards in the industry. Moreover, unlike any other cases on the market, the enlarged glass windows permit users to fully display every RGB component of the system, and show off their dedication and skill set.
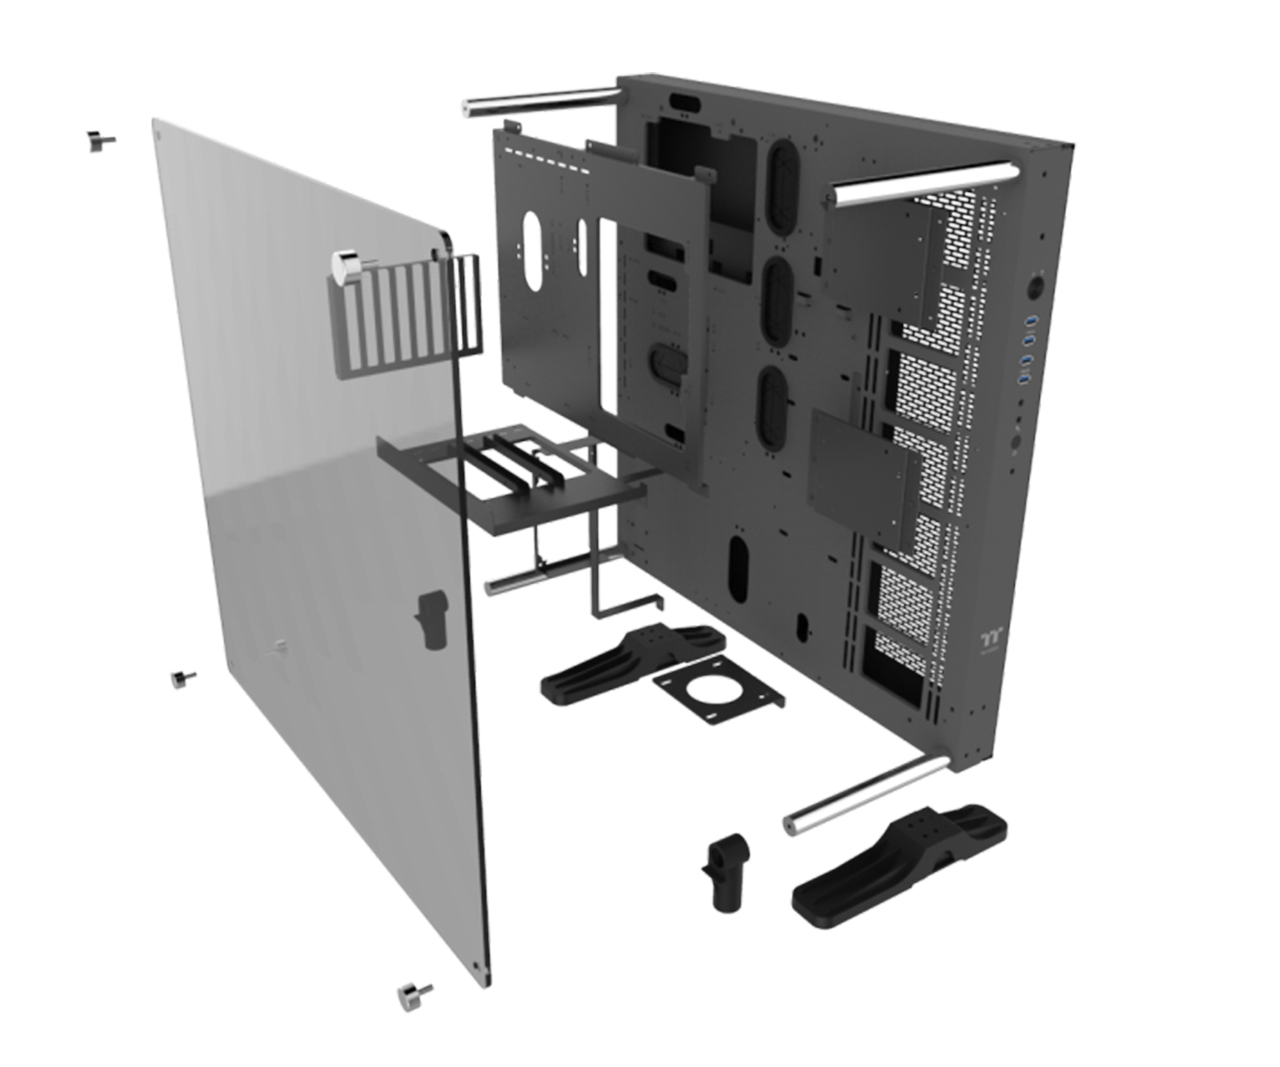
DMD – Dismantlable Modular Design
The Core P5 TG V2 Black Edition enables user to freely build the system from the ground up with given modular panels, racks, brackets, and pre-design mounting arrays. No more unreachable screw corners or gaps and enjoys installation in a breeze with Dismantlable Modular Design.
Thermaltake Core P5 Black Edition ATX Open Frame Panoramic Viewing
Core P5 Radiator Supporting List
Radiator Compatibility List
|
|||||||
120
mm |
140
mm |
240
mm |
280
mm |
360
mm |
420
mm |
480
mm |
|
L-Side
|
*
|
*
|
*
|
*
|
*
|
*
|
*
|
Core P5 Fan Supporting List
Thermaltake Fan Compatibility List
|
||
120mm
|
140mm
|
|
Pure Fan Series
|
*
|
*
|
Luna Fan Series
|
*
|
*
|
Riing Fan Series
|
*
|
*
|


Core P5 Wall-Mounting Support
It’s an optional feature that wall-mounting parts are not included. See the picture on the left-hand side or download the Core P5 manual under “Support”.
Case
Type
|
Mid
Tower
|
P/N
|
CA-1E7-00M1WN-03
|
Dimension
(H x W x D)
|
608 x
333 x 570 mm (23.9 x 13.1 x 22.4 inch)
|
Net
Weight
|
18.45
kg / 49.43 lb
|
Color
|
Black
|
Material
|
SPCC
|
Drive
Bays
|
-Accessible
1 x 3.5’’ or 2.5’’ (HDD tray)
-Hidden 3 x 3.5’’ or 2.5’’ (Behind the M/B tray) |
Expansion
Slots
|
8
|
Motherboards
|
6.7"
x 6.7" (Mini ITX), 9.6" x 9.6" (Micro ATX), 12" x
9.6" (ATX)
|
I/O
Ports
|
USB 3.0
x 2, USB 2.0 x 2, HD Audio x 1
|
PSU
|
Standard
PS2 PSU (optional)
|
Fan
Support
|
Left
Side: 4 x 120mm, 3 x 140mm
|
Radiator
Support
|
Left
Side: 1 x 480mm , 1 x 420mm
|
Clearance
|
CPU
cooler height limitation: 180mm
VGA length limitation: 280mm (With Reservoir) 320mm (Without Reservoir) PSU length limitation: 200mm |
Learn more about the Thermaltake CA-1E7-00M1WN-03
ModelBrandThermaltakeSeriesCore P5 Tempered Glass EditionModelCA-1E7-00M1WN-03
DetailsTypeATX Open Frame ChassisColorBlackCase MaterialSteel / Tempered GlassWith Power SupplyNoPower Supply MountedBottomMotherboard CompatibilityMicro ATX / ATX / Mini-ITXSide Panel Window3 x Tinted Tempered Glass
ExpansionInternal 3.5" Drive BaysTotal: 4 x 2.5"/3.5" - 3 x hidden drive mountsExpansion Slots8
Front Panel PortsFront Ports2 x USB 3.0 / 2 x USB 2.0 / 1 x Headphone / 1 x Mic Ports
Cooling SystemFan OptionsLeft Side: 4 x 120mm / 3 x 140mm fanRadiator OptionsSide - Up to 420mm
Dimensions & WeightMax GPU Length Allowance280mm (With Reservoir), 320mm (Without Reservoir)Max CPU Cooler Height Allowance180 mmMax PSU Length200 mmDimensions (H x W x D)23.90" x 13.10" x 22.40"Weight40.59 lbs.
Additional InfoFeaturesCPU cooler height limitation: 180mm
VGA length limitation: 280mm (With Reservoir) / 570mm (Without Reservoir)
PSU length limitation: 200mm
Additional InformationDate First AvailableSeptember 22, 2019


Accessories and Documentation First out of the packaging was this transparent panel for the left side of the Core P5. It is shipped with the paper still on both sides to protect it from damages. As we start to open the boxes, we first ran into this. There is a pump/reservoir bracket at the top left, next to the PSU mounting bracket. At the bottom, we also found the eight expansion slots, covers, and mounting screws. This next group of bit covers the rubber feet for the right side panel to lay the P5 on its back, along with the four included screws. Surrounding them is a PSU support bracket to help manage the weight of the PSU. At the bottom, we find two PCI-e extension cable brackets and thumb screws to lock them into the plate they are used with. This plate allows the option of vertically mounting the video cards. It attaches to the motherboard tray, and the expansion slots mount to the back. The large hole in the middle allows the extension cable a way into it, and the holes on either side are where the brackets in the last image install. Digging deeper, we found that we are given the extension cable to move the video card off the motherboard for vertical mounting. We also found a fourth drive tray to use in the front if all three in the back are planned to be used. Inside of another box, we slid these out for the photo. These are the steel supports for the transparent side panel of the chassis. One end mounts with a standard screw to the chassis, and the other end is a cap of steel to go through the panel and secure it. As to the staining seen here, we are told retail versions will not be stained and will be all pretty, as they should be. We also have to show the huge feet. The top of them are ribbed for design and strength, and with a plastic cover over the steel inner frames, the provided screws secure them to the chassis solidly with no fear of toppling this chassis. We also found the basics. We are given ten zip ties and a motherboard speaker seen at the top. In the bags, we have hex head 6/32 screws for just about everything mountable, one with standoffs and a socket, one full of round head M3 screws, and a bag of countersunk screws for SSD mounting. At the bottom is a sheet of rubber washers used to isolate drives when installing them. The manual is as good as it gets. It starts with a checklist to be sure you have everything needed, then takes off into the assembly of the chassis and is how we are presenting the build section. It covers everything with great images and descriptions to get even the most novice user through this build process. We are also given the warranty information as to what is covered during the one-year warranty period. Just in case we were not clear about how it works, we did snap an image of the manual and VESA wall mounting this chassis. With all the standard offsets and the notification that the bracket is not included, it is clear what you need to do if wall mounting the P5 is on your list of things to do.

Case Build & Finished Product Following the manual as our build guide, we are first told to set the pair of screws for the PSU mounting plate into the motherboard tray, then to go ahead and mount the PSU to that. Before that, though, you need also to install the support bracket, and there are four sets of holes to adjust for various length PSUs. It then shows us to install the standoffs in the appropriate locations and with the round head M3 screws, mount the motherboard into place. It is nice to see the grommets on the right and the open hole at the top are placed well for wiring this chassis. We opted to use an SSD for our build. In doing so, you will need to remove the clip with the 3.5" drive pins in it to allow the SSD to slide over enough to be screwed into place. Because we can, we decided not to hide our storage choice in this build and opted to mount our SSD just to the right of the motherboard in one of the optional locations these trays slide into. We are then directed to install the expansion slots. Here is where things can take a turn. Using three screws, you can install the bracket directly to the motherboard tray as seen here for the standard setup. However, you also have this option. Using the adapter bracket, we now install the expansion slots the other direction. Along with the use of the PCI-e extension cable and its bracket, cards can be installed to look at the coolers, or more relevantly, the water blocks on the video cards. In front of the PSU, there is a location to mount this pump/reservoir bracket for taller tube style reservoirs with the pumps built in under them. This can limit the PSU, and depending on the tube length, could affect video card length as well. Now we are directed to a set of four holes at either end of the bottom of the Core P5. This is where we had to dig the screws out of the plastic caps to mount them to these locations. Once installed, the feet are nearly as wide as the chassis, but do extend past all of the weight in both directions to give the Core P5 a very solid foundation with no fear of your expensive hardware falling over.

Case Build & Finished Product Continued You are now looking at the corner, outside of the right side panel. The manual also shows that instead of opting for the large set, you can install these solid rubber feet like this, and lie the Core P5 on its back like a test bench setup. For our purposes, this is the final version of what we went with. We see the resemblance to the Level 10 even more now, but we can now get a good feeling of just how wide this is. Without a custom loop to install at this time, we did make it easier going with the AIO, but it gave us a chance to play with the mounting and such. What we do like about this though is that not one bit of the build is hidden from view. Oh, and that video card on its side, that's damn cool too. There is no support for the rear I/O dust shield, but there doesn't need to be; this is an open air chassis after all. We still want to brag about the video card options, and we also see the PSU will have no issues sourcing air for the intake fan. Before we close this side of the chassis, we did want to show some of the potential. It is plenty deep enough to take our wiring without issue, and could have tubing routed there as well. We also removed the HDD rack as it did free us up to run the 24-pin lead. Then of course we are back to what we started with once the panel is back on. One other thing that we should mention is that the ventilated area to the left does offer a magnetic dust filter inside of it. From any angle, the Core P5 is a pleasure to view. Air cooling is more than possible for the average users, and water cooling with this chassis is also designed right into it. And for those using pots, it will lay flat and be ready to take that on as well. Truly an open air chassis for anyone. Once we powered things up, any noise we did hear was not a product of the Core P5 chassis, as it has no moving parts. The natural flow of ambient air is better thermally for the components, but dust can be a concern long term. The only thing that changes is the blue LED indication that the power is on, and we missed the blue LED flash when the SSD loaded the OS.
Final Thoughts Not everyone out there thinks that they have the skills to build a chassis from scratch like along the lines of a MountainMods or Danger Den chassis, but this is not a design that needs that level of skill and patience. If you can turn a Phillips screwdriver, and can read enough to follow the instructions, you too can get through this. Once all the parts are laid out and accessible, it was maybe thirty minutes tops until we had the chassis from laid out on the table to assembled with everything, but the wiring finished. So, do not let the fact that this chassis needs some love out of the box shy away from what Thermaltake is offering. We did find a couple of minor issues with our sample during the build process, but this is normal for pre-production samples. When discussing things with our Thermaltake rep, we were told they are fully aware of things like the staining on the steel bars, and assured us this will not be found in the retail versions that hit the shelves. Outside of superficial things, we have no complaints in the design, layout, feature set, its ruggedness, or its modularity to work in many situations, not just as a monolith that takes up space on the desk or floor. Being open air, and only needing to remove four caps to remove the transparent panel, everything is easily accessed, can be easily cleaned and maintained. And for those that like to bench a lot of different gear, this is a chassis that is right up your alley. Another nice thing about this design is that you are not wasting money on bits you won't normally need. Most of us change out stock fans, and enclosed cases have their set of issues that users constantly have to deal with. Also, there is the aspect that thermally and acoustically the limits are set by the user with no influence from Thermaltake. So, why buy it if you don't need it? Here you are given a structurally solid base that supports anything you can fit into this chassis. It offers the ability to not only be a case or a test bench, but it also can hang on the wall with any VESA mount rated for the finished weight of this design, and be sure to account for this. With a loop and all the gear installed, this chassis can vary greatly in what the weight is you will be hanging. What we still cannot get over though is that everything we just described is, in our opinion, way undervalued. Don't get us wrong here. We appreciate the sweet deal being offered as-is at the Core P5 open air chassis, we just feel they could have sold this at nearly double the cost. That being said, Thermaltake has no plans to make a price hike based on our opinions. We are pleased to say that when these do hit the shelves, the Core P5 is a serious bit of kit for an "entry level" investment. If kids or pets will not kill your dreams of a showcase system, the Core P5 is a perfect solution for anyone who appreciates what this design is all about in any fashion. No other case that we have reviewed offers what it does, and not at this price point.
Thermaltake Core P5 Black Edition ATX Open Frame Panoramic Viewing


Post a Comment